Thursday, October 25, 2018

Creepy Chic Halloween Dress

Hi everyone!  Today we are going to make our Halloween costume … in miniature!  And we will be using the Gypsy Soul Laser Cuts Dressform Hang Up to begin the process. 


To make the shabbiest, creepy dress possible, tear a piece of 12x12 double sided print card stock into irregular triangular shapes.


I found it easiest to use a ruler and tear the paper towards me.


Mist the triangles with water and carefully pleat and scrunch the shapes, allowing some of the reverse side of the print to show on the front.  Let the shapes dry.


Trace around the bodice portion of the hang up onto the back side of a piece of glittery fabric and cut out.


Ink up top portion of hang up with black pigment ink and heat emboss with Oil Rubbed Bronze embossing powder.  Don't worry if some of the embossing powder gets onto the bodice portion.  It will be covered up with our fabric piece.


Glue fabric to bodice portion of hang up, as shown.


Glue paper triangles together with hot glue at the top where it will be joined with the bodice. 


You will need to scrunch it together enough so it will fit behind the bodice.


Cut strips of creepy cloth gauze and glue to the top of the skirt.


Glue skirt to bodice.


Wrap black lace around front of bodice and skirt and glue to the back. 


I made a bow using black plastic netting from a bag that held produce and glued it to the top of the bodice.


Spray entire dress with Fully Purple mist and let dry.  Spread random patches of green glitter paint onto high spots of paper triangle strips.  You may want to enlarge the picture to see the colors better.


Paint the raven with Paynes Grey, then Black Ice glitter paint.  Paint the the bat with Berry Metallic, then Black Ice glitter paint.  Let dry.


Add dots of Lime Green Liquid Pearls to bat's eyes and one dot of Emerald Green Liquid Pearls to raven's eye. Let dry.  (I added tiny black dots to the eyes with a black Sharpie marker).


Glue bat to top of hanger and raven to bodice, as shown.

Lay out three lengths of chain, each one longer than the first.  My chain lengths measure approximately 3-1/2", 6-1/2", and 9". 


Use jump rings to connect the ends of each chain length. They should drape as shown  below.


Add skull charms to each length of chain, as shown.


Use small brads to attach the jump rings on each side to the top of the skirt.  I simply pierced a small hole through the paper part of the skirt and inserted the brad prongs.  A touch of glossy accents will keep everything in place.


At the last minute, I found this tiny metal gear on my desk, and instead of risking losing it, I glued it to the raven's eye, then added a tiny dot of the same Liquid Pearls to the center.  


Here is a closer look at the bat and his beady eyes.  I also glued a small skull charm to the center of the bow, as shown.


Find a nice place to hang your costume, and you will be ready for the mini Halloween ball.  


Supplies Used:

GSL Dressform Hang Up
GSL Spooky Shape Set (bat)
GSL Creepy Critters Shape Set (raven)
Colorbox Black pigment ink
Emerald Creek Oil Rubbed Bronze embossing powder
DecoArt Acrylic Paints (Payne's Grey, Berry Metallic, Black Ice Glitter Paint)
Ranger Liquid Pearls (Lime Green, Emerald Green)
Tattered Angels Fully Purple spray mist
Black Creepy Cloth gauze (Dollar Tree)
Black plastic netting bag that held vegetables (used to make bow)
Charms (skulls)
Jewelry chain and jump rings

I hope you enjoyed my project today.  Be sure to check out the online shop for more chipboard ideas and inspiration.  

Thanks so much for stopping by today, and have a very happy Halloween!

Barbara

Thursday, October 11, 2018

Haunted Halloween Cabana Row House with Gypsy Soul Laser Cuts

Hi everyone!  I just love this time of year!  Halloween is  probably my favorite genre for art projects.  I have always been a horror movie enthusiast, and I guess I am just in awe of creepy, slimey, gorey things.  So, when I saw the Gypsy Soul Laser Cuts Cabana Row House Set, my first thought went to a haunted house rather than a beach house.  So, here goes.  Join me now on my macabre interpretation of these cute fold up houses. 


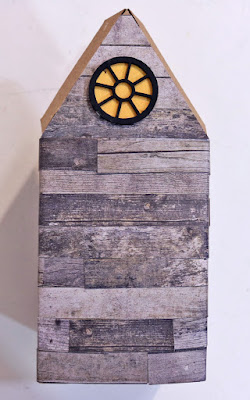
I chose the house and roof pieces labeled "D" and a couple of round windows for the peaked sides of the house. 


Cut up a piece of plank paper along the plank lines, as shown.


Fold the sides and tab along the score lines and glue the tab to the side of the house.  Use clamps to hold the piece together while the glue dries.


I folded the bottom tabs up and closed the bottom of the box without gluing it.  This will enable you to use it as a gift box, place a battery operated candle inside, or whatever you would like.

I ran my "plank" strips through my Xyron 1.5" sticker maker. 


Then, I started adding the "planks" paper to the sides of the house, varying the starting and stopping point, as shown. 


Continue layering the planks paper up towards the roof, cutting strips slightly larger as you go up to the peak.  Fold the tabs under and cut off the excess paper.


Glue a square scrap of grey paper to the box bottom.  Do not cover the tabs.


Paint the three circular window pieces with black chalk paint, let dry.  Punch two 1" circles from a yellow-orange piece of paper. 


Glue yellow-orange paper behind window pieces, center and glue windows to peaked area on each side of house.  (NOTE:  The open circle window piece was glued behind the four pane window piece.)


Cut a piece of corrugated card board the same size as the roof piece.


Paint top of corrugated roof with Timeless (beige) chalk paint and Carbon (black) chalk paint to give the roof a very grungy look.


Paint edges of roof along inside edge with same paint mixture.


Adhere the corrugated roof to the top of the house.  I found it easiest to glue one side of the roof first, let it dry, then glue the opposite side. 


I made a door by cutting striped print paper to 1" x 2", then adhered it to a piece of black card board.  Rough up the edges with sandpaper and add small snippets of black German Dresden border to the left edge to mimic hinges.  Snip off the brad prongs and adhere the brad top for a door handle.  Grunge up the whole door, hinges and brad handle with the paint mixture. 


Adhere door at slight angle to front of house.  Cut a piece of black card board to 3-1/4" square.  Adhere to base section of box.  


You will still be able to open the box bottom if you have not  previously glued it together.  This is optional, but I will be using it as a platform to add more embellishments along the bottom of the house.


Spread small splotches of crackle paste over the sides of the house with a small spatula, let dry.


Spread Black Soot distress ink over crackled areas with a sponge to bring out the cracks and grungy up the siding.


Paint each chipboard piece with Carbon (black) paint and Black Soot distress glitter, or Heritage (orange) paint and Spiced Marmalade (orange) distress glitter.  I found it easier to mix the glitter with a clear glue and spreading it over the painted chipboard pieces.  Some pieces will need to be painted and glittered on both sides, if the back side will show.  The ghost was painted with the Timeless (beige) paint mixed with Carbon (black) paint.


Adhere the chipboard pieces to the house, as shown in the photos below.  The smaller spider web was cut in half and half was placed on the front of the house.  The large bat wings extend from one side of the roof to the other.  I added a blue patina paint to the black German Dresden border along the roof line to help the bat show up better.  One of the ravens was placed atop the roof, as shown.  I cut a tiny slit in the roof to allow the foot of the raven to be inserted with a bit of glue.


The other half of the spider web was placed below the roof line on the left side of the house, as shown below.  The black cat was adhered to the left side of the roof with it's tail hanging below the roof line.


The larger spider web was glued to the right side of the roof with an orange glittered spider, and the ghost was adhered towards the bottom of the house.


On the back the word "SPOOKY" was adhered between the roof line with one of the ravens sitting atop it.  


Fall and Halloween botanicals were added around the bottom of the house, along with some botanical mini pumpkins and a resin skull.

Supplies Used:

GSL Cabana Row House Set (C)
GSL Decorative Windows 1 to 24
GSL Spooky Shape Set
GSL Creepy Critters
GSL Spiders and Webs Shape Set (contact store)
Xyron 1.5" sticker maker
German Dresden borders
DecoArt Americana chalk paint (Timeless, Carbon, Heritage)
Golden Crackle Paste
Blue patina paint (Art-C)
Card stock (gray, yellow-orange, kraft corrugated)
1" circle punch
Plank printed paper (Tim Holtz Halloween paper stash)
Stripe printed paper (Graphic 45 Rare Oddities paper collection)
Tim Holtz Distress Glitter (Black Soot, Spiced Marmalade)
Clear glue (Paper Studio)
Aleene's Fast Grab Tacky Glue

Well, there you have it, a beach house turned haunted.  I hope you enjoyed my Halloween cabana row house as much as I enjoyed making it.  Be sure to check out the Gypsy Soul online store for more fun laser cuts to use in all your projects, and the blog is also full of inspiration from the design team.

Thanks so much for stopping by, and have a wonderful and crafty day!

Hugs,
Barbara