Friday, June 23, 2017

#StudioABSeeSurf Video Hop - "Beautiful Seahorses" Mixed Media Canvas

Hi everyone.  So glad you stopped by today so I could tell you about another fun video hop from some of the gals over at Studio ABSee.  We often get together and make video tutorials to share with you, and we almost always have a giveaway from each channel.  So come on and join us for lots of fun ideas and inspiration, and a chance to win a prize.

Here is the link to my video in this hop.  When you get there, you can go to the description box below the video for all the links to each video in the hop.  Please leave a comment on each video for a chance to win, click on the like 👍button, and subscribe, if you don't already.


I hope you enjoy the hop, and thanks for stopping by.  

Have a wonderful, crafty day!

Barbara

Thursday, June 22, 2017

Cabana Row House with Gypsy Soul Laser Cuts

Hi everyone!  Today, I want to share a fun little Summer project using these Cabana Row Houses from Gypsy Soul Laser Cuts.  Not only would these cuties make great mixed media projects or table decorations and favors, but they would also make wonderful gift boxes since the bottom folds up, but does not have to be glued in place.  Hmmmm ... think of the possibilities.  I'm sure you can come up with even more ideas. 


When you get the set, look for the tiny alphabet letters (A through E) on each piece to match up the house with its coordinating roof piece.  They are so simple to put together, just fold the house up and attach the roof. 


House E

Cut one paper strip 2-3/8" x 8-1/2" and one 2-1/8" x 2-1/8" square.  Cut two triangles for the eaves.  I used the box itself to measure and trace the eaves onto back of paper.  


Run paper through Xyron sticker maker and edge paper strips with Evergreen Bough distress ink and foam blending tool. 


Adhere paper pieces to bottom section of house. 


Place red liner tape along roof and side tabs, as shown.  


Adhere a  half round window on each side of house under eaves.  Set aside.


Cut a piece of print paper cut to 2-3/4" x 4-3/4".  Run strip through Xyron sticker maker and edge paper with Vintage Photo distress ink.


Adhere paper to roof top.


Spread a thin layer of  light molding paste through stencil, let dry.  


Lightly add Vintage Photo distress ink to paste with blending tool.


Now back to the house.  Remove red liner from taped sides.  Fold side tab in and attach to side of house.


Fold tabs in and close up bottom of house.  You can also tape this in place if you do not plan on using the house as a gift box.


Fold roof tabs in and attach roof.  Glue two small square windows from the Seaside Doors & Windows set to the sides of the house, as shown.


Cut bottom portion of smallest Vintage Ladies Silhouette.


Glue bottom portion that was cut off back onto silhouette, but higher up.  This will shorten the lady and make her size more appropriate for the size of the house.


Use a spatula to apply a thick coat of Heidi Swapp Hot Pink Metallic Texture Paste to vintage lady, disguising chipboard join and swiping lines in the paste to resemble folds of fabric in her dress.  Set aside to dry.


Paint both sides of the vintage bicycle with Vivid True Silver.  Let dry, then add Vintage Photo distress ink, which will give it a coppery look.  Don't cover all of the silver, though.  


Spread light molding paste over hot air balloon and draw lines through paste, as shown.  Set aside to dry.

Paint balloon with Vivid Ultra Metallics, first with Lemongrass, then African Jade, then Pink Azalea, and lastly with Teal Zircon.  Let dry, then lighten the color with African Jade.


Cut a 5" piece of 20 gauge copper wire and adhere to back of balloon.  I used a wet glue and a piece of tape.  Let glue dry before handling.


Turn balloon over and repeat process for opposite side, i.e., add light molding paste, draw lines through it, and color with the Vivid Ultra Metallics.  This will cover where you have added the coper wire on the back.


Make a little twist in the copper wire, as shown.  


Use a paper piercer or awl to make a tiny hole in the roof top and insert wire through it.  Add clear drying glue to hold in place.


Adhere vintage lady to left side of house.

Decorate house as you like.  I have added some flowers just below the half round window, and adhered the vintage lady to the left, and the vintage bicycle was added to the right with a foam dot to make it look like it was propped up against the house.


Here are a few views from different angles.


GSL Miniatures Shape Set - Guy Thing
Paper Studio Country Road 4.5" x 6.5" paper pad
ColourArte Vivid Ultra Metallics
  True Silver
  Lemongrass
  African  Jade
  Pink Azalea
  Teal Zircon
Evergreen Bough, Vintage Photo distress ink
Foam blending tool
Xyron 3"sticker maker
Golden Light Molding  Paste
Spatula
Tim Holtz Stripes stencil
Heidi Swapp Hot  Pink Metallic Texture Paste
20g copper wire
Quick Grab Tacky Glue (Aleene's)
Miniature flowers (Paper Studio)

I hope you enjoyed my project today.  Be sure to check out the fabulous laser cut chipboard from Gypsy Soul for even more ideas to decorate these Cabana Row Houses.  

Thanks for stopping by, and have a crafty day!

Barbara

Monday, June 12, 2017

How to Decorate a Wooden Door Hanger

Hi everyone.  Today I wanted to share a really fun little project that can make either a great addition to your studio, or a really fabulous gift for just about anyone with a door.  Okay, I am just being goofy now, but these wooden door hangers are such fun to decorate and can be transformed into beautiful inspirational art pieces for you to see every time you enter your studio.  Also, imagine how you could decorate these to give to friends and family to suit their tastes.

You can visit my video tutorial here if you would like to see how I made mine.


To see more video tutorials like this, please click here to subscribe to my channel.  

Of course, I used a variety of ColourArte products to complete my project, and I would encourage you to stop by the ColourArte website to check out the fabulous products offered.  

Thanks for stopping by, and have a super wonderful day!

Barbara

Thursday, June 8, 2017

Father's Day Cards with Gypsy Soul Laser Cuts

Hi everyone!  I'm sure that, by now, you know that Father's Day is just around the corner, and if you need some ideas for those masculine type cards to make, I hope this tutorial will help inspire you.  Here are the two cards I made that I think would be suitable for any of the men in your life.


***************************************************************
Card 1

Card 1: Adhere a slightly smaller piece of print paper (Off to the Races) to the front of a 5"x7" kraft card.  (Optional:  Distress and ink edges before adhering to card front).


Use the 3"x4" notecard (Cigar Box Secrets) to measure the distance to cut through the 4"x6" notecard (Cigar Box Secrets).


Draw a line between the two marks with a pencil.  Punch a 1/8" circle at the sides where the lines intersect, then use a craft knife to slice the straight opening along the straight line between the two holes.  Erase pencil lines.


Place 3"x4" notecard into slot.


Turn 4"x6" notecard over and trace around 3"x4" notecard on reverse.  


At this time, you can distress and ink the edges of the 4"x6" notecard only before adhering to the card front.  Note where the glue has been applied.  The pocket area needs to be free from glue.


Adhere 4"x6" notecard to lower right of card front.


Round corners of  3"x4" notecard and slip into pocket.  Make two rosettes using the red print Graphic 45 paper and adhere to upper left corner of card.  Use a pop dot to lift the smaller rosette so it will sit slightly atop the larger one.


Choose four Gears and one of the Horses to alter.  The horse was inked with Vintage Photo and Fossilized Amber Distress Oxides.  The gears were inked with Versamark ink and heat embossed with Hammered Metal (left) and Charred Gold (right).


The horse's legs were  glued to the top portion of the pocket opening on the 4"x6" notecard only, leaving the 3"x4" notecard free to move up and down.  The gears were glued to the rosettes, while two gears were layered and adhered next to the rosettes, as shown.

Pull the 3"x4" notecard out of the pocket and use a repositionable glue dot to adhere your gift card to the reverse side.


Stamp a sentiment on the front of the notecard.  I used "just for you" for this card. 


Place notecard with gift card inside pocket and send your "gift" card on it's way.


On the inside, add a scrap of the G45 paper to the inside with a border strip, and stamp "Dad" with Versamark and heat emboss with champagne embossing powder.
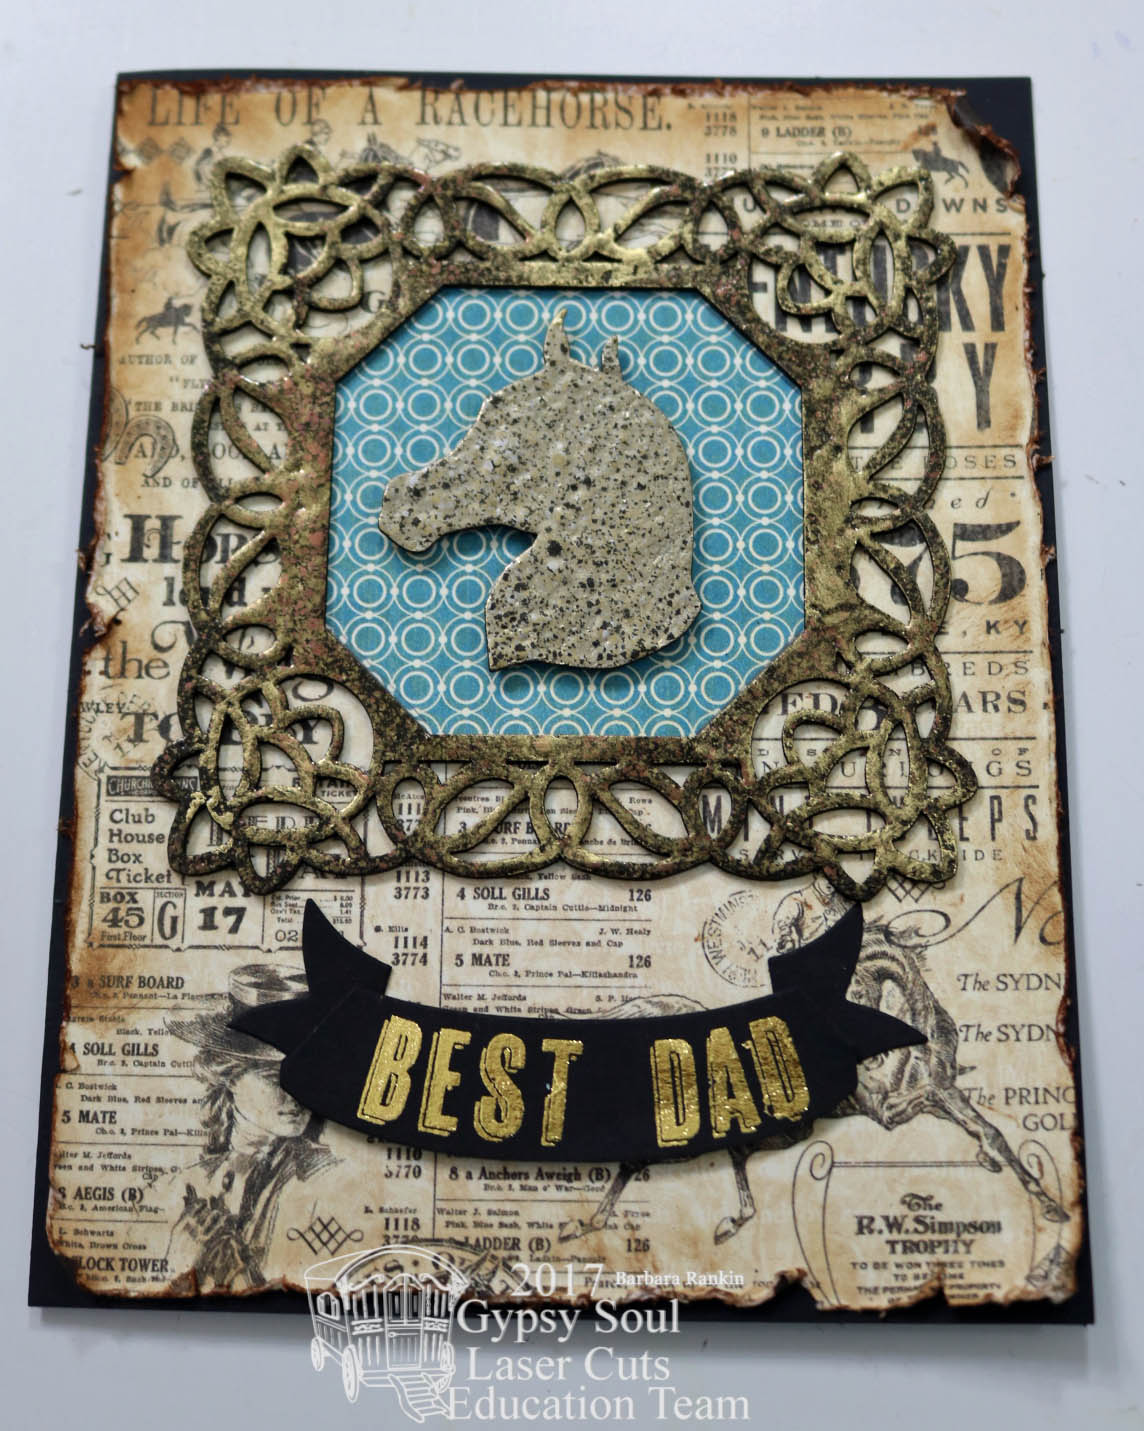

***************************************************************
Card 2

Card 2: Adhere a slightly smaller piece of print paper (Off to the Races) to the front of a 5"x6-1/2" black card.  (Optional:  Distress and ink edges before adhering to card front).  


Ink Flourished Frame Valerie Square with Versamark ink and heat emboss with Burnt Copper Leaves embossing powder.  


Trace around frame onto a piece of blue print paper (Off to the Races) and cut to fit inside frame.  


Adhere to back of frame opening, then adhere both to top half of card front.


Ink Horse Head with Versamark ink and heat emboss with Charred Gold embossing powder.  Adhere to center of frame opening with foam dots.


Die cut a banner from black card stock.  Use gold rub-ons to spell out "BEST DAD".


Fold ends of banner, place foam dots in center and glue at ends, as shown.


Adhere to bottom of card beneath frame.


Since the gold letters were so bright, I added touches of gold metallic paste to some areas of the frame to brighten the frame to match.


For the inside, stamp "Happy Father's Day" with Versamark ink and champagne embossing powder.  Cut around image and adhere to a scrap of the G45 paper that has been cut slightly smaller than the front of the kraft sack (envelope).


Adhere craft sack to center of card inside, and insert your gift card.  


Supplies Used:

GSL Horses Shape Set
GSL Gears Shape Set
GSL Flourished Frame Valerie Square
Graphic 45 Off to the Races papers
Prima Cigar Box Secrets papers
Kraft card (5"x7")
Black card (5"x6-1/2")
Black card stock scrap
Tim Holtz Distress Ink (Vintage Photo)
Tim Holtz Distress Oxides (Vintage Photo, Fossilized Amber)
Tim Holtz die (Regal Crest) 
Tim Holtz Gilded Alpha remnant rubs
Allure Embossing Powders (Charred Gold, Hammered Metal, Burnt Copper Leaves)
Pearlustre Champagne embossing powder
Versamark ink pad
Dad rubber stamp (Inkadinkado)
Mini Craft Sacks (2.5" x 4") (Paper Studio)
3D Foam Squares 
Happy Father's Day stamp (PSX)
Just for You stamp (Hero Arts)

I hope you enjoyed the project today, and be sure to check out the GSL shop.  Another fun set to consider for your male cards is the GSL Miniatures Shape Set - Guy Thing.  It contains lots of vintage style male type laser cuts, giving you even more choices.  

Thanks for stopping by, and have a great day!

Barbara