Thursday, August 23, 2018

Olde Curiosity Shoppe Shadowbox with Gypsy Soul Laser Cuts and Graphic 45

Hi everyone!  Today I want to share a peculiar shadow box with you using Gypsy Soul Laser Cuts
Deco Front Shadow Box and Graphic 45's Olde Curiosity Shoppe Collection.  Of course, this is just my jumping off point.  Who knows where this will lead me. 


Back of Box
Here is a diagram of the parts of a dovetail joint.  It's really easy, just pins and tails.


Cut paper to 6-3/4" square for the back of the shadow box, and four strips 1-1/4" by 6-3/4" for the inside of each side piece.  Glue each piece to the respective chipboard, leaving the dovetail pins and tails uncovered so they can be inserted into their respective openings, as shown.


Glue chipboard pieces together to form the box.


Ink up front of shadow box with Patina ink and heat emboss with Patina Oxide embossing powder.  Work in sections so you always have a part to hold onto.  


Repeat process for back side of frame.

Put glue on inside and outside of box pins and inside each of the tail openings.


Lay frame over them and push down on the pins to adhere frame to box.


When the glue dries, ink up the box pins showing through on the front and emboss with the Patina Oxide embossing powder.  I happened to have a reinker for my ink pad, and it made it easier to just ink and emboss the pins, but is totally optional.


You will still see the pins, but you could always continue adding embossing powder until it levels out.  However, I chose to leave it because most of it will be covered up by embellishments, and I kind of liked the texture and design it gave to the front.  


Cut two  pieces print paper to 1-¾"x 7-¾" and cover two sides opposite each other, mitering corners, as shown.

 Cut two more pieces 1-3/4" x 7", glue to remaining sides of box, turning edges only, as shown. 


Cut a piece of print paper to 7" square and adhere to back, as shown.  Edge box with Black Mixed Media ink pad.  Use heat tool to dry ink.


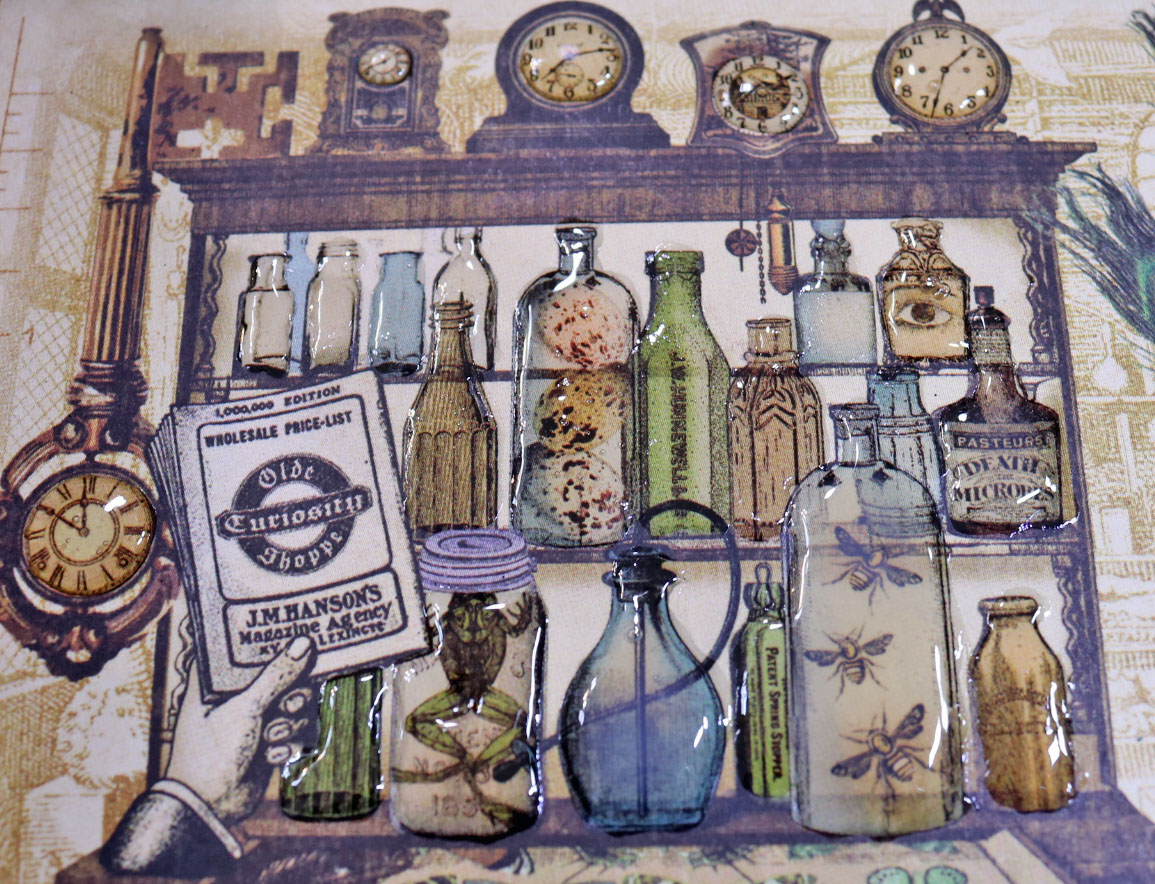
Use Glossy Accents on the bottles and clock bezels in and on the cabinet to bring them to life and add a bit of dimension.


Cut out the words "the Olde Curiosity Shoppe of Unusual Oddities" and layer it onto a slightly larger piece of black cardstock.  Adhere to inside along top edge with pop dots, as shown.


Fussy cut some images from the Graphic 45 paper.  I used Ultra Matte Varnish on the pieces because it adds strength to the paper and dries completely invisible.  I also added a layer of glossy accents to the legs in the jar at upper right in the photo.


Fussy cut a second shoe skate, curve it outward with your fingers and pop it up on top of the printed one using black foam squares or pop dots.  It's hard to tell in the photo, but I think you can see a shadow on the right side because I was shining a light inside the box from the left.  There is also a cut line showing on the right side of the skate because the paper is elevated by the foam dots.


To disguise the join between the two skate images, I fussy cut some additional leafy flourishes from the paper and edged each one with a Sepia Big Brush pen.


Then I carefully placed them over the edge of the skate to cover that cut line and add some cool dimension at the same time.


Cut apart the wrought iron border piece, as shown.  I used only two portions of what was left of my border piece.  Click on this link to see the entire Wrought Iron Set.  


 Ink pieces with Black Mixed Media ink and heat emboss with Oil Rubbed Bronze embossing powder.  Repeat this process for the two corner pieces in the  set.


Put dots of glue onto the right side of the border piece, as shown below.


Place border piece under lip of box frame and sides.  


Repeat embossing process for the two corner pieces in the Wrought Iron Set and adhere them to the inside edge of the frame, as shown.


Use a distressor tool to rough up the edges of the Olde Curiosity Shoppe sign.  Add Walnut Stain DS to the edges, then "water down" the color using the Antique Linen DS.


Use your fingers to shape the sign and glue it to the top of the frame, centering it over the opening.  I used clamps to hold the paper in place while it dried.


 Color some small ivory feathers with Peeled Paint and Antique Linen DS.  Use water to actually lighten the color.  The feathers will look like a hot mess, but they will dry back to their normal "fluffy" state.  

See, I told you so!  LOL


Insert the feathers inside the shoe skate, as shown below.


I layered all the bottles and clock bezels in and on the cabin with Glossy Accents.  I recommend you do this just before bedtime or when you are taking a break to let the Glossy Accents dry.  I tend to forget it's there and inevitably stick my finger or arm or something into it.   


I started adhering my remaining fussy cut pieces, as well as that last piece from the Wrought Iron Set which I placed just behind the lady.  I used a tiny wooden spool to elevate the larger flying pig, and a piece of a paper straw to elevate the smaller pig.  I also adhered the legs in glass piece to the right side of the frame (lower corner).


 To make the lamp that I placed above the jar with legs, I cut apart the sconce piece from the Fancy Lamp Post & Sconce Set Small.  The bottom of that is still useable as a corner piece.  


I also chose four propeller pieces (one is hidden beneath the pile of embossing powder).  I inked all pieces, both sides, with Adobe Mixed Media ink and heat embossed them with the Chunky Rust embossing powder.  


To finish the lamp, I traced the lamp area onto a small piece of mica with a black sharpie marker.


I cut the mica out and glued it to the back of the lamp with Glossy Accents.  Then I glued it just above the jar with legs, as mentioned before,


The propellers were layered with small metal beads glued between them.  I found it was easier to glue a bead to the back of  each propeller and let it dry.  Then I would stack them on top of each other.  This photo also shows how I glued the tiny wooden spool to the back of the larger pig.


Here is what I mean.  I used a rusty screw piece from Prima on the very top propeller. 


As you can see, the propellers were glued on either side of the Olde Curiosity Shoppe sign.


I fussy cut some butterflies from the paper and placed them randomly over the shadow box.  


Supplies Used:

GSL Deco Front Shadow Box
GSL ATC Stand
GSL Fancy Lamp Post & Sconce Set Small
GSL Wrought Iron Set
Graphic 45 Olde Curiosity Shoppe paper collection
DecoArt Media Ultra Matte Varnish
ColorBox Mixed Media Ink Pad (Patina) (Black) (Adobe)
Patina Oxide Baked Texture embossing powder (Seth Apter)
Chunky Rust Baked Texture embossing powder (Seth Apter)
Oil Rubbed Bronze embossing powder (Allure)
Tim Holtz Distress Stains (Peeled Paint, Antique Linen, Walnut Stain)
Mini Mica Tiles (USArtQuest)
DIY Shop Paper Straws (American Crafts)
Mini wooden spool
Glossy Accents (Ranger)
3D Foam Squares (black optional)
Aleene's Fast Grab Tacky Glue
Distressed Tool

Well, I hope you enjoyed all the photos and step-outs today.  Be sure to check out the Gypsy Soul Laser Cuts shop to see what fun things you will be inspired to make.  And don't forget to share your projects with us on our Facebook Group Page.  

Thanks so much for stopping by, and have a wonderful day!

Barbara

Thursday, August 9, 2018

Mixed Media Art Journal Page - Dreamcatcher with Gypsy Soul Laser Cuts

Hi everyone, and welcome! Today I want to share another art journal page using the Gypsy Soul Laser Cuts Dreamcatcher 2 chipboard set.  When I think of dreams, I seem to think in vivid color and lots of sparkly stuff.  So, naturally, I decided to share my gold foiling technique that I used on both my background and on the chipboard.  And as for the glitter, I know what you are thinking.  You are thinking, "Oh no, not glitter.  I will have that stuff everywhere1!"  Well, I have another technique to share that will keep  you from wearing your glitter, or in this case, sparkly mica, for the next week.  So, scroll on down and check out the step-by-step tutorial to see how!


Cover both pages with an uneven coat of white gesso using a silicone spatula, leaving some space uncovered.  Let gesso dry.


Brush  Deep Waters metallic paint over background.  Spritz with water to thin and spread paint.  Before paint dries, remove excess with damp baby wipe. 


(NOTE:  You can see how dark the paint is where the page has no gesso because it sucked the paint right into its fibers.)


Use baby wipe to pick up the Deep Waters and dab the paint through the Well Rounded stencil to add texture to the background.  You can remove some of the stenciling before the paint dries for a more muted and grungy look.  Dry well.


Do the same thing with Coral-Teal Opal Magic paint through another section of the same stencil. 


I used a foam blending tool to stencil the Emerald Green Metallique paint through a different part of the stencil. 


I used the Steampunk Copper Metallic paint with a foam blending tool to dab the color onto the words and dream catcher.  Using a dabbing motion adds texture to the chipboard and even gives the slight appearance of hammered metal. 


For a bit of color variation on the feathers, I dabbed the Emerald Green lightly over them.


I used the Tomboy mono adhesive (white) glue to adhere splotches of the gold foil.  This is not gold leafing.  Gold foil is applied to a clear carrier sheet, and when it touches sticky glue, the gold comes off and leaves the carrier sheet.  I used a cheap brush to apply random splotches to my background and let the glue dry.  This particular glue is perfect for this application because it drys sticky. 


I used the same technique to apply the glue to my dreamcatcher.  You can see the gold is coming off the clear carrier sheet, but you can continue using it until there is nothing left on the sheet.


I also added some of the gold foil to the top of the dreamcatcher, using a new piece of the sheet for better coverage.


Next, I adhered all of my chipboard pieces to my art journal pages, as shown.  I let these dry well before continuing so I wouldn't accidentally move them around.  Then I took the journal outside to give it a good spray with a clear gloss acrylic coating.  This covered any of the sticky glue that may not have been covered with the foil, and protects the pages, as well.


Now for the addition of glitter.  I prefer to mix my glitter in a puddle of clear drying glue.  I am using Mica Delights, which is actually mica particles that resemble glitter and are about the same size.  I mixed copper and gold together for a more antiqued look.


I then picked up small blobs of the glue mixture and carefully dropped it into the openings in each feather. 


Before the glue mixture dried, I picked up the tiniest amount of the sapphire mica and sprinkled gently over the glue sections.  I wanted just a hint of the blue.  I also glued dew drops to the dreamcatcher and feathers, as well as a few more colorful ones randomly on the page. 


Here is a closer look at the dried glue inside the feathers.


And here are closer pictures of the two pages.


Although I added  Simple Feathers in my supply list below, I would have used them if I had been working in a bigger art journal.  My words were large enough to fill up the pages, but I wanted to point them out in case you work in a larger size and can't think of what to add to your project to make it all come together.  

Supplies Used:
GSL 10 Words
GSL Simple Feathers (not used on this journal page)
TCW 384s Mini Well Rounded stencil
Dina Wakley white gesso
Prima Art Alchemy acrylic paints
  Deep Waters Metallique
  Emerald Green Metallique
  Steampunk Copper Metallique
  Coral-Teal Opal Magic
Tombow Mono Multi Liquid Glue 
Paper Studio Clear Glue Pen
US Art Quest Mica Delights
  Gold
  Copper
  Sapphire
Robin's Nest Dew Drops
  Light Vanilla
  Multi colors
Rub-On Foiling Paper
Silicone spatula
Assorted brushes
Paper piercer tool or tooth pick
Clear Acrylic Spray Sealer (Hobby Lobby)

I love how this turned out.  I know I may sound like a broken record when I say that chipboard is fabulous to use for dimension without all the bulk, and it is a perfect addition to art journals, as well as many other uses. 

I hope I've inspired you to make something with laser cut chipboard and share what you make!

Have a wonderful rest of the week!

Barbara xo