Showing posts with label Prima. Show all posts

Thursday, December 27, 2018

Medieval Cathedral Frame with Gypsy Soul Laser Cuts

Merry Christmas and Happy New Year to everyone!  I hope you all are enjoying the holidays and getting ready for the coming year.  I sure am.  As a matter of fact, this will be my last post with Gypsy Soul, unless they will have me back on occasion as a guest designer <hint>.  

I am one of those people who thinks there is always room for improvement, especially for myself.  I am always striving to learn new things, new crafts, new techniques, and more importantly, I continue to try to improve on things I feel I may already know but perhaps I have not perfected.  So, I will still be about on social media, hopefully with some new techniques and new ideas to share.  

front 
back
So, let's get to today's project.  I will be using this beautiful Cathedral Frame and an image from the Medieval Triptychs collage sheet from AlphaStamps. 


I simply laid the top frame with the opening over the images on the sheet until I found the one that I liked and that fit inside the frame the best.  


Use a makeup sponge to apply a coat of the Limestone Stone Effect Paste to the front and back sides only of the frame pieces.   Set aside to dry.


Paint front and back of frame pieces with Glorious Gold acrylic paint and let dry.


Delaminate a piece of mica large enough to fit over the collage image, and another piece large enough to fit behind the opening of the top frame piece.  Glue mica  pieces with Glossy Accents or a clear drying adhesive.


Trim excess mica from open top are of frame, and around collage image.  Glue pieces to front of frame (right).  Be sure to carefully burnish the collage image down to the back piece to ensure there are no air bubbles or wrinkles.  


The back frame piece (left) is ready to be glued to the front (right) piece, as shown.


Glue the frame pieces together.  
To conceal the seams along the edges where the two pieces have been glued together, I used a small spatula and my finger to add a layer of the Limestone Stone Effect Paste.  Let it dry.


Paint the edges with the Glorious Gold acrylic paint and let dry.

Glue metal embellishments to the frame, as shown.


Paint the embellishments with Glorious Gold acrylic paint and let dry.


Pick up the Fire Ruby wax with a brush and lightly hit the high spots over the frame and embellishments.  


Continue doing the same on the back of the frame, as well.


Glue rhinestones to the center of each embellishment.


Supplies used:

GSL Cathedral Frame
Medieval Triptychs Collage Sheet (www.alphastamps.com)
Limestone Stone Effect Paste (Prima/Finnabair)
Fire Ruby Antique Brilliance Wax (Prima/Finnabair)
Mica pieces (USArtQuest)
Makeup sponge
Small spatula
Ranger Glossy Accents
Metal embellishments
Amber gold rhinestones

I hope you enjoyed this quick and easy project today, and be sure to come back to see all the inspirational projects from the design team.  

I've enjoyed my time with Gypsy Soul Laser Cuts, and I hope you have enjoyed my projects during my time here.  Thanks so much for your support, and have a wonderful New Year!

Barbara

Thursday, November 22, 2018

Mixed Media How To - The Good Life Art Journal Page

Happy Thanksgiving and many blessings to all.  In the US, we celebrate Thanksgiving, so since today is Thanksgiving for us, I wanted to use my art journal to commemorate all that I am thankful for.  I will be using some Gypsy Soul Laser Cuts chipboard and ColourArte products to help me out.  I love using chipboard in my art journals because it adds some dimension and not too much bulk.  Also, when I find just the right shapes, it seems to get that ole' mojo started again.

I have prepared a video tutorial for you in the hopes you will enjoy watching the process.


CLICK HERE TO SUBSCRIBE TO MY CHANNEL

Supplies Used:

GSL The Good Life
GSL Mushrooms Shape Set
ColourArte Vivid Ultra Metallics
  Peaceful Poppy
  Black Cherry
  Autumn Leaf
  Burnt Umber
  True Metals Autumn Flame
  Bolivian Blue
ColourArte Radiant Rains Dabber
  Yellow Rose
  Nutmeg
  Mediterranean
Prima Metallique Wax
  Aged Brass
  Vintage Gold
  Bronze Age
6"x9" Art Journal (Ranger)
Studio 490 Crackled Texture Paste
Faber-Castell Glass Bead Glitter Gel
Dylusions 5x8 Luscious Leaves stencil
Tree Branch Archival ink pad
Paper Parachute AT-002 cling stamp
Viva Décor Pearl Pen - Cream

I hope you enjoyed today's project, and be sure to check out all the fabulous products found at ColourArte and  Gypsy Soul Laser Cuts.  

Thanks so much for stopping by, and have a super holiday!!

Barbara

Thursday, August 9, 2018

Mixed Media Art Journal Page - Dreamcatcher with Gypsy Soul Laser Cuts

Hi everyone, and welcome! Today I want to share another art journal page using the Gypsy Soul Laser Cuts Dreamcatcher 2 chipboard set.  When I think of dreams, I seem to think in vivid color and lots of sparkly stuff.  So, naturally, I decided to share my gold foiling technique that I used on both my background and on the chipboard.  And as for the glitter, I know what you are thinking.  You are thinking, "Oh no, not glitter.  I will have that stuff everywhere1!"  Well, I have another technique to share that will keep  you from wearing your glitter, or in this case, sparkly mica, for the next week.  So, scroll on down and check out the step-by-step tutorial to see how!


Cover both pages with an uneven coat of white gesso using a silicone spatula, leaving some space uncovered.  Let gesso dry.


Brush  Deep Waters metallic paint over background.  Spritz with water to thin and spread paint.  Before paint dries, remove excess with damp baby wipe. 


(NOTE:  You can see how dark the paint is where the page has no gesso because it sucked the paint right into its fibers.)


Use baby wipe to pick up the Deep Waters and dab the paint through the Well Rounded stencil to add texture to the background.  You can remove some of the stenciling before the paint dries for a more muted and grungy look.  Dry well.


Do the same thing with Coral-Teal Opal Magic paint through another section of the same stencil. 


I used a foam blending tool to stencil the Emerald Green Metallique paint through a different part of the stencil. 


I used the Steampunk Copper Metallic paint with a foam blending tool to dab the color onto the words and dream catcher.  Using a dabbing motion adds texture to the chipboard and even gives the slight appearance of hammered metal. 


For a bit of color variation on the feathers, I dabbed the Emerald Green lightly over them.


I used the Tomboy mono adhesive (white) glue to adhere splotches of the gold foil.  This is not gold leafing.  Gold foil is applied to a clear carrier sheet, and when it touches sticky glue, the gold comes off and leaves the carrier sheet.  I used a cheap brush to apply random splotches to my background and let the glue dry.  This particular glue is perfect for this application because it drys sticky. 


I used the same technique to apply the glue to my dreamcatcher.  You can see the gold is coming off the clear carrier sheet, but you can continue using it until there is nothing left on the sheet.


I also added some of the gold foil to the top of the dreamcatcher, using a new piece of the sheet for better coverage.


Next, I adhered all of my chipboard pieces to my art journal pages, as shown.  I let these dry well before continuing so I wouldn't accidentally move them around.  Then I took the journal outside to give it a good spray with a clear gloss acrylic coating.  This covered any of the sticky glue that may not have been covered with the foil, and protects the pages, as well.


Now for the addition of glitter.  I prefer to mix my glitter in a puddle of clear drying glue.  I am using Mica Delights, which is actually mica particles that resemble glitter and are about the same size.  I mixed copper and gold together for a more antiqued look.


I then picked up small blobs of the glue mixture and carefully dropped it into the openings in each feather. 


Before the glue mixture dried, I picked up the tiniest amount of the sapphire mica and sprinkled gently over the glue sections.  I wanted just a hint of the blue.  I also glued dew drops to the dreamcatcher and feathers, as well as a few more colorful ones randomly on the page. 


Here is a closer look at the dried glue inside the feathers.


And here are closer pictures of the two pages.


Although I added  Simple Feathers in my supply list below, I would have used them if I had been working in a bigger art journal.  My words were large enough to fill up the pages, but I wanted to point them out in case you work in a larger size and can't think of what to add to your project to make it all come together.  

Supplies Used:
GSL 10 Words
GSL Simple Feathers (not used on this journal page)
TCW 384s Mini Well Rounded stencil
Dina Wakley white gesso
Prima Art Alchemy acrylic paints
  Deep Waters Metallique
  Emerald Green Metallique
  Steampunk Copper Metallique
  Coral-Teal Opal Magic
Tombow Mono Multi Liquid Glue 
Paper Studio Clear Glue Pen
US Art Quest Mica Delights
  Gold
  Copper
  Sapphire
Robin's Nest Dew Drops
  Light Vanilla
  Multi colors
Rub-On Foiling Paper
Silicone spatula
Assorted brushes
Paper piercer tool or tooth pick
Clear Acrylic Spray Sealer (Hobby Lobby)

I love how this turned out.  I know I may sound like a broken record when I say that chipboard is fabulous to use for dimension without all the bulk, and it is a perfect addition to art journals, as well as many other uses. 

I hope I've inspired you to make something with laser cut chipboard and share what you make!

Have a wonderful rest of the week!

Barbara xo

Friday, August 3, 2018

How to Make a Rusty Grungey Tag Background with ColourArte Vivid Ultra Metallics

Hi everyone!  Welcome back for another video tutorial using ColourArte Vivid Ultra Metallics.  I started working on a Prima chipboard tag because they are super heavy duty and will stand up to a lot of weight.  I added Prima IOD molded pieces to the tag, some art stones, and started adding my colors.  I didn't know where it was going to take me, but I was super happy with the results.  My background began looking very rusty and grungey, and who doesn't like rust?

Here is my video tutorial showing my process.


CLICK HERE TO SUBSCRIBE TO MY CHANNEL

ColourArte Supplies Used:
Vivid Ultra Metallics
  China Black
  Siam White
  Bolivian Blue
  Teal Zircon
  Burnt Umber

Other Supplies Used:
Chipboard tags Large (Prima)
Pre-Molded Pieces (Prima IOD Molds)
Studio 490 Crackled Texture Paste
Texture Pebbles, Boulders, Sand (Brea Reese)
Fast Grab Tacky Glue (Aleene's)
Art Institute Dries Clear Adhesive
26 gauge aqua wire
Metal embellishments
DIY embellishment (see link to video tutorial:  https://youtu.be/5piXvFE3kcI)


I hope you enjoyed my video, and I would love to hear what you think.  Please give me a thumbs up, and it sure would be terrific if you would consider subscribing to my channel.

Thanks so much for watching, and have a super crafty weekend!!!

Hugs,
Barbara

Friday, April 20, 2018

Let the Fleur Fly Mixed Media Canvas

Hi everyone!  Lately, I've been purging my supplies, and I came across some items that I thought would add some great texture to a mixed media canvas.    I found some thumb tacks, some old buttons, and even some broken molded pieces I had made from plaster on a texture sheet.    Some of these things are quite old, but I'm pretty sure if you don't have the same exact things, you can find something similar in your own craft studio.   


CLICK HERE TO SUBSCRIBE TO MY CHANNEL

ColourArte Supplies Used:
Silks Acrylic Glaze
  Olive Vine
  Emperor's Gold
  Solar Gold
  Orange Peel
  Cinnamon Brown
  Jasper Red
  Stargazer
Vivid Ultra Metallics
  China Black
  Siam White

Other Supplies used:
8x12 Canvas
DecoArt Media Modeling Paste
DecoArt Media White Crackle Paste
Treasure Gold Metallic Wax (Classic)
Fleur de lys resin piece (hobby Lobby)
Large metal key (hobby lobby)
20 gauge wire
Prima #599409 wings mold
Faster Plaster
Buttons, thumb tacks (my stash)
Floral embellishments
Metal embellishments
Bee charms
Faber-Castell Texture Gems (Pearl)

I hope you enjoyed my video project today and maybe you've been inspired to go through your stash and make use of some of those things that have been forgotten and abandoned.

Thanks so much for stopping by, and have a wonderful, creative day!

Barbara

Thursday, June 8, 2017

Father's Day Cards with Gypsy Soul Laser Cuts

Hi everyone!  I'm sure that, by now, you know that Father's Day is just around the corner, and if you need some ideas for those masculine type cards to make, I hope this tutorial will help inspire you.  Here are the two cards I made that I think would be suitable for any of the men in your life.


***************************************************************
Card 1

Card 1: Adhere a slightly smaller piece of print paper (Off to the Races) to the front of a 5"x7" kraft card.  (Optional:  Distress and ink edges before adhering to card front).


Use the 3"x4" notecard (Cigar Box Secrets) to measure the distance to cut through the 4"x6" notecard (Cigar Box Secrets).


Draw a line between the two marks with a pencil.  Punch a 1/8" circle at the sides where the lines intersect, then use a craft knife to slice the straight opening along the straight line between the two holes.  Erase pencil lines.


Place 3"x4" notecard into slot.


Turn 4"x6" notecard over and trace around 3"x4" notecard on reverse.  


At this time, you can distress and ink the edges of the 4"x6" notecard only before adhering to the card front.  Note where the glue has been applied.  The pocket area needs to be free from glue.


Adhere 4"x6" notecard to lower right of card front.


Round corners of  3"x4" notecard and slip into pocket.  Make two rosettes using the red print Graphic 45 paper and adhere to upper left corner of card.  Use a pop dot to lift the smaller rosette so it will sit slightly atop the larger one.


Choose four Gears and one of the Horses to alter.  The horse was inked with Vintage Photo and Fossilized Amber Distress Oxides.  The gears were inked with Versamark ink and heat embossed with Hammered Metal (left) and Charred Gold (right).


The horse's legs were  glued to the top portion of the pocket opening on the 4"x6" notecard only, leaving the 3"x4" notecard free to move up and down.  The gears were glued to the rosettes, while two gears were layered and adhered next to the rosettes, as shown.

Pull the 3"x4" notecard out of the pocket and use a repositionable glue dot to adhere your gift card to the reverse side.


Stamp a sentiment on the front of the notecard.  I used "just for you" for this card. 


Place notecard with gift card inside pocket and send your "gift" card on it's way.


On the inside, add a scrap of the G45 paper to the inside with a border strip, and stamp "Dad" with Versamark and heat emboss with champagne embossing powder.


***************************************************************
Card 2

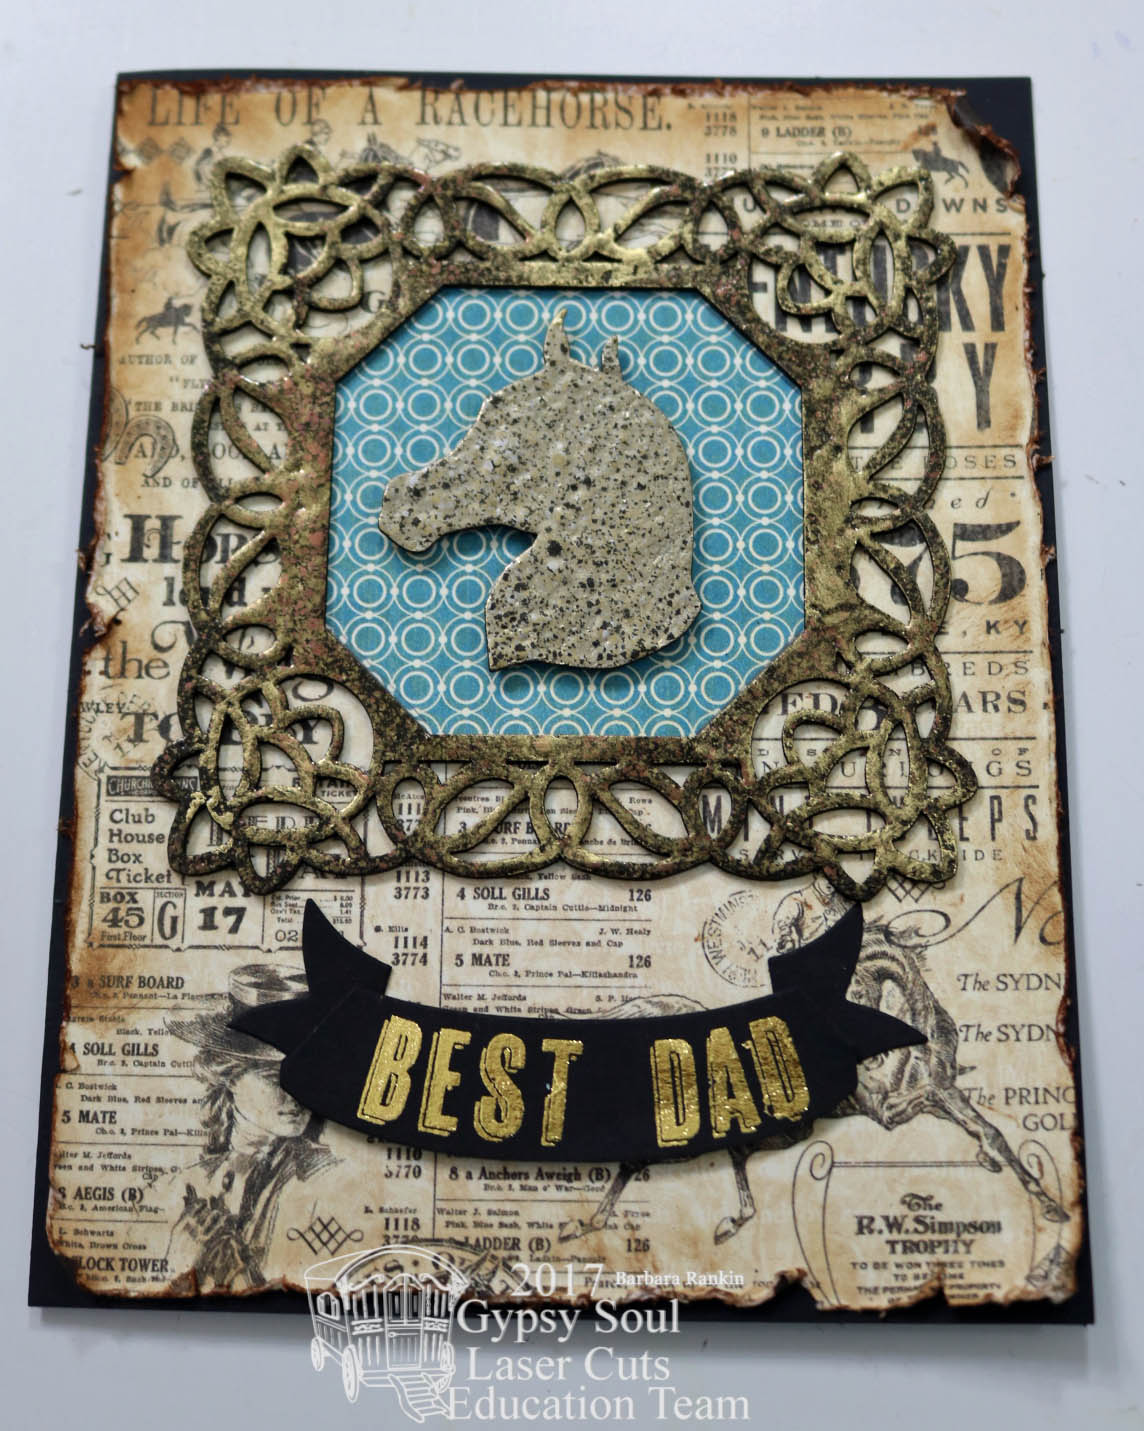
Card 2: Adhere a slightly smaller piece of print paper (Off to the Races) to the front of a 5"x6-1/2" black card.  (Optional:  Distress and ink edges before adhering to card front).  


Ink Flourished Frame Valerie Square with Versamark ink and heat emboss with Burnt Copper Leaves embossing powder.  


Trace around frame onto a piece of blue print paper (Off to the Races) and cut to fit inside frame.  


Adhere to back of frame opening, then adhere both to top half of card front.


Ink Horse Head with Versamark ink and heat emboss with Charred Gold embossing powder.  Adhere to center of frame opening with foam dots.


Die cut a banner from black card stock.  Use gold rub-ons to spell out "BEST DAD".


Fold ends of banner, place foam dots in center and glue at ends, as shown.


Adhere to bottom of card beneath frame.


Since the gold letters were so bright, I added touches of gold metallic paste to some areas of the frame to brighten the frame to match.


For the inside, stamp "Happy Father's Day" with Versamark ink and champagne embossing powder.  Cut around image and adhere to a scrap of the G45 paper that has been cut slightly smaller than the front of the kraft sack (envelope).


Adhere craft sack to center of card inside, and insert your gift card.  


Supplies Used:

GSL Horses Shape Set
GSL Gears Shape Set
GSL Flourished Frame Valerie Square
Graphic 45 Off to the Races papers
Prima Cigar Box Secrets papers
Kraft card (5"x7")
Black card (5"x6-1/2")
Black card stock scrap
Tim Holtz Distress Ink (Vintage Photo)
Tim Holtz Distress Oxides (Vintage Photo, Fossilized Amber)
Tim Holtz die (Regal Crest) 
Tim Holtz Gilded Alpha remnant rubs
Allure Embossing Powders (Charred Gold, Hammered Metal, Burnt Copper Leaves)
Pearlustre Champagne embossing powder
Versamark ink pad
Dad rubber stamp (Inkadinkado)
Mini Craft Sacks (2.5" x 4") (Paper Studio)
3D Foam Squares 
Happy Father's Day stamp (PSX)
Just for You stamp (Hero Arts)

I hope you enjoyed the project today, and be sure to check out the GSL shop.  Another fun set to consider for your male cards is the GSL Miniatures Shape Set - Guy Thing.  It contains lots of vintage style male type laser cuts, giving you even more choices.  

Thanks for stopping by, and have a great day!

Barbara