.............................................................................
If you are here for the House of Cards blog challenge, please click here.
˙˙˙˙˙˙˙˙˙˙˙˙˙˙˙˙˙˙˙˙˙˙˙˙˙˙˙˙˙˙˙˙˙˙˙˙˙˙˙˙˙˙˙˙˙˙˙˙˙˙˙˙˙˙˙˙˙˙˙˙˙˙˙˙˙˙˙˙˙˙˙˙˙˙˙˙˙˙˙˙˙˙˙˙˙˙
Hello fellow ColourArte-ists, and welcome back to my first post for May. I am so excited to share my project with you today because we are featuring some gorgeous paints, aka, Silks Acrylic Glaze. They are an iridescent and semi-transparent acrylic glaze paint. These paints are named perfectly because they go on smooth as silk. We are also featuring Primary Elements, which are a highly concentrated powder to make your own paints, glazes, and shimmery mists. The design team will be sharing lots of ways to use these fabulous products all month. Inspiration awaits you!


I made this Spring themed "Circle of Life" wreath to hang up for Spring and Summer! I will sure enjoy watching all the butterflies flit around the circle... ah, if only they were real!

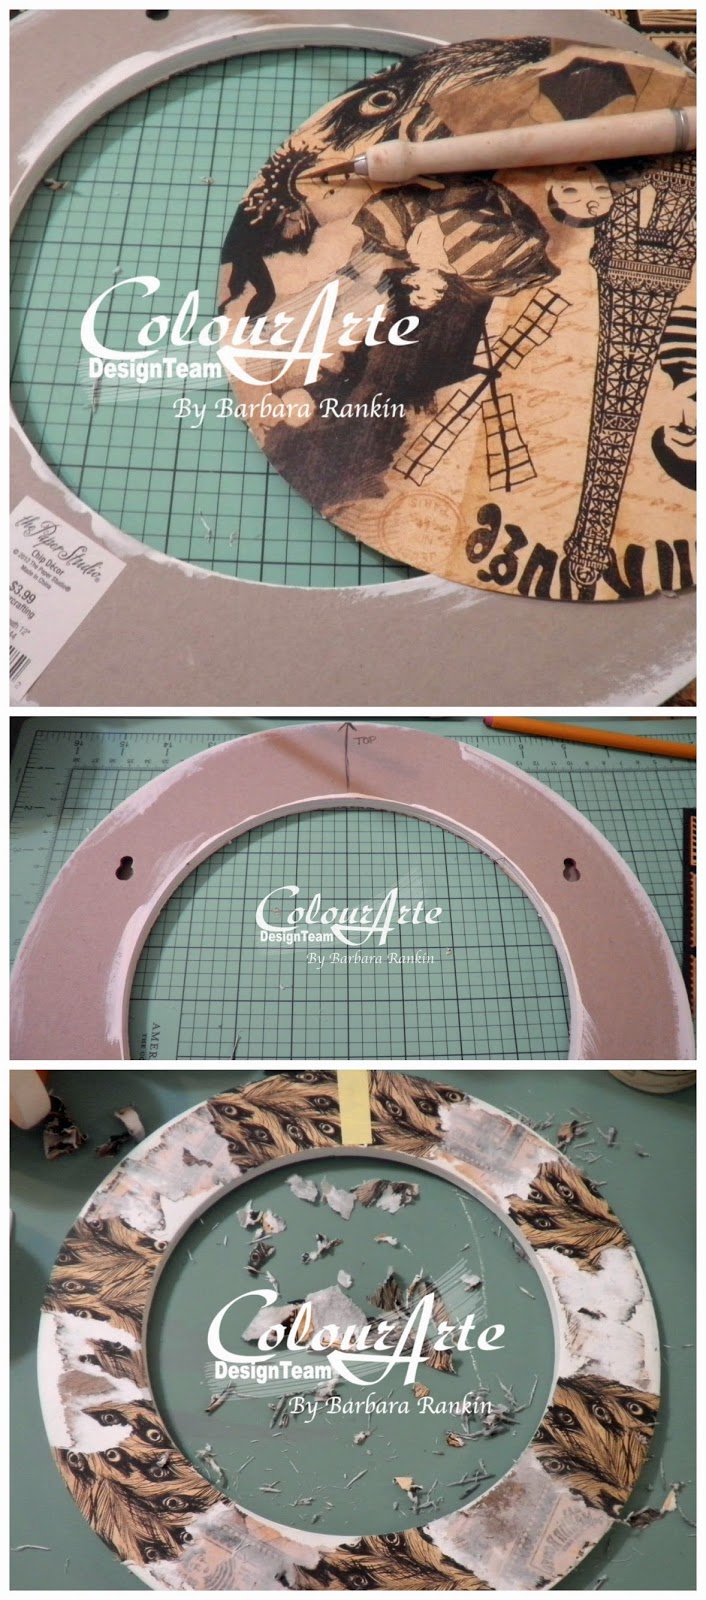
Start with a chipboard circular wreath. Paint surface with white gesso, let dry.

If you are here for the House of Cards blog challenge, please click here.
˙˙˙˙˙˙˙˙˙˙˙˙˙˙˙˙˙˙˙˙˙˙˙˙˙˙˙˙˙˙˙˙˙˙˙˙˙˙˙˙˙˙˙˙˙˙˙˙˙˙˙˙˙˙˙˙˙˙˙˙˙˙˙˙˙˙˙˙˙˙˙˙˙˙˙˙˙˙˙˙˙˙˙˙˙˙
Hello fellow ColourArte-ists, and welcome back to my first post for May. I am so excited to share my project with you today because we are featuring some gorgeous paints, aka, Silks Acrylic Glaze. They are an iridescent and semi-transparent acrylic glaze paint. These paints are named perfectly because they go on smooth as silk. We are also featuring Primary Elements, which are a highly concentrated powder to make your own paints, glazes, and shimmery mists. The design team will be sharing lots of ways to use these fabulous products all month. Inspiration awaits you!
I made this Spring themed "Circle of Life" wreath to hang up for Spring and Summer! I will sure enjoy watching all the butterflies flit around the circle... ah, if only they were real!
Adhere G45 Moulin Rouge print paper to front of chipboard with regular matte medium. Trim away excess paper inside and outside. On reverse, mark center between hanging holes.
Before proceeding, turn chipboard over to back and align hanging holes horizontally, then mark "TOP". This will help as you adhere your embellishments later.
Wet sections of the paper with a brush, let sit a minute or two. Start to peel and rub away those sections. (NOTE: Yellow post it note adhered to denote "TOP").
 Paint a gesso wash over the circle, wipe away some of the gesso from the print paper; let dry.
Spread modeling paste through script stencil around the circle. There was some blue paint on the stencil which got picked up in the paste. No matter ... it will get covered up by all the layers to come.
 Dab Radiant Rain Nutmeg over entire surface, then randomly dab Solar Gold, as shown.


Paint one set of butterflies with Mediterranean Blue PE (Primary Elements) mixed with Clear Medium. Let dry. Hit high spots with black archival ink pad.
Paint another set of butterflies with Ginger Flower PE mixed with Clear Medium. Let dry. Brush on a coat of Sunflower PE mixed with water to the butterfly centers, rub excess with finger. Let dry. Hit high spots with black archival ink pad.

 Paint several honeycomb chipboard pieces with white gesso, let dry.
 Sponge Yellow Rose and Spiced Pumpkin Silks onto each piece of honeycomb, front and back.
 Add a coat of white gesso to the chipboard berry stems, let dry.
 Paint each one on both sides with Silks Emperor's Gold. Do you see how one of the berry stems looks lighter than the others? That is what makes this paint so beautiful, how it changes colors depending on the way the light hits it. It is amazing to me!

Make a mist with Mediterranean Blue PE and water in a mister bottle. Spritz onto circular chip piece and dry.
Using a paintbrush to pick up the PE colors, sprinkle PE Mediterranean Blue, Black Orchid, and Ginger Flower around the perimeter. Continue to spritz with Mediterranean Blue mist, let it mix and run and marbleize, heat with heat gun. Spray a workable fixative over the surface to set the PE and prevent it from rubbing off. It does need a binder and I only used water in my mister.


 Spray paper flowers with Radiant Rain Autumn Leaf.
 While still wet, spray flowers with Radiant Rain Ginger Flower. Let dry. Look at that amazing color combo forming on the craft sheet. Isn't is gorgeous! I did not let any of it go to waste. I picked the excess up with a paintbrush and applied to areas of the flowers that I missed when misting. Boy, try saying that three times real fast.


Give the frame an antique gold look by first dabbing with Vintage Photo distress stain, dry, then Radiant Rain Solar Gold dauber, dry, then Radiant Rain Nutmeg dauber, dry.

 Begin adding embellishments to the wreath. Start with the title "Circle of Life" frame, placing it centered at the top.

Silks Acrylic Glaze:
Nutmeg
Emperor's Gold
Yellow Rose
Ginger Peach
Radiant Rain Daubers:
Nutmeg
Solar Gold
Primary Elements:
Mediterranean Blue
Ginger Flower
Black Orchid
Other Supplies:
Sin City Stamps: Art Journal 3 rubber stamp plate (Circle of Life)
DecoArt Media Modeling Paste
Golden Regular Matte Gel Medium
Graphic 45 Curtain Call Collection (12x12) (Moulin Rouge)
Sizzix Butterfly Duo die with matching embossing folder
The Crafter's Workshop Art Is Stencil (6x6)
Chipboard: Bits of Honey (honeycomb), Berry Stems (Blue Fern Studios)
Black archival ink
Vintage Photo distress ink
Tuxedo Black Pico Embellisher
Stop by the shop and check out the rest of these gorgeous paint products. And that's not all!
Thanks so much for stopping by, and I hope you are inspired to try some of these fabulous paints and watercolors in your next project!
Have a wonderful, creative weekend!
Barbara
Wet sections of the paper with a brush, let sit a minute or two. Start to peel and rub away those sections. (NOTE: Yellow post it note adhered to denote "TOP").
Spread modeling paste through script stencil around the circle. There was some blue paint on the stencil which got picked up in the paste. No matter ... it will get covered up by all the layers to come.
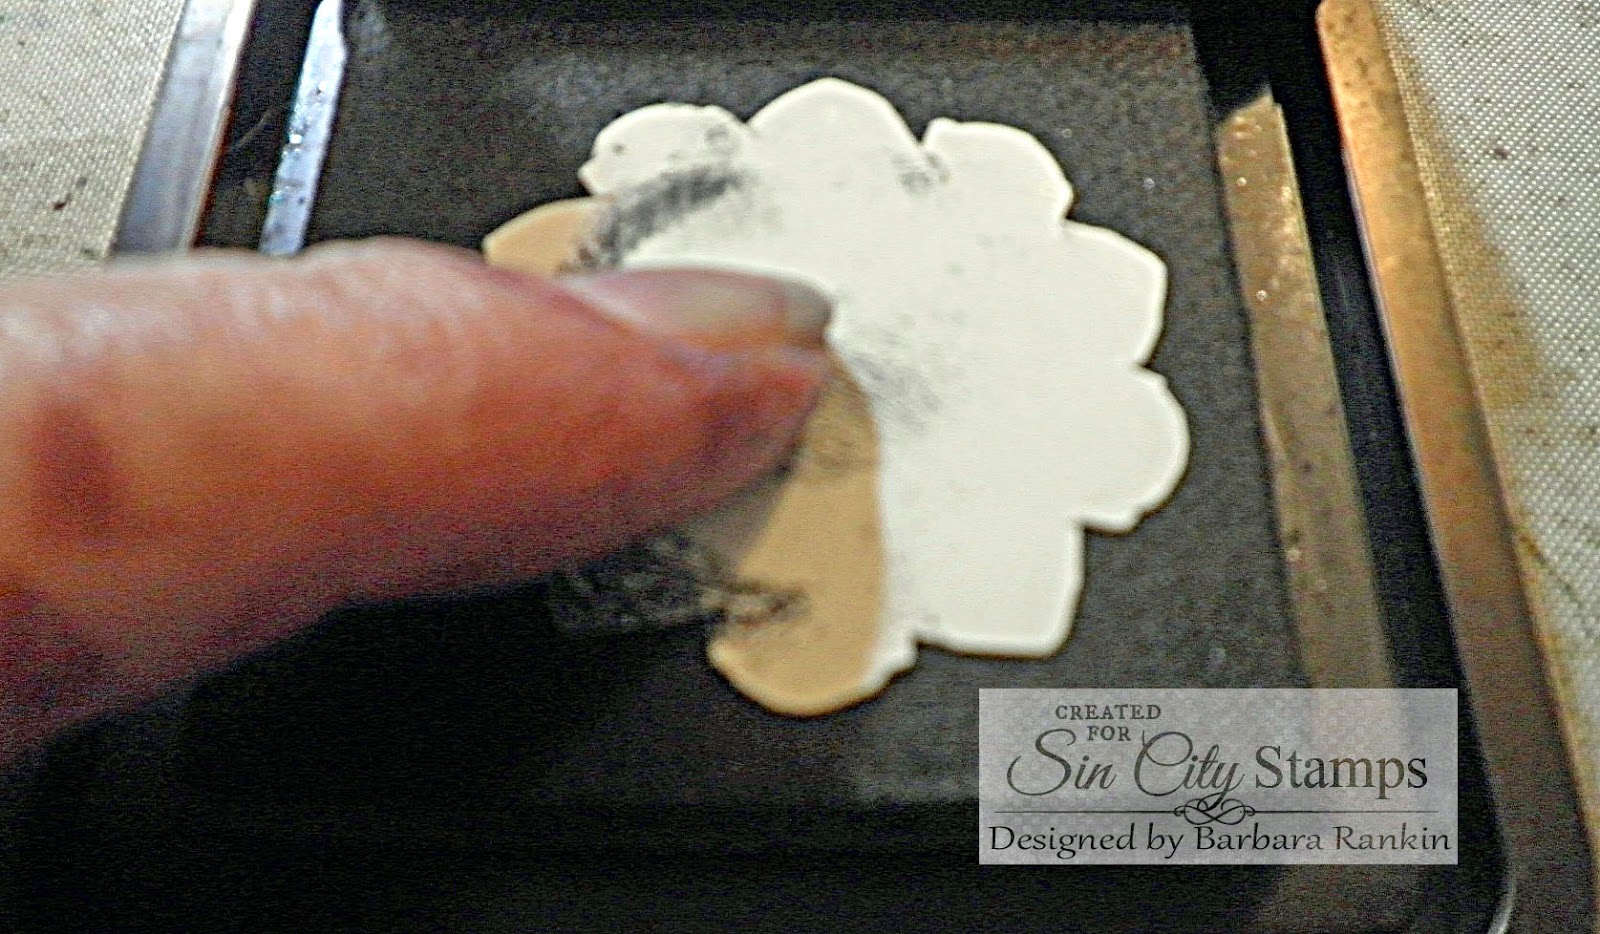
Die cut six sets of butterflies from chipboard and emboss with the matching embossing folder.
Paint each one, front and back, with black gesso.
Paint another set of butterflies with Ginger Flower PE mixed with Clear Medium. Let dry. Brush on a coat of Sunflower PE mixed with water to the butterfly centers, rub excess with finger. Let dry. Hit high spots with black archival ink pad.
Add Black Pico Embellisher to the butterfly bodies. Let dry.
To bring out the stenciled script, I hit the high spots with black archival ink.
Make a mist with Mediterranean Blue PE and water in a mister bottle. Spritz onto circular chip piece and dry.
Using a paintbrush to pick up the PE colors, sprinkle PE Mediterranean Blue, Black Orchid, and Ginger Flower around the perimeter. Continue to spritz with Mediterranean Blue mist, let it mix and run and marbleize, heat with heat gun. Spray a workable fixative over the surface to set the PE and prevent it from rubbing off. It does need a binder and I only used water in my mister.
Look at these gorgeous textures and colors. They make me so happy!
Paint both inside and outside edges of chipboard with Silks Nutmeg.
Hit the high spots on each rose with Silks Emperor's Gold.
Make chipboard frame to measure 1-3/4" x 2-1/4" with a 1-1/2" x 2" opening.
Give the frame an antique gold look by first dabbing with Vintage Photo distress stain, dry, then Radiant Rain Solar Gold dauber, dry, then Radiant Rain Nutmeg dauber, dry.
Stamp "Circle of Life" onto scrap tan card stock with black archival ink. Center words inside frame die cut, trace around inside and outside.
Trim frame from around the "C" and the "e" to fit . Erase the pencil lines and slip the frame over the letters before adhering the two pieces together. Add corner embellishments with Platinum Pearl Liquid Pearls.
Adhere butterflies, flowers, berry stems, and honeycomb around circle.
Here are some closeups of the different sections of the wreath. I only hope you can see the beautiful shimmer as it appears real life. These paints are super gorgeous and it is hard to capture them with a camera, but that is why I take so many pictures. I hope to capture some of its beauty in different views.


Silks Acrylic Glaze:
Nutmeg
Emperor's Gold
Yellow Rose
Ginger Peach
Radiant Rain Daubers:
Nutmeg
Solar Gold
Primary Elements:
Mediterranean Blue
Ginger Flower
Black Orchid
Other Supplies:
Sin City Stamps: Art Journal 3 rubber stamp plate (Circle of Life)
DecoArt Media Modeling Paste
Golden Regular Matte Gel Medium
Graphic 45 Curtain Call Collection (12x12) (Moulin Rouge)
Sizzix Butterfly Duo die with matching embossing folder
The Crafter's Workshop Art Is Stencil (6x6)
Chipboard: Bits of Honey (honeycomb), Berry Stems (Blue Fern Studios)
Liquitex white gesso
Utrecht black gessoBlack archival ink
Vintage Photo distress ink
Tuxedo Black Pico Embellisher
Stop by the shop and check out the rest of these gorgeous paint products. And that's not all!
Win Free Product Twice a Month
How do you win? Go to ColourArte Arte Blog April 30th and May 15th.
Scroll to the bottom of that days post The rules for the bi-monthly scavenger hunt will be posted Winner is announced in 72 hours.
Thanks so much for stopping by, and I hope you are inspired to try some of these fabulous paints and watercolors in your next project!
Have a wonderful, creative weekend!
Barbara