Monday, June 29, 2015

Bluebirds and Butterflies Card with Sin City Stamps

Hello all!  I have a really pretty vintage style card to share with you today using two of Terri Sproul's new stamp sets from Sin City Stamps.

Stamp image onto slick white card stock with black StazOn or any permanent ink.
Paint the birds, nest, flowers and leaves with Twinkling H20s in Burnt Umber, Pink Azalea, Ocean Wave, and Moss Green.  The best way to activate the "twinks" is to spritz water into each pot and let them sit for a few minutes.
I wanted to age the paper, so I used a blending tool to add Antique Linen distress ink to the white card stock.
Here is a close up of the coloring with the antiqued background.
Next, I layered this piece onto a pink card stock layer, then onto a dark green card stock layer.  I left the tiniest border of each color around the image.  Then I die cuts a piece of tan card stock with the Fancy Tags die, and before removing the paper from the die, I used the blending tool to add more Antique Linen distress ink to it.
When I removed the die, the tag now has this nice, aged look and highlights.
I adhered the stamped piece slightly off center of a 5"x7" periwinkle blue card base, and I cut the tag in half, adhering each half to the sides of the stamped image, as shown.
Die cut a branch from brown mat board with the bird branch die and adhere to the card front above the nest image.
Add some paper flowers to the left side, covering the edge of the branch.
Punch several leaves from the dark green card stock scrap, and paint with the Moss Green Twinkling H20s.
Adhere the leaves around the flower bouquet, and cut leaves apart to add to the branches.
The give my card a nice balance, I decided to stamp two butterflies from the Terri Sproul's Wish stamp set with black StazOn ink.  I used the Pink Azalea, Ocean Wave, and Moss Green twinks to color them.  Then I fussy cut them out, shaped their wings and adhered to the right hand side of my card.  I added Amber glitter liner to their butterfly bodies.

Supplies used:

Sin City Stamps: Terri Sproul's Vintage Set; Terri Sproul's Wish
ColourArte:  Twinkling H20s:  Burnt Umber, Pink Azalea, Ocean Wave, Moss Green
Card stock:  White, Pink, Green, Periwinkle Blue
Black StazOn ink pad
Antique Linen distress ink
Blending tool
Bird Branch (Sizzix)
Brown mat board
Fancy Tags Two die (Spellbinders)
Leaf punch (Martha Stewart)
Paper flowers (Prima, Recollections)
Amber Glitter (Viva Decor)

I hope you enjoyed my card project today.  I love these sets and I think you will too.  So pop on over to the Sin City Stamps online store and check out all of the new sets and products that Sin City Stamps carries.

Thanks for stopping by, and have a wonderful, creative week!

Barbara

Sunday, June 28, 2015

Observations with ColourArte

Hello everyone!  Barbara here today, and since I am always keeping notes, I thought it would be fun to turn a bare mini album into something useful.

Observation is the act or instance of noticing or perceiving.  It is also something that is learned in the course of observing things.  For me, as I journey through this life, attempting to create my kind of art, I use observation as a tool for learning.  So I decided to make my own Observations Notebook as a kind of reference book to help me remember those things I may have learned along the way.

Front

Back

I found this Heidi Swapp mini album in the clearance section of my local craft store.  It has fabric on one side and bare wood on the other.
Paint the fabric side of the front cover with clear gesso through the ripped fishnet stencil, and paint the fabric side of the back cover completely with clear gesso.  Let dry.


Spray both covers with water first, then Radiant Rains Peach Fuzz, Soft Lemon, and Pewter shimmering mists.  Let dry.
Use a spatula to spread Emperor's Gold Radiant Gel through the "Art Is" stencil on both front and back covers.  This dimensional paint is very thick and holds its shape.  I love its superior quality and the Gold is amazingly beautiful.
Front cover


Back cover
While I loved my background so far, I could not stop.  I was in a more vintage mood, so I needed to tone things down and make them look older.  To do this, I first added some Primary Elements (PE) Buttercup and Mandarin Citrine, mixed with PE Clear Glaze Medium, and painted it randomly over the covers.  I also picked up the tiniest amount of PE Apple Blossom and mixed that in a few areas as well.  Before drying, I spritzed it with lots of water to disperse the color and allow it to blend and run, all while using my heat gun to dry it.


Next, I sprayed both covers again with the Radiant Rains in Pewter, Honeydew, and Ginger Peach, to give it this warmer look.  I also distressed the edges with Charcoal chalk ink.  (See photo of finished covers).
While the covers are drying, decide what embellishments you want to use on your book cover.  I chose these chipboard shapes from Gina's Designs.
After covering each shape with clear gesso, I painted each piece as described below:

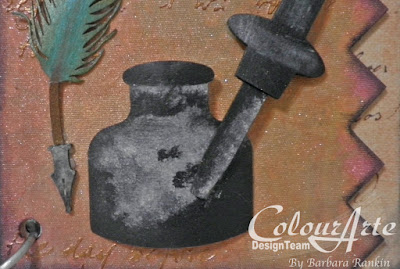
Ink bottle and eye dropper:  Silks Black Ice, PE Vanilla Bean mixed with PE Glaze Medium
I was not sure just how I wanted to color my ink bottle.  I knew I wanted it to look old, and I found this photo on Pinterest for my inspiration.  What do you think?
Writing Quill:  Silks Black Ice, topped with PE Vanilla Bean mixed with PE Glaze Medium (nib), Silks Sea Spray edged with Silks Olive Vine (feather), Silks Nutmeg (stem and up center of feather),  
Stackable Label:  Silks Yellow Rose, edged with Silks Black Ice
Metal Observations Label:  Silks Black Ice.  When dry, I wiped off the excess, leaving the black in the word crevices.  Attach the metal piece to the chipboard rectangle, then adhere that to the frame piece.
Here is each piece after painting.
Since they are just raw wood, I chose a piece of 12x12 scrapbook paper to cover them.
Raw wood inside covers

Script Paper adhered to inside covers
Adhere each of the chipboard pieces to the front cover, as shown.  I shaped the feather and ink bottle to give it a more rounded look, and used foam tape where necessary to give it lift. 


Here is a little tip to make adding your own pages easier.  Instead of trying to cut a zig zag on each page you add later, I cut a second piece of the matching scrapbook paper to match the back cover.  This will serve as the first page of the book, always showing just beneath the front zig zag cover.  Now, each page I add will be that size (no fussy cutting) and be placed behind the inside cover page.
Front cover, inside cover page, back cover

Supplies Used:

ColourArte:
Primary Elements Arte Pigments: Mandarin Citrine, Buttercup, Apple Blossom
Radiant Rain Peach Fuzz, Sour Lemon, Pewter
Radiant Gels Dimensional Paint Emperor's Gold 
Silks Acrylic Glaze:  Black Ice, Olive VineSea SprayYellow Rose
Primary Elements: Vanilla Bean
Primary Elements Clear Glaze Medium
Gina's Designs:  Pen and Ink Shape Set; Stackable Labels Shape Set
Heidi Swap Mini Album
Clear gesso
Prima Ripped Fishnet stencil (Finnabair)
Prima Ledger Pad 3 (12x12)
Art Is 6x6 stencil (The Crafter's Workshop)
Spatula
Beacon Quick Grip Glue

I hope you enjoyed my little mini album.  Be sure to check out the great products that ColourArte offers, and the chipboard from Ginas Designs.

Thanks for stopping by, and have a crafty weekend!

Barbara

Wednesday, June 24, 2015

Mixed Media Art Journal Pages: Amazing Wonder

Hello chippie fans.  Barbara here again with my last post as guest designer for Gina's Lasercut Chipboard.  But never fear, I am not gone for good.  I will be back next month as a regular designer on their design team. Yay, I am so excited about this fabulous opportunity.

Anyway, it is no surprise to those who know me that I am super fond of birds, and all animals, for that matter.  It is no "Wonder" that I am always "Amazed" by their sweetness, as well as their ability to fly!  Hence came the name for my journal pages.

Lay a background of printed tissue paper onto journal pages with matte medium.
Blend Radiant Gels Twilight and Celedon on both pages, spritzing with water to keep the transparency.
Dab Radiant Rain Coral Berry dauber along top edge of journal page, mist with water and allow color to run and spread.
Spread Twilight Radiant Gel through stencil with spatula, let dry.
Dab more Radiant Rain Coral Berry dauber randomly over background, spritz with water and add Kiwi Silks Acrylic Glaze, blending the two over the background.
Paint Flights of Fancy Music Girl with flesh tint acrylic paint.  Draw in a few facial details with a pencil.
Add highlights to face by mixing white gesso with the flesh tint paint.
Continue coloring face details with markers.
Cover face with paper towel and mist with a mixture of PE China Black and water for hair.  I love the mottled look this gives the hair.
Dab Radiant Rain Egyptian Gold over two Damask Singles.Heat emboss the ornamental bird cage with Versamark ink and silver embossing powder.  While the powder is still hot, sprinkle black embossing powder over it to give it an antique silver look.
Spray bird flourish with Fern Radiant Rain mist.  Add Twilight Radiant Gel to the bird only.
Spray Fern Radiant Rain Mist over the leaves and ornament.  These were the punch outs from the large Damask Single. Aren't they pretty?  Nothing goes to waste here.
Dab Egyptian Gold Radiant Rain dabber over words, then mist with Pewter Radiant Rain Mist.  When dry, add Delicata Silver Shimmer randomly over words.

Dab Egyptian Gold Radiant Rain dabber over the Damask Singles.
Adhere chipboard embellishments to pages as shown in photos.  I also added a piece of jewelry chain between the damask single and the birdcage to make it appear like it is hanging from the ornament above.
I added he three chipboard pieces that were punched out from the Damask Single to the based of the Music Girl, as shown.
One last thing I did was to add splotches of Egyptian Gold randomly over the page.  This is one of my favorite techniques to do with these daubers.  Make sure the dabber is juicy and just tap it down onto the page.  It will splatter the ink and make these perfect splotches.  Love it!  TIP:  Don't wear your expensive clothes when doing this. 
And here are the two pages once again.  

Supplies used:
Gina's Designs:  Flights of Fancy Music Girl, Damask Singles, Ornamental Bird Cages Shape SetWords and Phrases 2, Birds and Flourishes Shape Set
Cottonwood Arts A2 Canvas Notebook
ColourArte: Radiant Gels: Twilight, Celedon; Radiant Rain Daubers: Egyptian Gold, Coral Berry, Radiant Rain Shimmering Mists: Fern, Pewter; Primary Elements Arte Pigment: China Black
Print Tissue Paper (Tim Holtz)
Embossing Powder: Silver, Black
Markers: Faber-Castell
Stencil: Dylusions

Thanks for stopping by, and be sure to check out Gina's Designs for more fabulous chipboard shapes for all of your art work!  And please feel free to leave me a comment and let me know what you think of my pages.  I love to hear from you.

See you next month, and have a creative week!

Barbara