Thursday, February 25, 2016

Airbrushed Tag with the Craftwell eBrush & Teresa Collins dies

--------------------------------------------------------------------------------------------------
I have two posts to share today, so if you would like to see my project for Gypsy Soul Laser Cuts, please click here.  Thanks!
--------------------------------------------------------------------------------------------------

Hello everyone.  Today I get to share my first post as part of the Craftwell eBrush design team.  I am so thrilled to be here, and I don't mind telling you how much fun this eBrush is to use!  It is a fabulous little machine.  While I have done some airbrushing before using monstrous air compressors that were so loud, you could not hear yourself think, this little gem is so much quieter, and has several settings from low, medium, to high air pressure.  It is so convenient to use and store, too, unlike the monstrosities I have used before.  I cannot say enough good things about it.  So let's play!!!!


This month, we are pairing up with products from Teresa Collins.  I get to play with three different die sets, and I used something from each one of them for my tag!


After cutting the honeycomb from manila card stock, I used it first as a stencil to make background layers.


Move the die cut around the page, spraying Copic markers with the eBrush by Craftwell.  Keep your images random and uneven for best results.


BG72
BG34
YR23
B34, BG72
Script stamp from Bo Bunny set with Forest Moss distress ink
Airbrush these colors until you like it.
Stamp Finnabair Crackle randomly with Vintage Photo distress ink.
Stamp Blips randomly with Black Soot distress ink
Airbrush edges with 100 Black
Airbrush R85 in a few spots
Cut paper into a tag shape, approximately 8-1/2" by 5" wide, and set aside.  Die cut a butterfly from manila card stock.

Airbrush edges with B100
Y17 and YR23
B28 around edges, softening as you move inward
Die cut the numbers from manila cardstock and airbrush them in a similar fashion as the butterfly.  I added a white edge with a white craft pen to help it stand out better against the background.  

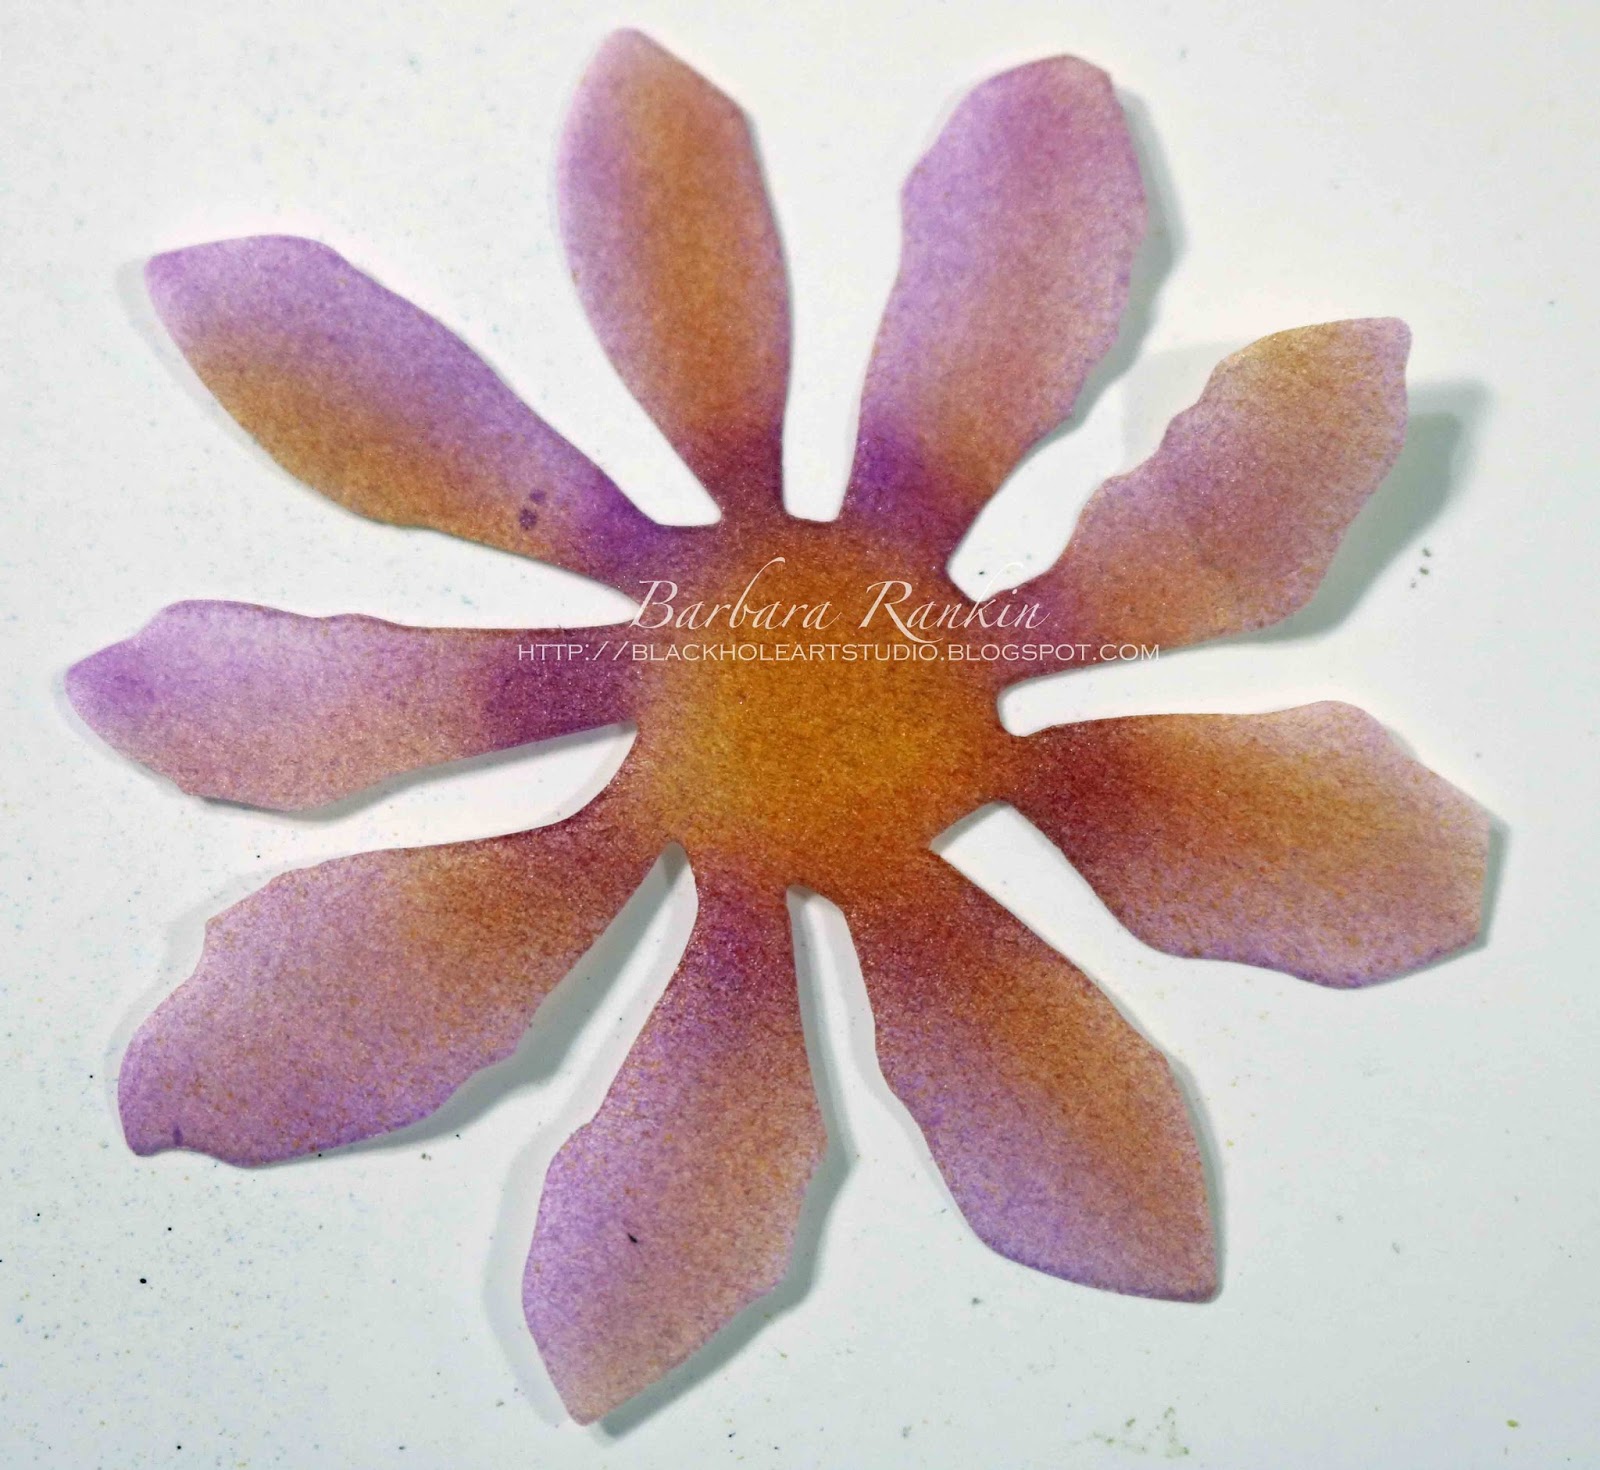
Die cut four tattered flowers from coffee filter paper.  Airbrush each as shown.


V11
YR23
V15
Offset two petals for each flower.
Trim the edge of the honeycomb die cut unevenly, then adhere to center of tag.  Add flowers, butterfly, numbers, and gold leaf ribbon trim, as shown.  Punch a hole and add eyelet to top center of tag.  Add jewel stickers to butterfly body and flower center.


Use the negative of the butterfly die cut (the portion left in the card stock piece after cutting out the butterfly) as a mask and airbrush Warm Gray No. 5 through the opening, lower right and upper left.


Airbrush with Warm Gray No. 5
The illusion of butterfly shadows
Lastly, pretty yarns were added through the tag hole to finish it off.  See photo of finished tag at top of post.


Supplies Used:


Teresa Collins Project Dies
Copic Markers
  • BG72
  • B34
  • B28
  • YR23
  • Y17
  • Y38
  • YG23
  • R85
  • V12
  • V15
  • 100 Black
  • Warm Gray No. 5


Rubber Stamps
  • Finnabair Crackle
  • Bo Bunny It is Written
  • Hero Arts Blips
  • Manila card stock
  • Tattered Flowers die (Sizzix)
  • Coffee filter paper
  • Gold leaves ribbon trim
  • Jewel stickers
  • Yarns
And here is a picture of my sweet tool!  Is that not just amazing... how small it is and totally easy to use.  And you can use all of the most common markers on the market, so there are just no limitations with this fabulous tool!


Thanks for stopping by, and have a great week!  See you next time with more fun and hopefully a slew full of inspiration.  


The Fashion Shoppe

Hey chipper gang!  Barbara here, and I have another one of those cute little mini house shaped shadow boxes from Gypsy Soul.  These are so fun to put together and decorate with your favorite theme.  I find them very inspirational to sit somewhere prominent for me to ponder.  If you missed my previous post using one of these cuties, you can click here to see that project.  But I warn you, it can be very addicting.  


I always lay my chipboard out the way it will be glued together, just to make sure I have it positioned  correctly.  I am using Mini House Shadowbox 1 for today's project.  This particular box is a taller, rectangular house, and I thought it would be perfect to house my dress forms and perhaps showcase the Fashionistas.  As always, I like to use Aleene's Fast Grab tacky glue to put my chipboard together.


I traced the box onto the flourish texture sheet and cut the approximate area needed to cover the back and sides of the box.  I cut a section from the diamond texture sheet for the roof.
Next, I cut out all the pieces of paper to use on the inside, outside, and roof of the box.
Paint the inside and outside of the box with chalk paint in matching colors.  Allow paint to dry thoroughly, then adhere papers, as shown.


Paint diamonds, fourishes, and corners with the chalk paints in a green and blue. 


Add crackle glaze over the diamonds and add green distress ink over it.


Add white antiquing cream over the flourishes.


Wrap flourished texture sheet around box and adhering as you fold over the edges and trim excess.  Glue diamond texture sheet to roof.


Add a copper paste over the corners to resemble patinated copper.


Glue one corner to the front and one to the back.


Use the medium sized window from the Windows 4 Panel pack to select the images from the G45 Ladies' Diary paper to appear through the open window.  Trace around it with a pencil and cut out.  Set paper aside for now.  Paint the window frame with a coat of white crackle paint.  When dry, add brown distress stain to bring out the crackles, then adhere over the G45 image. 


Glue the window frame on the inside of the box.  Now it looks like there are two very fashionable ladies standing outside the shoppe, deciding whether or not to go in .  

Paint three miniature dress forms with a pink chalk paint and add white antiquing cream to give it a shabby chic look.  Adhere inside the box, as shown.


Paint a miniature bookplate with the pink chalk paint, adding white antiquing cream around the edges and a line of minature pearls.  Computer generate La Mode Shoppe (The Fashion Shoppe) onto a scrap of print paper and place in the center of the bookplate.  Adhere to back of box.


Glue four cone-shaped metal beads to the bottom  for legs.  A scrap piece lace was glued inside the box, just above the window, to represent  a window valance.  Pretty posh, huh?

And a here are a couple of side views.  I just love those texture sheets. They really add to the piece, giving such cool texture, don't you think? 


Supplies used:

Mini House Shadowbox 1
Windows 4 Panel
Art Deco Corner Set
Dressforms 1 Miniature Shape Set
Texture Sheet Flourished
Texture Sheet Diamonds
Miniature Bookplates Shape Set
Graphic 45 Ladies' Diary 8x8 paper pad
Chalk Paint
White crackle paint
Clear crackle glaze
White antiquing cream
Distress inks
Pearls
Lace

I hope you are enjoying my "series" of mini house shrines.  I've got two more to go, so I hope you will come back and check out my next one.  I don't know what I am going to do yet, but I hope to inspire you, nonetheless.

Thanks for stopping by!

Have a wonderful and creative weekend!!

Barbara

Monday, February 22, 2016

Fairy Cards with Altered Pages and Faerie Song

Hello everyone!  Barbara here today.  I hope your week is off to a good start.  I have a couple of cards to share again, using these wonderful rubber stamps from our partner, Faerie Song Art Stamps.  I think you will find that these stamps work wonderfully together with Altered Page's products!  


Castle in the Forest Card:


I first stamped the Castle in the Forest image onto one of the Collage Background I images with Vintage Sepia ink.  The image fits perfectly, as you can see below.  Of course, if you get the digital collage images, you can resize them to whatever size you need.


After stamping, I trimmed around the image to fit an A2 size card that I made from pink card stock.  I always use my Scor Pal to make the center fold crease for crisp folds.  I also cut a piece of the Adhesive Corrugated kraft card slightly larger than the stamped image.  

I resized and fussy cut the fairy image to fit onto my forest scene.


Before adhering the layers to my card with the Double Side Tape Mini, I edged the stamped image first with the leather mixed media ink, then again with the gold Delicata ink.  When you do them together, the brown tones down the gold and makes it more antique looking.  Love that look.


Lastly, I computer generated the phrase I found on the internet, punched it out and adhered to the card.

"A rustle in the wind
reminds us a fairy is near!"

I had some gold leaf trim sitting on my desk so I added that with Aleene's Tacky Glue.  

Bryony Fairy Card:


For this card, I again used my Scor Pal to make a blue folded A2 size card.  I cut a piece of print paper from the Botanical Odyssey paper pad and edged it with the Leather ink, then the gold, just as I did in the first card.

Bryony was stamped onto white card with Versafine black ink and colored using Gelatos with a water brush.  These paints are so creamy and nice, and so very easy to use.  After I die cut the image into a nice shape, I also edged it with the same inks as before.  I adhered it with Adhesive Dimensionals.

I fussy cut a butterfly from another sheet from the Botanical Odyssey paper and adhered it, along with some pretty Assorted Flowers.  

Shimmer was added to the wings of all fairies and butterflies.

Altered Pages Supplies:

Collage sheets:  Little FairiesCollage Background I
A2 Cards
Kaisercraft Paper Pads (Botanical Odyssey)
Wink of Stella Glitter Pens
Adhesive Corrugated
Assorted Flowers
Versafine Ink (Vintage Sepia, Black)
Delicata gold ink pad
Mixed Media Salazar Inkx (Leather)
Ranger Blending Tools
Gelatos
Water brushes
Aleene's Tacky Glue
Adhesive Dimensionals
Double Side Tape Mini
Scor Pal

Other supplies used:

Faerie Song Art Stamps:  BryonyCastle in the Forest
Blue, Pink, Ivory card stock
Trim

Die cut shapes


I hope you enjoyed today's projects and will pop on over to Faerie Song Art Stamps to check out their wonderful selection of stamps.  And be sure to check out all the new products arriving at Altered Pages.  

Have a wonderful and very creative week!

Barbara