Showing posts with label Black Hole Art Studio. Show all posts

Friday, March 2, 2018

Mixed Media Backgrounds for Cards with ColourArte Powdered Pigments

Hi everyone!  Barbara Rankin here today with another video creator tutorial for ColourArte.  Today I want to make a couple of pretty backgrounds using some mixed media and the beautiful ColourArte Primary Elements powdered pigments.  I'll also show you how to make your own watercolors with the powdered pigments and ColourArte's The Solution Acrylic Wash Medium.

Enjoy the video tutorial.


ColourArte Supplies Used:

Primary Elements Artist Pigments
  Teal Zircon
  Kiwi
  Snap Dragon
  Sunburst
  Emperor's Gold
The Solution Acrylic Wash Medium

Other Supplies Used:

Strathmore Acrylic 9x12  Paper Pad
Card stock (Gold Foil, Purple, Lagoon, Dark Lagoon, Off White)
The Crafter's Workshop TCW431s Mini Ripples Stencil
Golden Light Molding Paste
Spray bottle with water
Ranger Mini Mister with water
Krylon 18ct. Gold Leafing Pen
Krylon Workable Fixatif (spray)
Krylon Crystal Clear Acrylic Coating (spray)
Ranger Tanzanite embossing powder
Versamark ink pad
Flourish Hearts chipboard texture sheet (Gypsy Soul Laser Cuts)
Tim Holtz Quote Chips
Wooden laser cut elephant
Wooden bird cutout

Card Layers Measurements:

Off-White card base -10"  x 7" (folded in half to make 5"x7" card)
Dark Lagoon card stock - 4-3/4" x 6-3/4"
Gold Foil  and Light Lagoon card stock - 4-1/2" x 6-1/2"
Acrylic Paper mixed media background - 4-1/4" x 6-1/4"

I hope you enjoyed the video and are inspired to play with your paints and papers and mediums to make some fascinating backgrounds to use in your card making, your canvas art, your scrapbook layouts, or any way you choose.  

Thanks so much for stopping by, and have a wonderful, crafty day!

Barbara

Friday, September 1, 2017

ColourArte VIdeo Tutorial: 3D Mixed Media Canvas

Hi everyone!  Today I have a mixed media canvas video tutorial to share using ColourArte's Silks Acrylic Glazes.  This canvas is inspired by the very talented Finnabair.  I learned so much from her and I hope you will be inspired by my interpretation.


CLICK HERE TO SUBSCRIBE TO MY CHANNEL

ColourArte Supplies Used:
Silks Acrylic Glazes
  Pixie Pink
  Apple Blossom
  Sunflower
  Mediterranean Blue
  Jasper Red
Radiant Rain Dauber
  Solar Gold

Other Supplies Used:
Liquitex white gesso
Golden Polymer Medium (Gloss)
3D Gloss Gel (Transparent)(Finnabair)
AP-302 Chubby Cheeks collage image (www.alteredpages.com)
MicroGlaze (Judi-kins)
Tim Holtz Ornate Frame #2 Bigz die (Sizzix 661195)
Black chipboard
Recollections printed tissue paper (keys) (script)
Metal embellishments (Prima, Tim Holtz)
Flowers (Petaloo)
Clear glue (Paper Studio)
Beadazzles beads (Macarena)(Suze Weinberg)
Aleene’s Fast Grab Tacky Glue
Black Soot distress ink
Ink Blending Tool

Thanks so much for stopping by, and have a wonderful, crafty day!


Barbara

Friday, August 4, 2017

Part Two - Finishing Acrylic Poured Canvas with ColourArte

Hi everyone.  Today I am sharing the second part of my acrylic poured canvas video tutorial in which I did a lot of manipulating and experimenting with pouring products and, of course, ColourArte.  You can CLICK HERE to see that first video.  

The canvas has completely dried since taping of that video, and here are photos of how it looks now.


Although I did not get very many cells in this pour, I still thought it was pretty, but not quite pretty enough to stand on its own as a piece of abstract art.  So, I decided to use it as my background for an assemblage piece.  In the second part of this project video tutorial, I will show you how I finished the piece and hopefully saved it from trash can.  I hope you will gain some inspiration from my second part of this video tutorial here.  


CLICK HERE TO SUBSCRIBE TO MY CHANNEL

ColourArte Supplies Used

Vivid Ultra Metallics
  True Metals Dragon Gold
  True Metals Autumn Flame
  Solar Gold
  Pink Azalea
  Teal Zircon
  African Jade
  China Black
  Sunflower
  Bolivian Blue
Radiant Gels Dimensional Paint
  Copper Pearls

Other Supplies Used

Golden Light Molding Paste
DecoArt Media White Crackle Paste
Gyspy Soul Laser Cuts Diamonds Texture Sheet
Sizzix 656562 Key & Keyhole Bigz Die
Black Chipboard
Graphic 45 metal brads
The Crafter’s Workshop TCW380s Mini
  Grandma’s Doily stencil
Krylon Crystal Clear Coating spray
Ranger Blending Tool
Kanban Flight of the Butterflies paper collection
Frayed Burlap distress ink

I hope you enjoyed today's project, and I am always pleased to have you stop by.  Thanks so much for watching, and have a super day!

Barbara

Friday, July 21, 2017

Some Acrylic Pouring Fun with ColourArte Vivid Ultra Metallics

Hi everyone!  Today, I want to share my first acrylic pour using ColourArte Vivid Ultra Metallics.  If you've been here before, you know how I like to experiment, and so this video will do just that.  I decided to try playing with the pour to see what may or may not work.  I hope you will join me for this "adventure".  


Supplies Used:
ColourArte Vivid Ultra Metallics
  Bolivian Blue
  African Jade
  Lemongrass
  Pink Azalea
  Solar Gold
Americana Lamp Black acrylic paint
8"x8" canvas
Flood Floetrol 
3-in-1 All Temp Silicone
Silicone brush (Prima)
Aluminum foil roasting pan (Dollar Store)
Push Pins

I hope you enjoyed my project today.  I would love to hear what you think, and if you have any questions, please leave me a comment below.  I will check in and try to answer them.

Thanks for stopping by, and have a super day!

Barbara

Saturday, May 20, 2017

How to Make an Acrylic Skin for Jewelry Making

Hi everyone!  I just wanted to take a moment to share my newest video tutorial using ColourArte's Vivid Ultra Metallics to make a marbelized acrylic skin to use in a bezel for a beautiful necklace, but it doesn't stop there.  These skins can be used in a wide variety of mixed media and art applications and sized to your needs.


See how easy it is to make!


I hope you  enjoyed my project and video.  If you liked it, I would really appreciate a thumbs up, and comments are always appreciated.  If you would like to see more videos like this, please consider subscribing to my YouTube channel.


ColourArte Supplies Used:
Vivid Ultra Metallics:
  Bolivian Blue
  Solar Gold
  Teal Zircon
  Jasmine
  Snap Dragon
  Wine & Roses
  Siam White
  China Black

Other Supplies Used:
1" square Silve Bezel
Golden Polymer Medium (Gloss)
Clean Water
Mini Cups for Mixing
Food skewers or craft sticks (for stirring)
Pin or Needle
Craft Mat
Ice Resin

As always, thanks for stopping by, and remember to take time to play!

Barbara

Thursday, May 11, 2017

Rusty Steampunk Altered Notebook Tutorial

Hi everyone!  Barbara here again with another fun project using Gypsy Soul Laser Cuts.  I found this inexpensive little hardback notebook in the $1.50 bin of my local craft store.  I am always making notes of things I want to create, or things I want (need) to do, and so, a notebook with a hard cover is the perfect substrate to add layers chipboard embellishments.

This is my finished "Bright Ideas" notebook, hence, the light bulb, which suggests that there just might be some good ideas hiding inside this little book.  And, as you can see, it is rusty and very Steampunk!  So scroll down for more information on l how I made this rusty, crusty and dusty cover using Andy Skinner's rust technique with and a few added products for even more crustiness.


Cut two pieces of paper to measure 4-3/4" x 7-1/8" for this particular book.  If your book is a different size, cut the paper slightly smaller than the front of the book, without covering the spine.   Adhere the paper to the front and back of the book.


I cut the gears texture sheet apart, leaving the top and left edges straight to line up against the edge of the book.  The bottom edges were cut more randomly between the gear shapes. 


Adhere this piece to  the top of the book, a shown.


Arrange and adhere the chipboard pieces to your liking.  I layered some of the gears, clock hands, and propellers for added depth and dimension.


Paint front and back of book with a wash of white gesso.  Remove some of the gesso from the script paper with a damp paper towel if you want to see more of the print show through.  Place a piece of paper between the book covers and the pages to protect them during this process. Let gesso dry.
front cover


back cover
Spread splotches of texture sand paste randomly over the chipboard and open areas of the book cover.  Let dry.


front cover

Turn book over and spread modeling  paste through gears stencil.  Let dry.


back cover

Let modeling paste dry.  This is how your back cover will look.
back cover

Paint front and back covers with a wash of Paynes Grey + water.  In the photo of the front, you can see the gritty texture left by the texture sand paste.


front cover

The back cover shows the stenciled gears and the texture sand paste I added after painting.  I simply used my finger to apply a very thin, random coat over the background.  Let paste dry.


back cover

Paint both front and back cover with a wash of Quinacridone Gold and let each side dry.  Then paint both sides again with the Quinacridone Gold direct from bottle for a deeper tone.  Let dry.


front cover

back cover
Add highlights by painting covers with Translucent Yellow Iron Oxide, concentrating on the sanded sections.  This adds a really subtle color variation.  


front cover


back cover


Next, add splotches of Titan Buff randomly over covers by applying with finger and very little paint.  Let dry.


Apply Cobalt Teal Hue in the same fashion as previously done with Titan Buff.  Let dry.


Now apply a wash of the Quinacridone Gold + water over the entire cover, front and back. This will tone down the colors and make them look more grungy.


Apply small amounts of Rusty with finger, just hitting high spots and edges very randomly.


Highlight high spots and edges with Rose Quartz Treasure Gold.  Use sparingly and apply with your finger.


Shade chipboard pieces with a slightly watered down Paynes Grey, allowing the paint to collect in the nooks and crannies.  Glue metal letters "Bright Ideas" along the left edge of front cover, as shown.


Repeat shading process on back cover with slightly watered down Paynes Grey, allowing the paint to collect in the nooks and crannies.


Finish off inside covers by adhereing print scrapbook paper of your choice to the inside, as shown.


Supplies Used:

GSL Steampunk Lightbulb Set
GSL Texture Sheet Gears 6x6
GSL Steampunk Shape Set
GSL Gears Shape Set
GSL Propellers
Hardback note book (5"x7")
7Gypsies print papers
White gesso (Liquitex)
Mixed Media Adhesive (Derivan) (or any white glue or gel medium)
Light Molding Paste (Golden)
Texture Sand Paste (DecoArt)
DecoArt Media Fluid Acrylic Paints 
  Quinacridone Gold
  Transparent Yellow Iron Oxide
  Paynes Grey
  Titan Buff
  Cobalt Teal Hue
Rust Effect Paint (Viva Décor)
Rose Quartz Treasure Gold metallic wax
Metal Embellishments (from my stash)

I hope you enjoyed my remake of a fairly non-descript notebook into something  you just might want to record your "Bright Ideas" for posterity.  Of course, if Steampunk is not your thing, I would suggest that you check out the Gypsy Soul Laser Cuts online shop to see the wonderful selection of chipboard in just about any theme you can imagine.  Make it your own!

Thanks for stopping by, and have a great day!

Barbara

Thursday, April 27, 2017

Oriental Trinket Box with Gypsy Soul Laser Cuts

Hi everyone!  Barbara here on the Gypsy Soul Laser Cuts blog today.  I love this Treasure Chest, and had so many ideas running through my head.  I finally settled on an oriental theme.

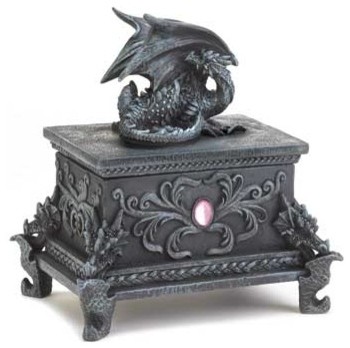
And here is my finished Black Dragon Treasure Chest   I'm on the lookout for some small but really cool feet for it.  Until then it will go without feet, but it still looks pretty good, nonetheless.


This was my inspiration piece:


Black Dragon Treasure Box


1.  Assemble bottom of chest.  Set aside to dry.


bottom of chest pieces


2.  Assemble top.  Adhere glue to center cut out piece only...


top pieces


... and lay border and center cut-out rectangular piece on top of solid piece, using the border to help center the cut out rectangular piece. 


Remove border.


Flip top over and put glue on border...


... and adhere to top, as shown.  Set aside to dry.


3.  Turn bottom of chest over and add glue.


Bottom of chest with slightly larger chipboard piece (left)


Center and glue bottom of chest to slightly larger chipboard piece, as shown.  Set aside to dry.


4.  Place box top on box to check fit.


Glue chipboard strips around box bottom and top edges, as shown.  Remove top to make sure the pieces are tight up against the top edge.  Add clips to hold in place, if needed.


5.  While bottom is drying, start painting the lid and two dragons with black chalk  paint.  Paint both sides of the top as well as the two dragons.  Set aside to dry.


6.  Paint box bottom with the black chalk paint, inside and out.  Set aside to dry.


7. Mark the center of two pieces from the Punch Elements Deco set by drawing a pencil line from the points shown in the photo.  Punch hole where the "X" crosses and use that as a template to mark the second piece.  Paint the two pieces with the black chalk paint, as well as the corresponding circles.  Don't punch holes in the circle pieces because they are going to be used behind the elements to level them when we glue them down.


8.  Dry brush all pieces with Cascade chalk paint, or any color that looks like a blue patina. 


Remove most of paint from stencil brush onto paper towel
before dry brushing pieces 


9.  Glue black lace around top and bottom of the box bottom.


10.  Dry brush the lace with Cascade chalk paint, or whatever you used to dry brush your box.


11.  Glue a second circle to the painted one.  Insert butterfly embroidered fabric brad through deco element and add two brass pieces to each side, as shown.


Find the center of the box side and glue the double thick circle to the box.


This will give you a level area to glue the deco element.  You may need to clamp in place while it dries.


12.  Glue two dragons onto top, as shown.  Let pieces dry before handling.  A quick grab tacky glue works well at keeping the dragons upright while drying.


13.  Add more metal embellishments to the sides and top, as shown.  


Supplies Used:

GSL Treasure Chest
GSL Dragons Shape Set
GSL Punch Elements Deco
Chalk Paint (Black, Cascade)
Metal embellishments
Black lace
Butterfly embroidered fabric brad (Paper Studio)
Assorted Brushes
Quick Grab Tacky Glue
Stencil brush
Assorted paint brushes

I hope you enjoyed my project today.  If you see something online that inspires you, why not give it a try to emulate it, as I have done with this Black Dragon inspired chest.  Gypsy Soul Laser Cuts has a huge line of chipboard for you to work with, so go check it out and see what catches your fancy!!!

Thanks so much for stopping by, and always take time to play!

Barbara