Showing posts with label Tim Holtz. Show all posts

Thursday, September 27, 2018

Wicked Halloween Explosion Box with Gypsy Soul Laser Cuts

Hi everyone!  I hope your week is going well, and I have just one question … are you ready for Fall?  I sure am!  So today, I wanted to share a fun project using Gypsy Soul Laser Cut's Double Explosion Box. 


There are three boxes (upper left) and two lids (lower right).


Run a strip of washi tape over score lines on outside of box, as shown.  Fold box up to allow tape to stretch, then lay it flat again. 


Cut four pieces of floral print paper a scant less than 3" square to fit around the outside of the large box.  Distress the edges with Black Soot Distress Ink (DI) and run through your Xyron 3" sticker maker, or use whatever adhesive you have on hand. 


Adhere pieces to box sides, as shown.  Cut one piece of script paper a scant less than 3" square to fit the bottom of the large box.  Repeat distress inking the paper before applying the adhesive.  


Glue to box as shown.  Do not cover fold lines.


Repeat process for inside area of base box using harlequin paper.  


Cover center of box with damask print paper, as shown.


Cover the score lines with washi tape, as before.  Cover the box lid with flocked dots paper, as shown.  Do not cover the fold lines with the paper.  Distress the paper edges with black soot DI.  Leave tabs free to add glue for assembly.

Add glue to the box top tabs and glue lid together. Let glue dry, then cover inside with flocked damask paper, as shown.


Here is what the lid looks like when placed over the explosion box pieces.


For next smaller box, cut five pieces of script paper a scant less than 2-1/2" square and adhere to inside box, as shown.


Cover scored edges of box bottom with washi tape, as shown, and repeat process by folding sides up to stretch tape.  Lay box flat.

Cut four pieces of striped paper a scant less than 2-1/2" square and adhere to outside of box, as shown.  Add glue to center bottom of box, as shown.


Adhere to center section of larger box base, as shown.


Cover outside only of smallest box and lid, as shown.


Glue the bottom box to the center of the explosion box, as shown.  (NOTE:  It was not necessary to cover the bottom of this box since it is being glued down).


Mark an "X" on the inside of  the lid, and use a craft knife to cut an "X" in the center.  Use an awl to start and enlarge the hole in the center, as shown.


Insert a small battery-operated tea light into the hole in the lid opening, as shown.


When you are ready to turn on the tea light, you can do so easily by opening the box lid and turning the on/off switch.  You can also change the batteries easily, too.  The purpose of this box is only to house the tea light.


Paint four 5mm wooden balls with Smokey Quartz glitter paint, let dry. 


Adhere wooden balls to bottom of large box, as shown.


Paint spider web corners, spider, raven, mouse, black cat, BOO!, and scrap of chainlink panel with black paint.  Let that coat dry, then paint pieces with black glitter paint.  


Adhere two corner spider webs to middle box, as shown.  Only add glue to outer edge of web to allow it to serve as a pocket so you can insert bits of ephemera or tags, etc.  On remaining two flaps, add black German Dresden border strip, gluing only the edges to serve as a band to hold more ephemera.  I added a tiny piece of mummy cloth around the tea light bulb to add some texture.


Cut four strips of orange webbing ribbon to 3".  Distress the webbing with Vintage Photo DS, let dry.


Make four coffin shaped tags to fit the largest box flaps, which is 3".  Decorate the front with stamped and fussy cut images.


On the reverse, add labels cut from one of the papers in the Halloween stash pad and adhere to the back of each coffin tag.


Adhere the orange webbing pieces to the outer flaps, adhering only along the sides.  Add labels over the webbing, as shown.  Insert coffin tags beneath webbing to hold in place.


Continue adding ephemera, as shown.  Slip pieces beneath corner spider webs and the Dresden borders.  Glue metal apothecary mask over tea light bulb.

Tea light off

Tea light turned on

Close box up and add Zombie hand to box top with tiny bit of moss around it.  Place "BOO!" iside hand, as shown.  Run black trim around the box top, tie a knot at the front corner, and add Wicked token to trim.  Finish decorating the outside panels with the remaining chippies ... cut chickenwire panel into smaller pieces and adhere to each side with either the mouse, the raven, the spider, or the cat.   See photos below for placement.


Supplies Used:

GSL Double Explosion Box
GSL Chainlink 8 by 8 Inch Panel
GSL Spiders and Webs (coming soon)
GSL Creepy Critters
GSL Spooky Shape Set
Xyron 3" Sticker Maker
German Dresden Border (Black)
Tim Holtz Halloween Stash 8x8 paper pad
Tim Holtz Halloween Trimmings
Tim Holtz Halloween Tokens
Tim Holtz Halloween Design Tape
Tim Holtz Halloween Mummy Cloth
Tim Holtz Halloween Zombie Hands
Tim Holtz Black Soot Distress Ink
Tim Holtz Vintage Photo Distress Stain
Recollections 520886 Halloween Clear Stamp and Die Set
VersaFine Vintage Sepia ink pad
Black Archival ink pad
Black acrylic paint
Martha Stewart Black glitter paint
Martha Stewart Smokey Quartz glitter paint
White glue
Wooden small round beads (ArtMinds)

Well, thanks for sticking with me again.  If you made it to here, you got to see all the fun pictures and cool Halloween ephemera.  I have to admit, this is my favorite time of year.  I love making Halloween items, and I hope I've inspired you to check out the really cool stuff in the Gypsy Soul Laser Cuts online shop.  And don't forget to check out the blog, too.  There is tons of inspiration from the rest of the fabulous design team.

Thanks so much for stopping by, and have a super crafty week!

Barbara

Friday, March 2, 2018

Mixed Media Backgrounds for Cards with ColourArte Powdered Pigments

Hi everyone!  Barbara Rankin here today with another video creator tutorial for ColourArte.  Today I want to make a couple of pretty backgrounds using some mixed media and the beautiful ColourArte Primary Elements powdered pigments.  I'll also show you how to make your own watercolors with the powdered pigments and ColourArte's The Solution Acrylic Wash Medium.

Enjoy the video tutorial.


ColourArte Supplies Used:

Primary Elements Artist Pigments
  Teal Zircon
  Kiwi
  Snap Dragon
  Sunburst
  Emperor's Gold
The Solution Acrylic Wash Medium

Other Supplies Used:

Strathmore Acrylic 9x12  Paper Pad
Card stock (Gold Foil, Purple, Lagoon, Dark Lagoon, Off White)
The Crafter's Workshop TCW431s Mini Ripples Stencil
Golden Light Molding Paste
Spray bottle with water
Ranger Mini Mister with water
Krylon 18ct. Gold Leafing Pen
Krylon Workable Fixatif (spray)
Krylon Crystal Clear Acrylic Coating (spray)
Ranger Tanzanite embossing powder
Versamark ink pad
Flourish Hearts chipboard texture sheet (Gypsy Soul Laser Cuts)
Tim Holtz Quote Chips
Wooden laser cut elephant
Wooden bird cutout

Card Layers Measurements:

Off-White card base -10"  x 7" (folded in half to make 5"x7" card)
Dark Lagoon card stock - 4-3/4" x 6-3/4"
Gold Foil  and Light Lagoon card stock - 4-1/2" x 6-1/2"
Acrylic Paper mixed media background - 4-1/4" x 6-1/4"

I hope you enjoyed the video and are inspired to play with your paints and papers and mediums to make some fascinating backgrounds to use in your card making, your canvas art, your scrapbook layouts, or any way you choose.  

Thanks so much for stopping by, and have a wonderful, crafty day!

Barbara

Friday, February 16, 2018

How to Decorate Eileen Hull's Journal Cover with Mixed Media Techniques

Hi everyone!  We all love Sizzix dies, and this journal die from Eileen Hull is ever so popular.  So, I will be decorating this cover using some of my favorite mixed media techniques.  If you are new to mixed media, I have a fairly short video tutorial with step-by-step directions to help you along the way. 


I hope you will subscribe to my channel to help me meet the new You Tube video requirements for smaller channels, like mine.  


CLICK HERE TO SUBSCRIBE TO MY CHANNEL

ColourArte Supplies Used:

Vivid Ultra Metallics
  African Jade
  True Metals Autumn Flame
  Teal Zircon
  Royal Orchid
  Siam White
  Ginger Peach
  Mango Freeze
Radiant Rains Daubers
  Egyptian Gold

Other Supplies Used:
Sizzix/Eileen Hull Journal Die
Sizzix/Tim Holtz Layered Bee Die
Sizzix/Tim Holtz Regal Crest Die
Sizzix/Tim Holtz Honeycomb On The Edge Die
Sizzix White Scoreboards or mat board
Tim Holtz Honeycomb stencil
Dylusions Letter Jumble stencil 5x8
Black chipboard
Xyron 3" sticker maker
Graphix .020 craft plastic
Versamark ink  pad
Stampers Anonymous G3-1074 "Trust Your Crazy Ideas"
  wood mounted rubber stamp (Tim Holtz)
Ranger Archival Black ink pad
Ranger Eucalyptus Stickles
Ranger Black Enamel Accents
Ranger Glossy Accents
Ranger foam blending tools
WOW Silver Pearl embossing powder

Thanks for stopping by, and have a wonderful, crafty day!

Barbara 

Friday, January 5, 2018

Discover Your Dreams 2018 Art Journal Page with ColourArte

Hi everyone!  I hope you had a wonderful holiday and that you're ready to start the new year off right.  So, today, I will be working in my art journal again, and what better resolution for the new year than to "Discover Your Dreams".  I'm sure this is a resolution that will not only be fun,  but also one we can keep.  

A complete step-by-step project video for you to follow and/or enjoy!  


CLICK HERE TO SUBSCRIBE TO MY CHANNEL

ColourArte Supplies Used:
Vivid Ultra Metallics
Blue Flame
Mallard Green
Mandarin Blush
Burnt Umber
Radiant Gels Dimensional Paint
Emperor's Gold
Other Supplies Used:
Strathmore 9"x12" Mixed Media Visual Journal Page
Liquitex White Gesso
Liquitex Matte Medium
DecoArt Media White Modeling Paste
Sizzix/Tim Holtz Weathered Clock die
Sizzix/Tim Holtz Tick Tock die
Sizzix/Tim Holtz Broadway die (2018)
DCWV The Natural Matstack
Tim Holtz Lost & Found 12x12 Paper Stack
Tim Holtz Big Chat Stickers
Art Anthology Lotus 6x9 Stencil
Faber-Castell Big Brush Pens
Warm Grey
Nougat
Cobalt Teal
White Gel Pen
Copper Brads
Xyron 1.5" Sticker Maker
Aleene's Tacky Glue
Collage Glue Stick (Ranger)
Screen Wire scrap
Vegetable bag scrap
Various spatulas and brushes

Thanks so much for stopping by, and I want to wish each and every one of you a very happy and most prosperous New Year!

Barbara

Thursday, June 8, 2017

Father's Day Cards with Gypsy Soul Laser Cuts

Hi everyone!  I'm sure that, by now, you know that Father's Day is just around the corner, and if you need some ideas for those masculine type cards to make, I hope this tutorial will help inspire you.  Here are the two cards I made that I think would be suitable for any of the men in your life.


***************************************************************
Card 1

Card 1: Adhere a slightly smaller piece of print paper (Off to the Races) to the front of a 5"x7" kraft card.  (Optional:  Distress and ink edges before adhering to card front).


Use the 3"x4" notecard (Cigar Box Secrets) to measure the distance to cut through the 4"x6" notecard (Cigar Box Secrets).


Draw a line between the two marks with a pencil.  Punch a 1/8" circle at the sides where the lines intersect, then use a craft knife to slice the straight opening along the straight line between the two holes.  Erase pencil lines.


Place 3"x4" notecard into slot.


Turn 4"x6" notecard over and trace around 3"x4" notecard on reverse.  


At this time, you can distress and ink the edges of the 4"x6" notecard only before adhering to the card front.  Note where the glue has been applied.  The pocket area needs to be free from glue.


Adhere 4"x6" notecard to lower right of card front.


Round corners of  3"x4" notecard and slip into pocket.  Make two rosettes using the red print Graphic 45 paper and adhere to upper left corner of card.  Use a pop dot to lift the smaller rosette so it will sit slightly atop the larger one.


Choose four Gears and one of the Horses to alter.  The horse was inked with Vintage Photo and Fossilized Amber Distress Oxides.  The gears were inked with Versamark ink and heat embossed with Hammered Metal (left) and Charred Gold (right).


The horse's legs were  glued to the top portion of the pocket opening on the 4"x6" notecard only, leaving the 3"x4" notecard free to move up and down.  The gears were glued to the rosettes, while two gears were layered and adhered next to the rosettes, as shown.

Pull the 3"x4" notecard out of the pocket and use a repositionable glue dot to adhere your gift card to the reverse side.


Stamp a sentiment on the front of the notecard.  I used "just for you" for this card. 


Place notecard with gift card inside pocket and send your "gift" card on it's way.


On the inside, add a scrap of the G45 paper to the inside with a border strip, and stamp "Dad" with Versamark and heat emboss with champagne embossing powder.


***************************************************************
Card 2

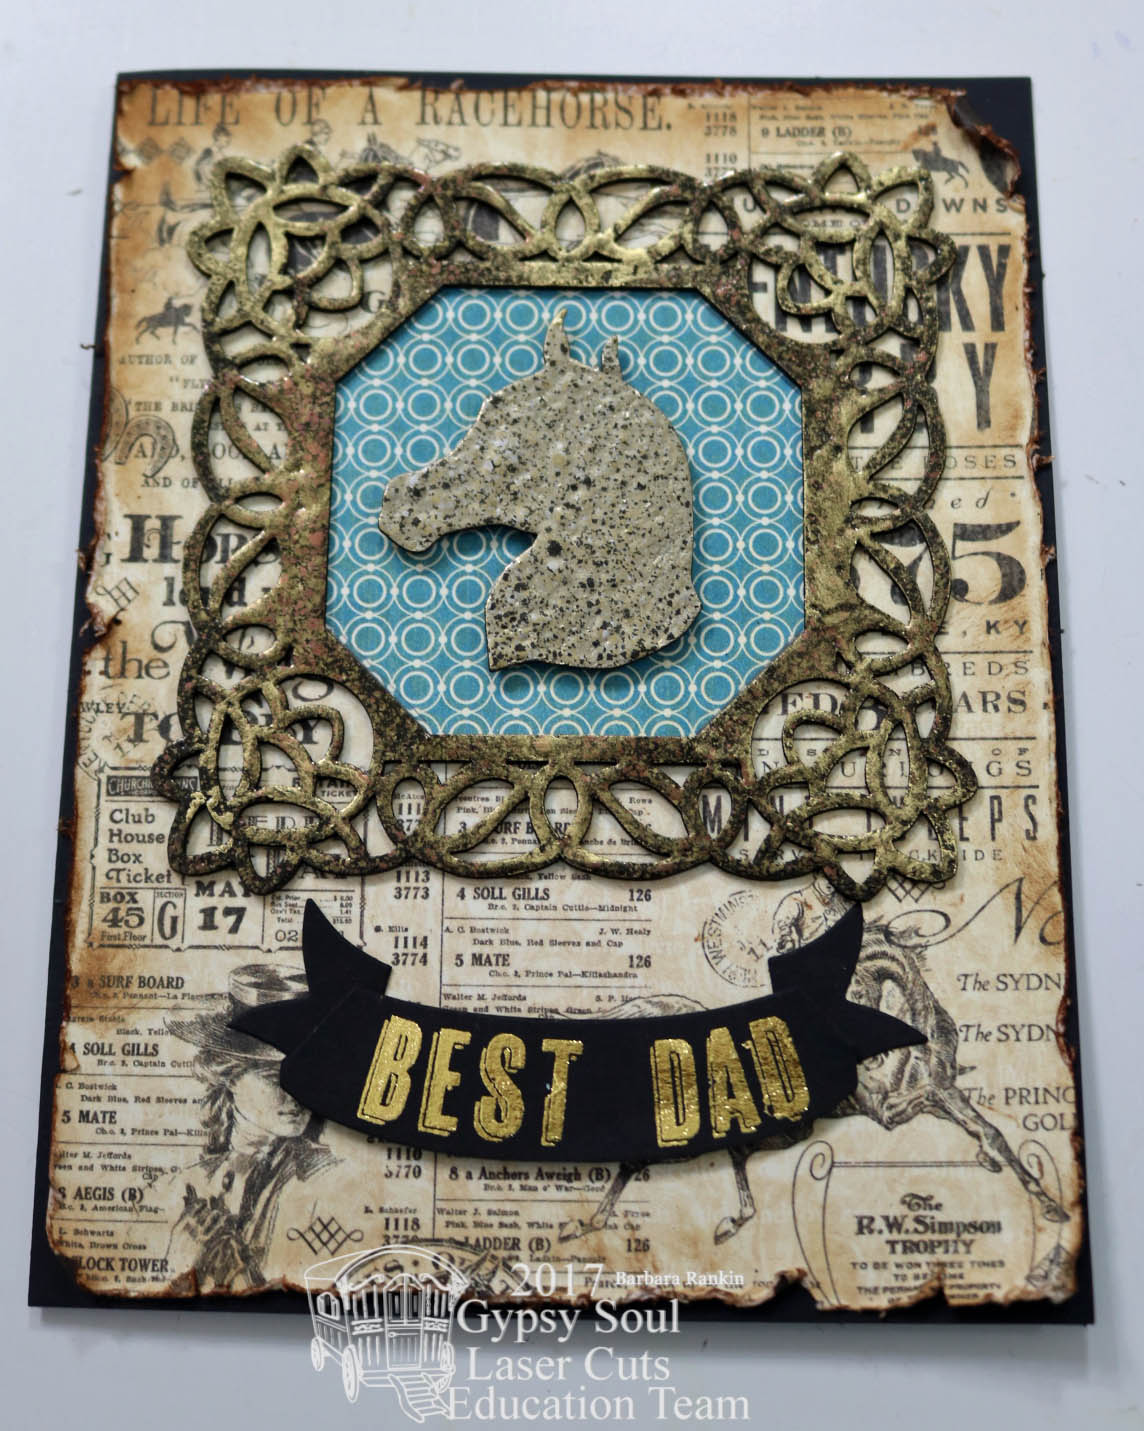
Card 2: Adhere a slightly smaller piece of print paper (Off to the Races) to the front of a 5"x6-1/2" black card.  (Optional:  Distress and ink edges before adhering to card front).  


Ink Flourished Frame Valerie Square with Versamark ink and heat emboss with Burnt Copper Leaves embossing powder.  


Trace around frame onto a piece of blue print paper (Off to the Races) and cut to fit inside frame.  


Adhere to back of frame opening, then adhere both to top half of card front.


Ink Horse Head with Versamark ink and heat emboss with Charred Gold embossing powder.  Adhere to center of frame opening with foam dots.


Die cut a banner from black card stock.  Use gold rub-ons to spell out "BEST DAD".


Fold ends of banner, place foam dots in center and glue at ends, as shown.


Adhere to bottom of card beneath frame.


Since the gold letters were so bright, I added touches of gold metallic paste to some areas of the frame to brighten the frame to match.


For the inside, stamp "Happy Father's Day" with Versamark ink and champagne embossing powder.  Cut around image and adhere to a scrap of the G45 paper that has been cut slightly smaller than the front of the kraft sack (envelope).


Adhere craft sack to center of card inside, and insert your gift card.  


Supplies Used:

GSL Horses Shape Set
GSL Gears Shape Set
GSL Flourished Frame Valerie Square
Graphic 45 Off to the Races papers
Prima Cigar Box Secrets papers
Kraft card (5"x7")
Black card (5"x6-1/2")
Black card stock scrap
Tim Holtz Distress Ink (Vintage Photo)
Tim Holtz Distress Oxides (Vintage Photo, Fossilized Amber)
Tim Holtz die (Regal Crest) 
Tim Holtz Gilded Alpha remnant rubs
Allure Embossing Powders (Charred Gold, Hammered Metal, Burnt Copper Leaves)
Pearlustre Champagne embossing powder
Versamark ink pad
Dad rubber stamp (Inkadinkado)
Mini Craft Sacks (2.5" x 4") (Paper Studio)
3D Foam Squares 
Happy Father's Day stamp (PSX)
Just for You stamp (Hero Arts)

I hope you enjoyed the project today, and be sure to check out the GSL shop.  Another fun set to consider for your male cards is the GSL Miniatures Shape Set - Guy Thing.  It contains lots of vintage style male type laser cuts, giving you even more choices.  

Thanks for stopping by, and have a great day!

Barbara