Showing posts with label Eileen Hull. Show all posts

Friday, February 16, 2018

How to Decorate Eileen Hull's Journal Cover with Mixed Media Techniques

Hi everyone!  We all love Sizzix dies, and this journal die from Eileen Hull is ever so popular.  So, I will be decorating this cover using some of my favorite mixed media techniques.  If you are new to mixed media, I have a fairly short video tutorial with step-by-step directions to help you along the way. 


I hope you will subscribe to my channel to help me meet the new You Tube video requirements for smaller channels, like mine.  


CLICK HERE TO SUBSCRIBE TO MY CHANNEL

ColourArte Supplies Used:

Vivid Ultra Metallics
  African Jade
  True Metals Autumn Flame
  Teal Zircon
  Royal Orchid
  Siam White
  Ginger Peach
  Mango Freeze
Radiant Rains Daubers
  Egyptian Gold

Other Supplies Used:
Sizzix/Eileen Hull Journal Die
Sizzix/Tim Holtz Layered Bee Die
Sizzix/Tim Holtz Regal Crest Die
Sizzix/Tim Holtz Honeycomb On The Edge Die
Sizzix White Scoreboards or mat board
Tim Holtz Honeycomb stencil
Dylusions Letter Jumble stencil 5x8
Black chipboard
Xyron 3" sticker maker
Graphix .020 craft plastic
Versamark ink  pad
Stampers Anonymous G3-1074 "Trust Your Crazy Ideas"
  wood mounted rubber stamp (Tim Holtz)
Ranger Archival Black ink pad
Ranger Eucalyptus Stickles
Ranger Black Enamel Accents
Ranger Glossy Accents
Ranger foam blending tools
WOW Silver Pearl embossing powder

Thanks for stopping by, and have a wonderful, crafty day!

Barbara 

Thursday, September 15, 2016

Gift Box with Craftwell USA eBrush and Sizzix

Hi everyone!  Barbara here with a fun little project, perfect for gift giving.  Of course, to finish it off, I will be using my Craftwell eBrush,  along with some other products from the Craftwell USA line.  Aside from the fact that Christmas is just around the corner, and boxes of all sizes will be needed, I also have quite a few birthdays in September.  So, why not get started now, whether for birthday giving or Christmas.  Boxes are always needed.


I die cut this box from one of  Eileen Hull's Sizzix ScoreBoards XL Dies.  I had previously done some stamping on it but never finished it.  So I painted it with a coat of white gesso.  You can still see some of the stamping, but that will just add to the layers.  


I put the box together without glueing it so I could pencil in directional arrows.  Although I did not need to do that for this project, it is always a good idea to figure that out before decorating the box, particularly if you decorate it while it is flat.  


I used a non-directional stencil and spread some texture paste through it without concern for covering the sides completely.  I used post-it notes to cover the flaps that will be glued to the inside so the stenciling would not interfere with the box closure.  Let the paste dry before proceeding.  


When the paste was dry, I began giving the piece its color.  I began with this green-yellow marker.  I left some white areas for the following colors.


Next, I used the medium green marker, again leaving some white areas.


The light blue marker was used to fill in the background, and randomly giving it darker areas for depth.  I love how the eBrush allows you to see all the layers of color on your background.


I wanted to bring out the stenciled texture again, so I realigned the stencil and eBrushed the light purple through it, moving the stencil along.


By eBrushing with the Silver metallic marker, I was able to give a really nice shimmer to the box.  I think I was able to capture a small section just below the pen tip in the photo below.


Now it is time to glue the box together.  


I left the top flap unglued so that I could add a gift inside.


Now to decorate the top.  I used my Craftwell Cut n' Boss machine to dry emboss a piece of Core-dinations color core card stock with my A6 embossing folder.  I love this embossing folder because it has some really fun words to use on many projects.


I specifically chose the purple color core card stock to match my paper, so after giving it a quick sanding to reveal the words, here is the result.  I cut out "Forever Friends" and sat it aside for the moment.


And what box is complete without something pretty on the top?  I tore out a page from a Dollar Store dictionary and gave it a quick blast of color with the light purple.  


I die cut the flowers with my Cut n' Boss machine and eBrushed a dark purple center in each flower.


Next, I eBrush a peach color around the edges of each flower.


Then I eBrushed the green-yellow color between the dark purple center and the peach edges.


I had to cut out a few more flowers from the dictionary paper. I simply scrunched the paper a bit and carefully opened it back up.  Then I layered the flowers, starting with the largest and ending with the smallest on top.  I used a paper piercer to punch a hole through the center and a decorative brad holds the petals together.


Some black beaded floral embellishments were added to match the card stock and the lace around the top edge of the box.

Supplies used:


Eileen Hull Sizzix ScoreBoards XL Die - Blocks/Cubes, 3-D
Tim Holtz Sizzix Tattered Florals Bigz Die 
Sharpie Markers
Stencil 
Core'dinations Color Core card stock (black with purple core)
Dictionary paper
White gesso
Texture paste
Decorative brads
Sand paper


There will be more fun projects featuring up cycled projects, so make sure to check out the Craftwell Blog all month long for more inspiration from the team. 

Thanks for stopping by, and have a crafty day!


Tuesday, April 5, 2016

April 2016 Craft Hoarders Anonymous Monthly Blog Hop

Welcome to the April Craft Hoarders Anonymous Blog Hop! You should be coming to my blog from Teresa Horner's  blog. After visiting me, hop over to Tracey Sabella's  blog next! To start at the beginning of the hop, and for the full list of Bloggers, go to Gloria's Blog!


As the saying goes, April showers bring May flowers, so I naturally wanted to make something very Spring-like with lots of flowers.  I've had this fabulous watering can die from Eileen Hull for a bit now, and I could not think of a better use for my Spring project.  


I bought these pretty floral sprays for my projects, but you could certainly make your own flowers, too.  


I  have a few simple details about how this came together.  There are instructions with the die, but I put mine together a bit differently.  After covering a piece of scoreboard with this piece of hammered metal looking paper that I have had for over a decade, I ran these pieces through my die cut machine.


To make these pieces work my way,  had to trim about 3/8" from the short section of the strip.  


Before attaching the side strips to the watering can, I added some of the same paper to the parts that would be exposed, as shown.


I attached the strips along the sides, with the short piece at the top of the watering can, instead of at the bottom, as instructed.  


I used an awl to poke holes in these sections so that I could insert tiny flower stems in them, just like you would use a frog in your flower vase.  I punched many more than shown here, but you get the idea.  


I darkened the white edges of the scoreboard by using a makeup sponge with Walnut Stain distress stain. 


I colored a miniature bookplate with copper metallic paste, added the words "Jardin de Fleurs" in the center, and added two metal stickers from TPC Studios, shown below.  Now, I have been hoarding these for quite awhile.  I will probably never see these again, and that is scary.  After all, isn't that why we hoard?  


The bookplate was added to the side of the watering can, as shown in the photos above.  The last thing I did was to add a bit of gilder's paste to the can to "age" it a bit.  Oh, and I found a little butterfly laying on my floor.  Don't know where he came from, but I gave him a home on one of the flower stem.  

Supplies used:

Sizzix Scoreboards XL die - Watering Can 3D by Eileen Hull
Gypsy Soul Miniature Bookplates
Bronze hammered metal look paper
Red Liner Tape
Gilder's Paste (copper, German silver, patina)
Flower sprays 

Here is the list of the participating Bloggers. Make sure to hop along and say hello! 

Craft Hoarders Anonymous Blog Hop List:
Gloria Stengel
Donna Idlet
Pam Bray

Karen Zueger-Brownell
Glenda Brooks

Teresa Horner
Barbara Rankin (you are here)
Tracey Sabella

Marisa Job
Debbie Seyer
Wendi Robinson


I hope we have inspired you to join us every month and de-hoard those supplies! 

Have a wonderful and creative weekend, but most of all, have fun!!!

Barbara

Friday, March 25, 2016

Shabby Chic Needle Book with Eileen Hull's Sizzix Dies

Hello everyone.  I am so excited to share my post with you today.  I was asked by Eileen Hull, one of Sizzix very talented designers, to do a guest spot on her blog.  She designs the most amazing dies for paper crafters, and is the inventor of the fabulous "scoreboard" dies.  As a matter of fact, I was lucky enough to get my hands on one of her newest dies, the sewing Needle Book.  I am so in love with this sweet little book that can be cut from scoreboard, mat board, chipboard, and paper.  

Here is a picture of this sweet little book that I turned into a notebook to carry in my purse.  It is quite versatile and, besides the obvious, can be used for many things.  Please visit Eileen Hull for a full description and more photos of my project.


As always, thanks so much for stopping by, and have a very happy and blessed Easter!

Barbara

Friday, October 16, 2015

Ravenswood Manor with ColourArte

Hello and welcome everyone!  Well, here we are in the middle of October.  My, the time is flying so fast, and Halloween will be here before we know it.  I love making Halloween projects, and my ColourArte paints are waiting to turn this cute little birdhouse die from Eileen Hull into something spook-tacular!


I made a video tutorial to share the creative process and show you how wonderful the ColourArte products are, and how well they work together.


Just for fun, here are a few still photos of the project, but I hope you will take a few minutes to watch the video to see the creative process, as well as watch how well the ColourArte products work.  If you like my video, I would appreciate if you would give me a thumbs up, and subscribe to my youtube channel so you will be the first to know when I post my next video.


In honor of those we know who have battled with this disease, please be sure to make a generous donation to the National Breast Cancer Foundation

Supplies used:

ColourArte Radiant Rains Shimmering Mist:  Snapdragon

ColourArte Radiant Rains Dauber:  Solar Gold, Mallard Green, Yellow Rose, Rich Cobalt
ColourArte Silks Acrylic Glaze:  Carmen, Key Lime, Clear Clear Glaze Medium
ColourArte Primary Elements:  Vanilla Bean, Mandarin Citrine, Burnt Umber, Smokey Diamond

Other:

Black chipboard
Black card stock
Sizzix/Eileen Hull 658451 Birdhouse 3D 
Sizzix/Tim Holtz 658248 Mini Spider & 31
Sizzix/Tim Holtz 657458 Mini Bat & Skull Set
Sizzix/Tim Holtz 658725 Mini Owl & Crescent Moon
Sizzix/Tim Holtz 6572908 Mini Branch & Leaf Set
Tim Holtz THS014 Shatter layering stencil
The Crafter's Workshop TCW 169s Mini Kasbah 6x6 Template
Red liner tape
20 gauge copper wire
Miniature Halloween Ravens (Michaels)


I hope you enjoyed my video project today, and please visit ColourArte for some fabulous products to use in your next art project.

Happy October to you all!!!


Barbara

Thursday, August 14, 2014

Mausoleum Card Featuring Altered Pages and Sin City Stamps


Hello everyone, and welcome back to the second half of our monthly partnership with Altered Pages.  For the next two weeks, both design teams will be creating Halloween themed projects using products from both Sin City Stamps and Altered Pages.  So if you love Halloween, like I do, you won't want to miss all the inspiration from both design teams.

I am just sharing a peek at my project here.  You can see this project in its entirety over on the Sin City Stamps blog.  I have a complete step-out and much more detail for you there.

Supplies used:

Sin City Stamps:  Halloween Takes Flight stamp set; Halloween Bingo stamp set; Art Journaling with Terri Sproul 2 stamp set;

Altered Pages:  AP-562 The Other Side of Halloween collage sheet; Jet Black StazOn ink pad; Niji Oil Pastels; Scor Tape; Glitz Giant Rhinestones (Raven); Faber-Castell Big Brush Pen (Black); Stickles glitter glue

Other:  Eileen Hull/Sizzix Gift Card Holder-House; chipboard; Cuttlebug rose die, Odorless Mineral Spirits; cotton swab; StazOn Orange Zest

So, please pop on over to see much more of my project, and check out the rest of both of the design team's Halloween themed inspiration for the rest of this month. 

Thanks for stopping by, and have a wonderful, creative weekend!


Thursday, May 29, 2014

Altered Trading Blocks and Altered Pages Birdhouse


If you've been following along this month, you already know that Altered Pages has partnered with The Artists on the Block, sharing our Altered Trading Block creations, aka, ATBs.  These fun, easy to alter, blocks are made with Eileen Hull's Sizzix block dies.  

As this is the last Thursday of the month, I believe I am the last to submit my creation.  However, I am so excited to present my double-decker bird house.  Can you see the tenants inside?  I had my husband hold a flashlight and shine it into the hole so I could take a picture.


Supplies used:
Eileen Hull's Sizzix Blocks/Cubes, 3-D XL die
Sizzix mat board
Sizzix embossing folders: Bricked, Woodgrain
Metal candle holder
Rustique Tin Can embossing powder
Clear Embossing Ink Dabber
Corrugated cardboard from packaging
Acrylic paint, matte medium, Cobalt Teal, Rust

For a complete tutorial and more pictures of my double decker ATB bird house, especially a closer look at those cute little tenants living inside, please visit the Altered Pages blog.  

Check out this awesome special sale, through the end of the month.  We will add a FREE 6 well plastic palette and 1 ready to fill mister bottle when you purchase Splash Inks at the special limited sale price of 26.98!    Supplies are limited to on-hand quantities, valid until May 31, 2014 or until supply is gone. NO coupoon needed.

Thanks for stopping by, and have a wonderful weekend!

Barbara

Friday, January 10, 2014

CHA Block Party

Hello everyone, and welcome.  As most of you already know, the big Craft and Hobby Show, or CHA, opens today in Anaheim, California.

I am honored to be participating with many other designer artists in Sizzix's Block Party at CHA featuring one of Eileen Hull's 
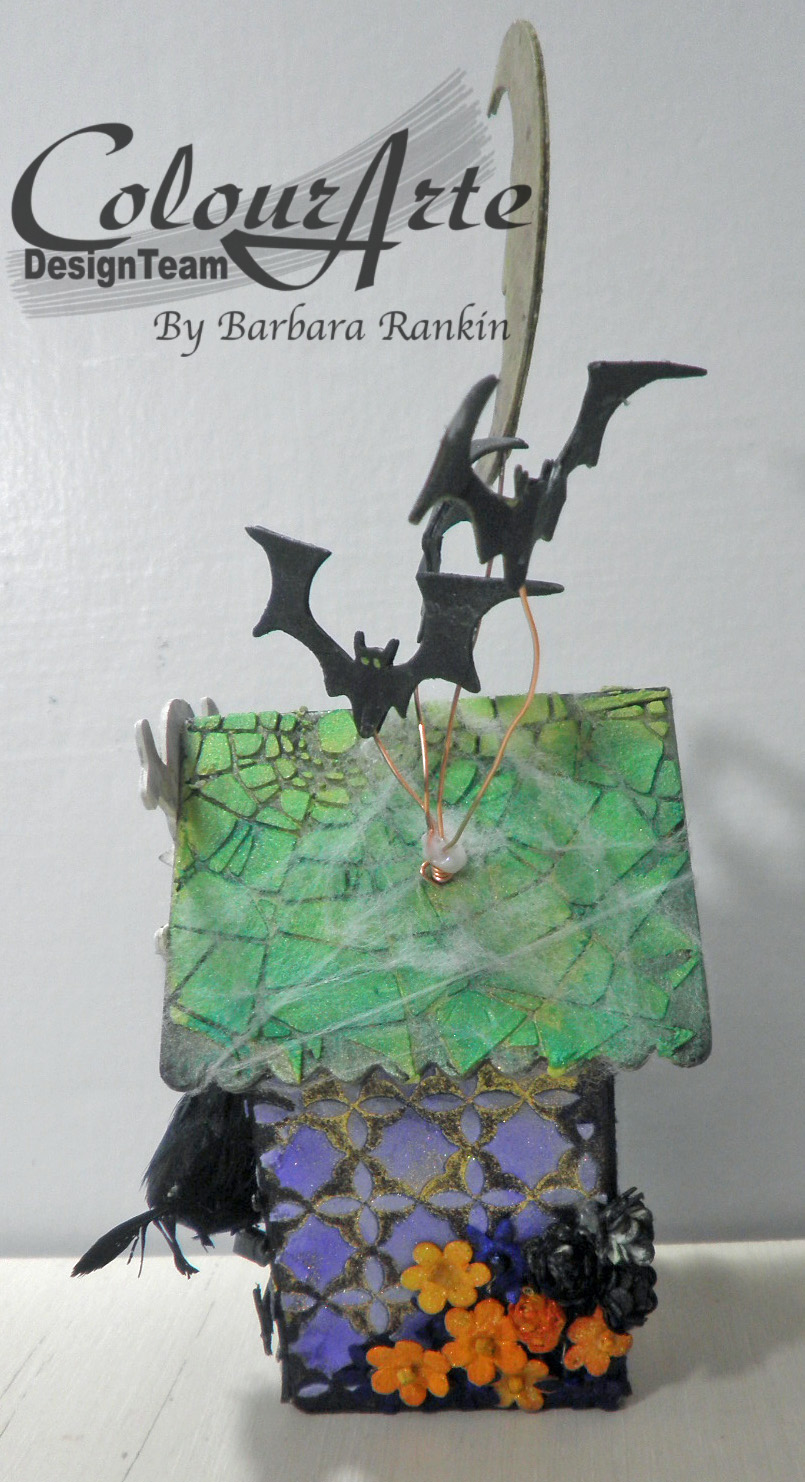
new Sizzix dies, the Block/Cube/Bank, 3-D, aka the Artist Trading Block™, or ATB for short!   Here is a quick look at mine, with some directions on how I decorated it.


Eileen says this about her ATBs:

 The Block is part of my new Sizzix Cherished collection which is designed around a baby theme. But let me tell you, this die is not just for babies! First of all, it is a ScoreBoards die, which is specially designed to cut and score THICK materials, like matboard and chipboard. This technology is unique to Sizzix so you won't find anything else like it! 
The Block measures 3" square, can be assembled in under a minute and it is super versatile! You can use inks, paint, chalks, mists, or markers with your stencils- the rigid matboard makes the block nice and sturdy so you don't have to worry about wrinkling or tearing- load on the techniques- the matboard can handle it! 
Artist Trading Blocks™ are the next big thing in the crafting world! Unlike tags and ATC’s, Artist Trading Blocks allow you to create in 3-D!  Why show only one side of your creativity when you can express yourself with multidimensional style? Make your mark on these six-sided blocks using all of your favorite craft supplies and techniques.

Supplies Used:

Sizzix Scoreboards die: Block/Cube/Bank, 3-D
The Looking Glass 8x8 paper pad (Kaisercraft)
Distress ink:  Evergreen Bough (Tim Holtz)
Decorative Labels Eight die (left side), Blossom Tags and Accents (front)(back), Damask Motifs (top)(right side)(bottom),  (Spellbinders)
Corner rounder (Marvy)
Wooden clock (Prima)

Hey Pesto, South Pacific, Nougat Fresco Finish acrylic paint (Paper Artsy)

Paint edges and inside of both pieces of box with the three acrylic paints, blending as you brush it on.

Dry fit box together and mark sides and direction, as shown.  This will help greatly when you are decorating your box, especially if your papers and embellishments have a direction.
Now you can see which way to place your papers and images while working on it flat.

Cut 6 pieces of print paper slightly smaller than 3" x 3", ink edges with Evergreen Bough, and adhere to each side, marking with a tiny post-it note as you go.
Add your embellishments, maintaining that direction you have noted on your post-it notes.

Here are some close-ups of each side of the box.


And the completed box, once again.
I hope you enjoyed my project today.  This is going to be a fun new trend this year, so you may want to check out your local stores to get your hands on this wonderful die as soon as it becomes available.  If you are at CHA this year, I hope you are having a blast!

Thanks for stopping by, and have a super wonderful weekend.

Barbara