Showing posts with label Craft Hoarders Anonymous Monthly Blog Hop. Show all posts

Sunday, June 5, 2016

June 2016 Craft Hoarders Anonymous Blog Hop

Welcome to the June Craft Hoarders Anonymous Blog Hop!  This will be the last hop for a few months.  Since everyone is so very busy during the Summer, the Hoarders have decided to take those months off.  We will be back in October, though.   

You should be coming to my blog from Vicki Robertson's  blog. After visiting me, hop over to Wendi Robinson's blog next! To start at the beginning of the hop, and for the full list of Bloggers, go to Gloria's Blog, which is where it all starts!


So, do you remember this paper collection from Pink Paislee? It is called Daily Junque.  I apparently liked it very much, because I have a lot of it left, even though I have made several cards, and even a mini album using it.  

I decided to make this travel folder from matching aqua card stock.  It measures 8-1/2" x 8-1/2", folded in half.  I rounded the two outer corners for a softer look.


Next, the embellishing began.  I cut a piece of the pink ledger paper about 1" shorter than the paper, rounded the two outer corners and adhered it, as shown.  I fussy cut a piece from the collage sheet and adhered it to the bottom.


Next, I die cut a chevron piece from the same aqua card stock and adhered it over the image, gluing down only the top, bottom, and right side.  This allowed me to slip the next fussy cut image with the bicycle behind the chevron piece and adhere it in place.  


The rosettes were die cut from the same pink ledger card stock and adhered to the front.  Below is how I make my rosettes.  I use the 1' Gluber glue dots to hold the bottom of the rosette together long enough until I can turn it over and adhere the center piece with Glossy Accents.  You can make multiple rosettes and they are ready to adhere with their very own glue dot on the bottom.


 The next embellishment was cut apart from the paper, making three pieces.  This enabled me to add foam tape to the THINK POSITIVE label and pop it up from the striped cirle.     


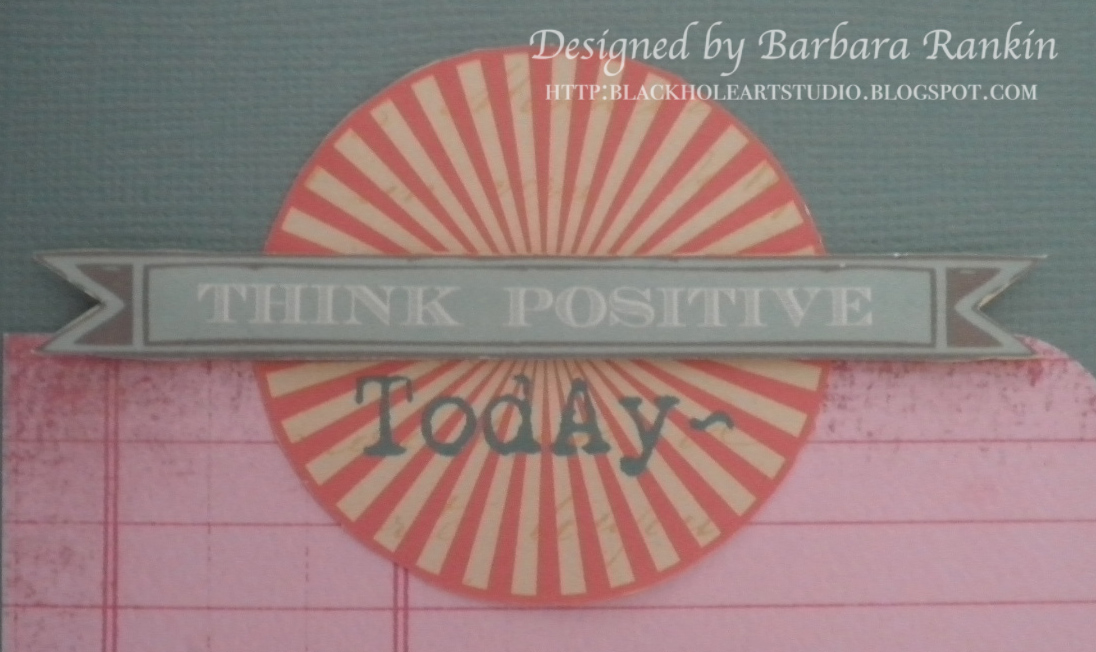
I adhered it at the top of the folder, as shown.  A few more flowers from my stash were added to fill in the rosette "bouquet".  


I thought my bouquet needed some leaves, so I cut them from a scrap of the aqua striped paper, pinching them as shown on the left.


I added the leaves and a length of the crochet lace ribbon, as shown.


I fussy cut this sweet little bird image, also from the collage sheet in the paper collection, and adhered it to the front, as shown.


I decided to stamp "enjoy the journey" and label from the Tim Holtz Simple Sayings stamp set and adhered it to one of the pockets.  This was a last minute decision, as you won't see it in the final photo after this one.


I made two pockets from a piece of map paper from the Journey pad and adhered them to the insides of the folder, as shown.  I just slipped a couple of flash cards in the pockets for the picture, but your travel information and boarding passes will it in them quite nicely.  You will be a very stylish traveler with this handy little folder.  


Supplies Used:

Pink Paislee Daily Junque paper collection
Me&My Big Ideas Journey 5x7 Paper Pad
Bo Bunny Double Dot ledger card stock
Aqua card stock
Glubers 1" glue dots
Tim Holtz/Sizzix Mini Paper Rosettes decorative strip die
Tim Holtz/Sizzix Chevron frameworks die
Tim Holtz Simple Sayings stamp set
Paper flowers (Hobby Lobby)
Pink beads (Michaels)
Foam Tape
Ivory crochet lace

Here is the list of the participating Bloggers. Make sure to hop along and say hello! 

Craft Hoarders Anonymous Blog Hop List:


I hope we have inspired you to join us every month and de-hoard those supplies!   Don't forget, though, that we will be on hiatus for a few months and will be back in October.  So, in the meantime, try to go through that stash you've been hoarding and make some fun things with it. 

Thanks for stopping by, and have a wonderful and creative week, but most of all, have fun!!!

Barbara


Tuesday, April 5, 2016

April 2016 Craft Hoarders Anonymous Monthly Blog Hop

Welcome to the April Craft Hoarders Anonymous Blog Hop! You should be coming to my blog from Teresa Horner's  blog. After visiting me, hop over to Tracey Sabella's  blog next! To start at the beginning of the hop, and for the full list of Bloggers, go to Gloria's Blog!


As the saying goes, April showers bring May flowers, so I naturally wanted to make something very Spring-like with lots of flowers.  I've had this fabulous watering can die from Eileen Hull for a bit now, and I could not think of a better use for my Spring project.  


I bought these pretty floral sprays for my projects, but you could certainly make your own flowers, too.  


I  have a few simple details about how this came together.  There are instructions with the die, but I put mine together a bit differently.  After covering a piece of scoreboard with this piece of hammered metal looking paper that I have had for over a decade, I ran these pieces through my die cut machine.


To make these pieces work my way,  had to trim about 3/8" from the short section of the strip.  


Before attaching the side strips to the watering can, I added some of the same paper to the parts that would be exposed, as shown.


I attached the strips along the sides, with the short piece at the top of the watering can, instead of at the bottom, as instructed.  


I used an awl to poke holes in these sections so that I could insert tiny flower stems in them, just like you would use a frog in your flower vase.  I punched many more than shown here, but you get the idea.  


I darkened the white edges of the scoreboard by using a makeup sponge with Walnut Stain distress stain. 


I colored a miniature bookplate with copper metallic paste, added the words "Jardin de Fleurs" in the center, and added two metal stickers from TPC Studios, shown below.  Now, I have been hoarding these for quite awhile.  I will probably never see these again, and that is scary.  After all, isn't that why we hoard?  


The bookplate was added to the side of the watering can, as shown in the photos above.  The last thing I did was to add a bit of gilder's paste to the can to "age" it a bit.  Oh, and I found a little butterfly laying on my floor.  Don't know where he came from, but I gave him a home on one of the flower stem.  

Supplies used:

Sizzix Scoreboards XL die - Watering Can 3D by Eileen Hull
Gypsy Soul Miniature Bookplates
Bronze hammered metal look paper
Red Liner Tape
Gilder's Paste (copper, German silver, patina)
Flower sprays 

Here is the list of the participating Bloggers. Make sure to hop along and say hello! 

Craft Hoarders Anonymous Blog Hop List:
Gloria Stengel
Donna Idlet
Pam Bray

Karen Zueger-Brownell
Glenda Brooks

Teresa Horner
Barbara Rankin (you are here)
Tracey Sabella

Marisa Job
Debbie Seyer
Wendi Robinson


I hope we have inspired you to join us every month and de-hoard those supplies! 

Have a wonderful and creative weekend, but most of all, have fun!!!

Barbara

Saturday, March 5, 2016

March 2016 Craft Hoarders Anonymous Monthly Blog Hop

Welcome to the March Craft Hoarders Anonymous Blog Hop! You should be coming to my blog from Teresa's blog. After visiting me, hop over to Karen's blog next! To start at the beginning of the hop, and for the full list of Bloggers, go to Gloria's Blog!


March always makes me think of St. Patrick's Day, luck of the Irish, and so on.  It is also National Irish American Heritage Month, so better way to commemorate it than with a 3D Shamrock card.  


I love 3D, and some years ago, I discovered paper tole.   So, what is paper tole? 
    Paper tole, also known as three-dimensional decoupage, is the art of handcrafting three-dimensional pictures from flat prints. This art is created by skillfully cutting, shaping, and assembling pieces of paper layered onto an image until a three-dimensional version of the image emerges.
This technique was right up my alley.  Of course, back in those days, I would stamp, color, and fussy cut an image several times to achieve what can be done quickly and easily today with our die cuts and electronic die cutting machines.  

Below is a picture of the various layers of paper shapes I cut using my Silhouette die cutting machine.  This paper is from Imaginesce.  One sheet is called Sweet Pea from Out on a Whim collection, and the other two prints are Totally Taj and Artistic Kashmir, both from from Exotic East collection.  The date on the paper tab is 2007, now that is some serious hoarding!  


The papers were layered onto the card base, as shown below.  The top two layers were adhered with foam dots to raise it off the card.  I also added gold pearls around the perimeter, as shown.


The shamrock bouquet needed to be shaped by using a large ball stylus and forming the petals over a soft piece of foam.


Then the piece was turned over to push the petals down in the center, as shown.


And here is one of the completed pieces.  Each layer will give beautiful dimension and add so much to your card.


Tiny pieces of foam dots were adhered to the centers of the shamrocks to keep them lifted, only gluing down the end of the stems.  


Each shamrock was adhered over its corresponding petal below it, giving this beautiful layering effect.   


I added Crystal Stickles glitter glue to the petals, and a seam binding bow with a tiny metal lock charm. 


Here is the list of the participating Bloggers. Make sure to hop along and say hello! 

Craft Hoarders Anonymous Blog Hop List:
Gloria Stengel
Debbie Seyer
Pam Bray
Jacquie Southas
Glenda Brooks
Tracey Sabella
Donna Idlet
Wendi Robinson
Teresa Horner
Barbara Rankin (you are here)
Karen Zueger-Brownell
Christy Houser


I hope we have inspired you to join us every month and de-hoard those supplies! 

Have a wonderful and creative weekend, but most of all, have fun!!!

Barbara

Friday, February 5, 2016

February 2016 Craft Hoarders Anonymous Monthly Blog Hop


Welcome to the February Craft Hoarders Anonymous Blog Hop! You should be coming to my blog from Teresa's blog. After visiting me, hop over to Karen's blog next! To start at the beginning of the hop, and for the full list of Bloggers, go to Gloria's Blog.

February is the month for love, so Valentine's Day is on my mind.  I am particularly fond of vintage, shabby chic, and pink!  I have some of my older papers in boxes which I have sorted by occasions.  In my Valentine's Day box, I found these beautiful papers from Memory Box, and I had even saved a couple of sheets of matching card stock that I had purchased while I had the print papers in my hot little hands.  

Here is my February inspiration!


This card measures 6"x6".  I cut the print paper slightly smaller than the card front and inked the edges with the Brilliance Pearlescent Purple ink pad.  

I die cut the scalloped heart from the light orchid card stock and inked the edges with the same Brilliance Pearlescent Purple ink pad.

Next, I die cut the plain heart from ivory card stock, then embossed it with the Chain embossing folder.  I edged the heart with a Krylon gold leafing pen, and again, I highlighted the embossing with the Pearlescent Purple ink pad before adhering it to the scalloped heart.

I used foam dots to adhere and raise the heart piece on the card front.

All that was left now was to decorate the card front with the various flowers, leaves, and trim from my stash.  The Love Notes die cut tag was added to the right of the flower bouquet.  

Simple, but elegant.

Supplies used:

Spellbinders dies:  Nested Hearts, Nested Scallop Hearts (largest size)
Card stocks:  Ivory, Orchid, Light Orchid
Print Paper:  Making Memories 12x12 LoveBirds Scallop Love Notes 
Making Memories Love Notes die cut tags
Embossing folder:  Chain (Lifestyle Crafts)
Ink Pads:  Brilliance Pearlescent Purple
Petaloo and Prima Flowers and Leaves
Ivory stem flowers (Joann's)
Gold leaves ribbon trim (my stash)

Here is the list of the participating Bloggers. Make sure to hop along and say hello! 


I hope we have inspired you to join us every month and de-hoard those supplies! 

Have a wonderful and creative weekend, but most of all, have fun!!!

Barbara

Tuesday, January 5, 2016

JANUARY 2016 Craft Hoarders Anonymous Monthly Blog Hop


Welcome to the January 2016 Craft Hoarders Anonymous Blog Hop, and Happy New Year! You should be coming to my blog from Teresa's blog. After visiting me, hop over to Karen's blog next! To start at the beginning of the hop, and for the full list of Bloggers, go to Gloria's Blog!

I decided to make a box from some very old hoarded paper I purchased from Target.  It is called Sophie by Marcella.  


I used my Silhouette to cut out a 3D Box using different patterned papers for the inside, outside, top and bottom of the box.  Here are the pieces when cut.


Time to assemble the pieces.

This paper is white on the reverse, so I cut a second pattern paper for the inside and glued them together.  Adhere the box bottom to the box bottom sides, as shown. 


When you have finished going around the box, the bottom will look like this.  Glue the brown paper (shown in the picture below) to cover the works.


Follow the same procedure to make the box top.

Here is what the box looks like when all glued together.  By adhereing two pattern papers together, you automatically finish off the inside.


Now comes the fun!  Time to add the embellishments.

First, trim a strip from the border paper in the collection.  Adhere along the box bottom.  (See photo below).


Stain a length of lace with Frayed Burlap distress stain, and a piece of seam binding and decorative trim with Tattered Rose distress stain.  Adhere along top of lid, as shown in photo above.


Make a bow with the seam binding and adhere to the top of the box.  Wrap a length of the seam binding around the box bottom and adhere a pearl button.


Add small flowers, metal embellishments, a word band , and pearls to the top.


A length of brown gems was also adhered along the bottom of the box.


Supplies used:

Marcella 12x12 Paper Pad - Sophie
Seam Binding
Lace
Decorative Trim
Distress Stains:  Tattered Rose, Frayed Burlap
Hope metal embellishment (Tim Holtz)
Gem strands
Metal embellishments
Flowers

Here is the list of the participating Bloggers. Make sure to hop along and say hello! 

Gloria Stengel 
Debbie Seyer
Jacquie Southas
Glenda Brooks
Amber Milone
Tracey Sabella
Donna Idlet
Wendi Robinson
Teresa Horner
Barbara Rankin (you are here)
Karen Zueger-Brownell
Christy Houser

I hope we have inspired you to join us every month and de-hoard those supplies! 

Have a wonderful and creative week, but most of all, have fun!!!

Barbara