Showing posts with label Sizzix dies. Show all posts

Wednesday, April 11, 2018

Making Cards with Your Gel Press Printed Papers

Hi everyone.  Today I am going to show you how I made some cards with the background prints I made in my last video using my gelli plate and my Vivid Ultra Metallics from ColourArte.  Let your imagination run wild with all the possibilities of how to use these fun, but oh so addictive to make background prints.


CLICK HERE TO SUBSCRIBE TO MY CHANNEL

Here are a few closeups of the individual cards.  It is so hard to capture the true shimmer and shine of these printed backgrounds, but in person, they truly are beautiful.  


Supplies Used:

Variety of gelli plate printed papers
Various card stock to match printed papers
ColourArte Vivid Ultra Metallics
Spellbinders SR-001 Birds of a Feather die
Spellbinders S4-445 Majesty dies
Spellbinders S4-425 Elegant Ovals dies
Sizzix/Tim Holtz 661190 Wildflowers dies
Sizzix/Tim Holtz 661182 Detailed Butterflies
Sizzix 659579 Layered Dragonfly Bigz Die (Tim Holtz)
  with matching embossing folder
Aztec border punch (Family Treasures)
Thinking of You stamp (Crafty Individuals)(CI-407)
Tim Holtz Occasions Chit Chat stickers
Faber-Castell Texture Gems (Pearl)
Fude Ball 1.5 black pen (Ohto)(distributed by Ranger)
Black Soot Distress Ink
Ranger blending tool
Masking tape or washi tape
Xyron sticker maker
White glue
Double sided tape
Foam dots

I hope you enjoyed today's card making projects, and I would love for you to subscribe to my channel.  Leave me a comment if you have any questions or want to share some of your own tips or tricks.

Thanks so much for stopping by, and have a super fun, creative day!

Barbara

Tuesday, May 9, 2017

If There Were No Butterflies Canvas with ColourArte

Hi everyone!  Today, I want to share another mixed media video tutorial using ColourArte's Vivid Ultra Metallics, some die cut chipboard, as well as some laser cut chipboard, to make an inspiration art canvas for your home, or to keep as a daily reminder in your craft/art studio.


I hope you enjoy it, and please be sure to give me a thumbs up if you liked it, and I always love to read your comments, which are so appreciated.


And here is another picture showing a bit of the dimension you can get with the chipboard.


ColourArte Supplies Used:

Vivid Ultra Metallics
African Jade
Bolivian Blue
Sunflower
Olive Vine
Jasmine
Lemongrass
True Metals Dragon Gold
Snap Dragon
Douglas Fir
China Black
Solar Gold

Other Supplies Used:

8x10 canvas
Fantasy Frame & Flourishes (Gypsy Soul Laser Cuts)
Sizzix/Tim Holtz dies:  Layered Butterfly,  Garden Greenery
Distressed Harlequin Stencil  (Americana)
Liquitex White Gesso
White Crackle Medium (DecoArt)
Quick Grab Tacky Glue (Aleene's)
No Butterflies rubber stamp (B-Line)
Champagne Pearl Lustre embossing powder
Black chipboard
Versamark ink pad
Cut n' Dry foam (Ranger)
Metal embellishments

Thanks so much for stopping by.  I hope you will consider subscribing to my YouTube channel, and as always, remember to take time to play!

Barbara

Thursday, September 22, 2016

Using the CraftwellUSA eBrush for a Mixed Media Fall Canvas

Hey all!  Are you thinking about Fall yet?  I sure am, which brings me to my mixed media canvas today.  Of course, I am going to be adding color with my Craftwell eBrush.  So let's get started.


I cut a piece of corrugated cardboard to 11" x 8-1/2".  Then, I tore some of the top layer off, exposing the corrugations in some areas.  Next, I added some strips of flower printed fabric tape and gave the entire background a rough textured coat of Teresa Collins' modeling paste.  Let this dry thoroughly.


Spread extra course garnet gel in a couple of spots, then sprinkle gold micro beads over wet medium.


Brush random strokes of gel medium over background and lay pieces of torn book pages over it.  Let all mediums dry.


Remove any portions of the book pages that did not adhere and you will get this really cool torn effect.


Brush on a wash of white gesso and water to give a nice, light background for the eBrushed colors to adhere to.


I die cut a piece of script paper with Teresa Collins Honeycomb Project Die using my Cut n Boss.


Tear honeycomb apart and adhere pieces to canvas, as shown, along with some of the punched out honeycomb pieces.  Let dry.


Emboss white card stock with the Teresa Collins Beautiful Words A6 Embossing Folder and cut out the word "FOREVER".  (This was left over from another project, so nothing goes to waste.)


Adhere to canvas, as shown.  Let dry.  I also die cut and embossed some leaves from thin chipboard and arranged the on the canvas.  It is a good idea to do this to get an idea of where you are going with your piece, although it can change.


Now the fun begins.  eBrush the first layer with BG15 Aqua, concentrating on the edges and corrugations.


Next layer is eBrushed with R85 Rose Red.


I wanted to warm the background a bit so I eBrushed Y21 Buttercup Yellow over the background, concentrating on the center of the piece.


The yellow leaf was eBrushed with YR23 Yellow Ochre, then E74 Cocoa Brown around the edges.


The two large orange leaves were first eBrushed with YR 23 Yellow Ochre, then YR68 Orange was eBrushed around the edges.  A light coat of E74 Cocoa Brown was added over it to tone it all down.


The wider small red leaf was first eBrushed with YR23 Yellow Ochre, then R29 Lipstick Red was eBrushed around the edges, and a light coat of E74 Cocoa Brown was added over all to tone it all down.


The last reddish green leaf was first eBrushed with YR23 Yellow Ochre, then R29 Lipstick Red was eBrushed in the center.  Next, the edges were eBrushed with the G09 Veronese Green, and a light coat of E74 Cocoa Brown was added over all to tone it all down.  All leaf stems were also eBrushed with the Cocoa Brown.


I found these puffy plastic letters to spell "fall" in my stash, so I eBrushed them with the E74 Cocoa Brown.  It would have been impossible to color them straight from the marker because each brush stroke of the marker removed what I put down.  So the eBrush is super fantastic for this sort of technique.  (Tip:  They are stickers, so you want to place them on your craft mat before eBrushing them so that you can remove them.)


Since I had already adhered my "FOREVER" word to my canvas, I used post it notes to protect the area around it from overspray and eBrushed it with the E74 Cocoa Brown.


I removed the post it notes and outlined the letters with a brown Micron pen to add depth.


I used a die cut piece of card stock as a stencil and eBrushed the E74 Cocoa Brown through it in random spots.


I used brown distress ink and a blending tool to edge all of the leaves, as well as the edges of the canvas.  I just really like the look.


Supplies Used:

Teresa Collins Beautiful Words and Stars A6 Embossing Folder
Copic Markers - BG15, R85, Y21, YR23, YR68, E74, R29, G09
Teresa Collins Modeling Paste
Gel medium
White gesso
Extra course garnet gel medium
Gold micro beads
Sizzix Tattered Leaves die (Tim Holtz)
Sizzix Layered Leave die (Tim Holtz)
Corrugated Chipboard from boxes
Vintage book pages
Distress ink - Vintage Photo
Blending tool

There will be more fun projects featuring up cycled projects, so make sure to check out the Craftwell Blog all month long for more inspiration from the team. 

Thanks for stopping by, and have a crafty day!


Thursday, September 15, 2016

Gift Box with Craftwell USA eBrush and Sizzix

Hi everyone!  Barbara here with a fun little project, perfect for gift giving.  Of course, to finish it off, I will be using my Craftwell eBrush,  along with some other products from the Craftwell USA line.  Aside from the fact that Christmas is just around the corner, and boxes of all sizes will be needed, I also have quite a few birthdays in September.  So, why not get started now, whether for birthday giving or Christmas.  Boxes are always needed.


I die cut this box from one of  Eileen Hull's Sizzix ScoreBoards XL Dies.  I had previously done some stamping on it but never finished it.  So I painted it with a coat of white gesso.  You can still see some of the stamping, but that will just add to the layers.  


I put the box together without glueing it so I could pencil in directional arrows.  Although I did not need to do that for this project, it is always a good idea to figure that out before decorating the box, particularly if you decorate it while it is flat.  


I used a non-directional stencil and spread some texture paste through it without concern for covering the sides completely.  I used post-it notes to cover the flaps that will be glued to the inside so the stenciling would not interfere with the box closure.  Let the paste dry before proceeding.  


When the paste was dry, I began giving the piece its color.  I began with this green-yellow marker.  I left some white areas for the following colors.


Next, I used the medium green marker, again leaving some white areas.


The light blue marker was used to fill in the background, and randomly giving it darker areas for depth.  I love how the eBrush allows you to see all the layers of color on your background.


I wanted to bring out the stenciled texture again, so I realigned the stencil and eBrushed the light purple through it, moving the stencil along.


By eBrushing with the Silver metallic marker, I was able to give a really nice shimmer to the box.  I think I was able to capture a small section just below the pen tip in the photo below.


Now it is time to glue the box together.  


I left the top flap unglued so that I could add a gift inside.


Now to decorate the top.  I used my Craftwell Cut n' Boss machine to dry emboss a piece of Core-dinations color core card stock with my A6 embossing folder.  I love this embossing folder because it has some really fun words to use on many projects.


I specifically chose the purple color core card stock to match my paper, so after giving it a quick sanding to reveal the words, here is the result.  I cut out "Forever Friends" and sat it aside for the moment.


And what box is complete without something pretty on the top?  I tore out a page from a Dollar Store dictionary and gave it a quick blast of color with the light purple.  


I die cut the flowers with my Cut n' Boss machine and eBrushed a dark purple center in each flower.


Next, I eBrush a peach color around the edges of each flower.


Then I eBrushed the green-yellow color between the dark purple center and the peach edges.


I had to cut out a few more flowers from the dictionary paper. I simply scrunched the paper a bit and carefully opened it back up.  Then I layered the flowers, starting with the largest and ending with the smallest on top.  I used a paper piercer to punch a hole through the center and a decorative brad holds the petals together.


Some black beaded floral embellishments were added to match the card stock and the lace around the top edge of the box.

Supplies used:


Eileen Hull Sizzix ScoreBoards XL Die - Blocks/Cubes, 3-D
Tim Holtz Sizzix Tattered Florals Bigz Die 
Sharpie Markers
Stencil 
Core'dinations Color Core card stock (black with purple core)
Dictionary paper
White gesso
Texture paste
Decorative brads
Sand paper


There will be more fun projects featuring up cycled projects, so make sure to check out the Craftwell Blog all month long for more inspiration from the team. 

Thanks for stopping by, and have a crafty day!


Friday, October 16, 2015

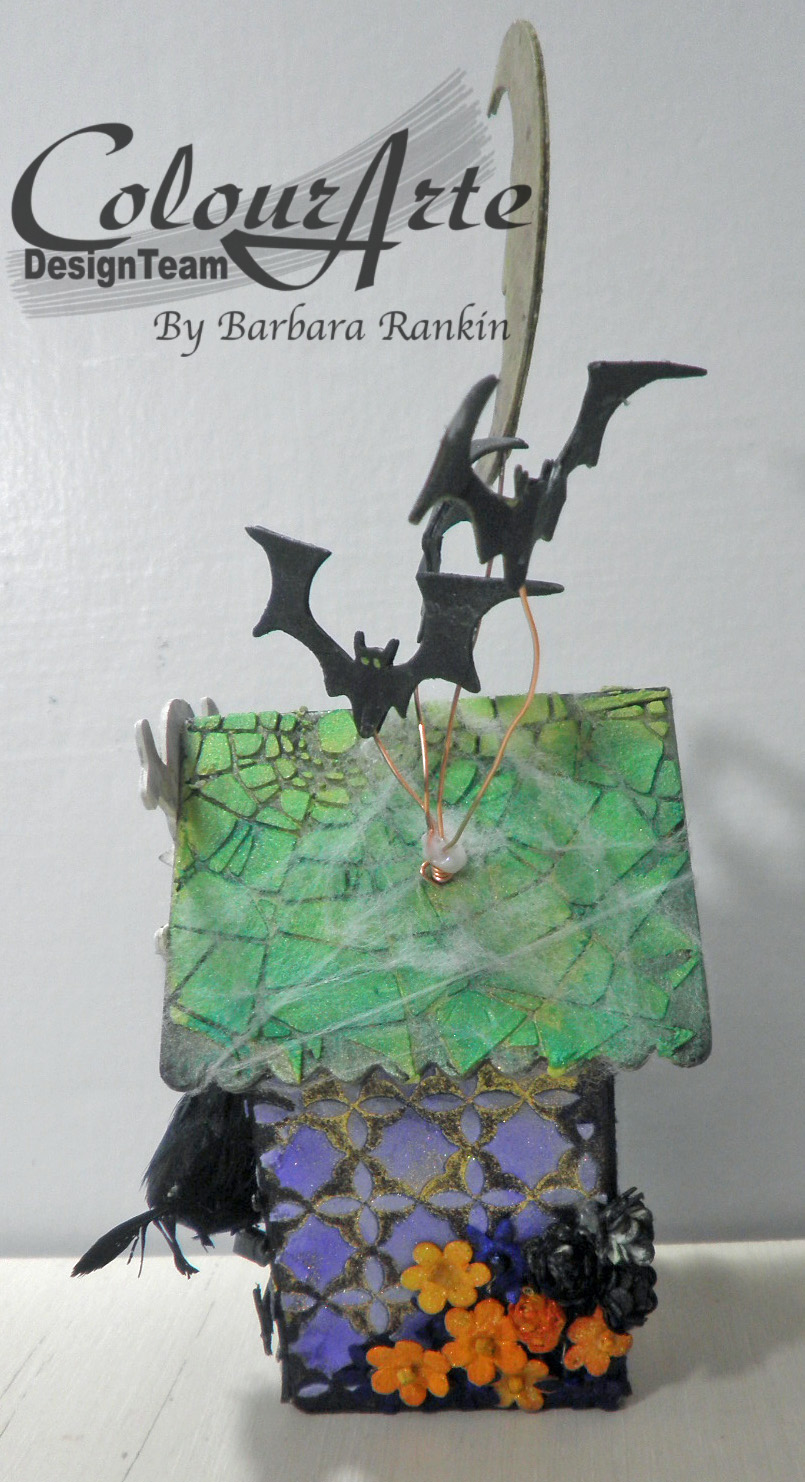
Ravenswood Manor with ColourArte

Hello and welcome everyone!  Well, here we are in the middle of October.  My, the time is flying so fast, and Halloween will be here before we know it.  I love making Halloween projects, and my ColourArte paints are waiting to turn this cute little birdhouse die from Eileen Hull into something spook-tacular!


I made a video tutorial to share the creative process and show you how wonderful the ColourArte products are, and how well they work together.


Just for fun, here are a few still photos of the project, but I hope you will take a few minutes to watch the video to see the creative process, as well as watch how well the ColourArte products work.  If you like my video, I would appreciate if you would give me a thumbs up, and subscribe to my youtube channel so you will be the first to know when I post my next video.


In honor of those we know who have battled with this disease, please be sure to make a generous donation to the National Breast Cancer Foundation

Supplies used:

ColourArte Radiant Rains Shimmering Mist:  Snapdragon

ColourArte Radiant Rains Dauber:  Solar Gold, Mallard Green, Yellow Rose, Rich Cobalt
ColourArte Silks Acrylic Glaze:  Carmen, Key Lime, Clear Clear Glaze Medium
ColourArte Primary Elements:  Vanilla Bean, Mandarin Citrine, Burnt Umber, Smokey Diamond

Other:

Black chipboard
Black card stock
Sizzix/Eileen Hull 658451 Birdhouse 3D 
Sizzix/Tim Holtz 658248 Mini Spider & 31
Sizzix/Tim Holtz 657458 Mini Bat & Skull Set
Sizzix/Tim Holtz 658725 Mini Owl & Crescent Moon
Sizzix/Tim Holtz 6572908 Mini Branch & Leaf Set
Tim Holtz THS014 Shatter layering stencil
The Crafter's Workshop TCW 169s Mini Kasbah 6x6 Template
Red liner tape
20 gauge copper wire
Miniature Halloween Ravens (Michaels)


I hope you enjoyed my video project today, and please visit ColourArte for some fabulous products to use in your next art project.

Happy October to you all!!!


Barbara