Showing posts with label Graphic 45. Show all posts

Thursday, July 27, 2017

How to Make an Accordion Style Book with Gypsy Soul Laser Cuts by Barbara Rankin

Hi everyone!  Barbara here today to show you a fast and easy way to turn these engraved book covers from Gypsy Soul Laser Cuts into a fabulous little mini album. i used Decoart Media Fluid Acrylic products to transform these covers.  While I have a variety of ideas for making the book pages, I have chosen the simplest way, which is to make an accordion style book. I have chosen Graphic 45's A Ladies' Diary paper collection, but you can use whatever papers you like or have on hand.


Book Cover Front
Book Cover Back


CLICK HERE TO SUBSCRIBE TO MY CHANNEL

INSTRUCTIONS FOR ACCORDION BOOK (see video for full tutorial)

The book covers measure 2-7/8" x 4-1/2".

Cut two pieces of cream paper to 5-7/8" x 12".

Score horizontally along 12" bottom edge at 1-1/2".  This will form pockets to hold tags and ephemera.

Score vertically at 2-3/4, 5-1/2", 8-1/4", and 11".  

Adhere the two lengths of paper together along the 1" flap to make one long piece of paper.  Fold bottom edge up to form pockets, and accordion fold the length of paper at each scored line.  Cut remaining 1" flap off.  

Adhere the front and back pages to the inside book covers. Decorate pages as desired.  

Here are some photos of the completed, decorated book.  


Supplies Used:
GSL Book Cover Deco Engraved (coming soon)
GSL Miniature Bookplates Shape Set
GSL Miniatures Shape Set - Ladies Choice
GSL Vintage Ladies Silhouettes Set
DecoArt Media Fluid Acrylics
  TitaniumWhite
  Translucent White (optional)
  Titan Buff
  Primary Magenta
  Primary Yellow
  Interference Gold
  Burnt Umber Antiquing Cream
DecoArte White Crackle Past
DecoArt Metallic Lustre
  Gold Rush
  Cosmic Blue
  Polished Coral
  Black Shimmer
Derivan Liquid Pencil (for shading)
Assorted Paint Brushes
12"x12" cream card stock
Graphic 45 A Ladies' Diary paper collection
Tags, Scallop Combo(Sizzix Original)
Brick/Stone mini stencil (Tim Holtz)
Martha Stewart Deco Fan punch
Assorted embellishments

I hope you like my project today and are inspired to make one of these sweet accordion books using your favorite papers. 

As always, thanks for stopping by, and have a wonderful and creative day!

Barbara

Thursday, July 13, 2017

Mixed Media Chipboard Tag with Gypsy Soul Laser Cuts

Hi everyone!  Today I have a cool mixed media super-sized tag for you.  Ever since I started playing around with mixed media, I have been having so much fun from experimenting and learning all sorts of things.  I hope you enjoy watching my transformation process video here, too.


Supplies Used:

GSL Chipboard Decorative Tags X Large
GSL Layered Frame Aria
GSL Herald Medallions (coming soon)
Acrylic Paints
  FolkArt Home Décor Chalk Vintage Mustard
  FolkArt Home Décor Chalk Cascade
  Craftsmart Chalky Burnt Orange
DecoArt One Step Crackle Medium
Finnabair Gold Crackle Texture Paste
Stampendous (Dreamweaver) Optic Checkerboard stencil
Carabelle Art Stamps - Mixed Media Strips
Graphic 45 Vintage Hollywood paper collection (image)
Mister bottle
Ink Pads
  Ranger Archival Black
  Distress Oxide Broken China
  Distress Oxide Fossilized Amber
  Distress Ink Black Soot
Ranger blending tool
Art-C Gold Metallic Paste
Assorted brushes
Assorted embellishments (ribbon, lace, flowers, jewelry, etc.)

I hope you enjoyed my project today. Be sure to check out all the great laser cut chipboard at Gypsy Soul Laser Cuts.

Thanks so much for stopping by, and have a super crafty day!

Barbara

Thursday, June 8, 2017

Father's Day Cards with Gypsy Soul Laser Cuts

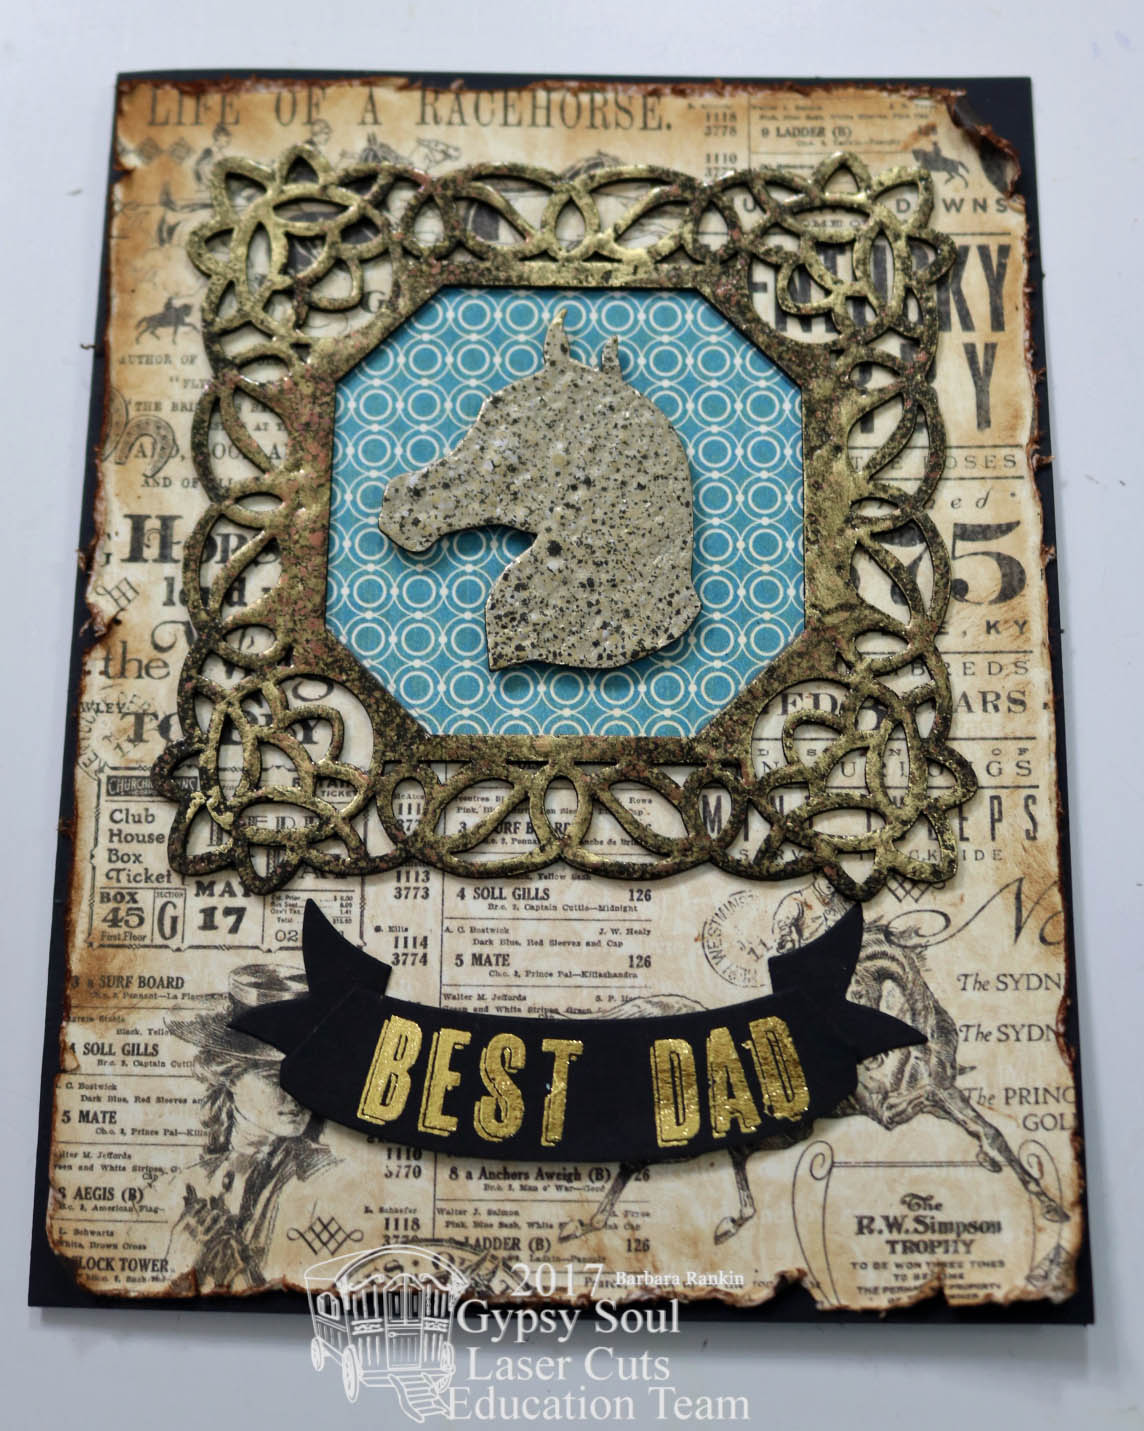
Hi everyone!  I'm sure that, by now, you know that Father's Day is just around the corner, and if you need some ideas for those masculine type cards to make, I hope this tutorial will help inspire you.  Here are the two cards I made that I think would be suitable for any of the men in your life.


***************************************************************
Card 1

Card 1: Adhere a slightly smaller piece of print paper (Off to the Races) to the front of a 5"x7" kraft card.  (Optional:  Distress and ink edges before adhering to card front).


Use the 3"x4" notecard (Cigar Box Secrets) to measure the distance to cut through the 4"x6" notecard (Cigar Box Secrets).


Draw a line between the two marks with a pencil.  Punch a 1/8" circle at the sides where the lines intersect, then use a craft knife to slice the straight opening along the straight line between the two holes.  Erase pencil lines.


Place 3"x4" notecard into slot.


Turn 4"x6" notecard over and trace around 3"x4" notecard on reverse.  


At this time, you can distress and ink the edges of the 4"x6" notecard only before adhering to the card front.  Note where the glue has been applied.  The pocket area needs to be free from glue.


Adhere 4"x6" notecard to lower right of card front.


Round corners of  3"x4" notecard and slip into pocket.  Make two rosettes using the red print Graphic 45 paper and adhere to upper left corner of card.  Use a pop dot to lift the smaller rosette so it will sit slightly atop the larger one.


Choose four Gears and one of the Horses to alter.  The horse was inked with Vintage Photo and Fossilized Amber Distress Oxides.  The gears were inked with Versamark ink and heat embossed with Hammered Metal (left) and Charred Gold (right).


The horse's legs were  glued to the top portion of the pocket opening on the 4"x6" notecard only, leaving the 3"x4" notecard free to move up and down.  The gears were glued to the rosettes, while two gears were layered and adhered next to the rosettes, as shown.

Pull the 3"x4" notecard out of the pocket and use a repositionable glue dot to adhere your gift card to the reverse side.


Stamp a sentiment on the front of the notecard.  I used "just for you" for this card. 


Place notecard with gift card inside pocket and send your "gift" card on it's way.


On the inside, add a scrap of the G45 paper to the inside with a border strip, and stamp "Dad" with Versamark and heat emboss with champagne embossing powder.


***************************************************************
Card 2

Card 2: Adhere a slightly smaller piece of print paper (Off to the Races) to the front of a 5"x6-1/2" black card.  (Optional:  Distress and ink edges before adhering to card front).  


Ink Flourished Frame Valerie Square with Versamark ink and heat emboss with Burnt Copper Leaves embossing powder.  


Trace around frame onto a piece of blue print paper (Off to the Races) and cut to fit inside frame.  


Adhere to back of frame opening, then adhere both to top half of card front.


Ink Horse Head with Versamark ink and heat emboss with Charred Gold embossing powder.  Adhere to center of frame opening with foam dots.


Die cut a banner from black card stock.  Use gold rub-ons to spell out "BEST DAD".


Fold ends of banner, place foam dots in center and glue at ends, as shown.


Adhere to bottom of card beneath frame.


Since the gold letters were so bright, I added touches of gold metallic paste to some areas of the frame to brighten the frame to match.


For the inside, stamp "Happy Father's Day" with Versamark ink and champagne embossing powder.  Cut around image and adhere to a scrap of the G45 paper that has been cut slightly smaller than the front of the kraft sack (envelope).


Adhere craft sack to center of card inside, and insert your gift card.  


Supplies Used:

GSL Horses Shape Set
GSL Gears Shape Set
GSL Flourished Frame Valerie Square
Graphic 45 Off to the Races papers
Prima Cigar Box Secrets papers
Kraft card (5"x7")
Black card (5"x6-1/2")
Black card stock scrap
Tim Holtz Distress Ink (Vintage Photo)
Tim Holtz Distress Oxides (Vintage Photo, Fossilized Amber)
Tim Holtz die (Regal Crest) 
Tim Holtz Gilded Alpha remnant rubs
Allure Embossing Powders (Charred Gold, Hammered Metal, Burnt Copper Leaves)
Pearlustre Champagne embossing powder
Versamark ink pad
Dad rubber stamp (Inkadinkado)
Mini Craft Sacks (2.5" x 4") (Paper Studio)
3D Foam Squares 
Happy Father's Day stamp (PSX)
Just for You stamp (Hero Arts)

I hope you enjoyed the project today, and be sure to check out the GSL shop.  Another fun set to consider for your male cards is the GSL Miniatures Shape Set - Guy Thing.  It contains lots of vintage style male type laser cuts, giving you even more choices.  

Thanks for stopping by, and have a great day!

Barbara

Thursday, May 19, 2016

Graphic 45 Steampunk Debutante Card and Matching Tag with Gypsy Soul Laser Cuts

Hello chipp-ie fans!  Did you know that Gypsy Soul Laser Cut chipboard works really well for card making?  Why?  Because you can get some dimension without having to spend extra postage.  How cool is that?  

So, today, I want to share a card and matching tag that can be used for any occasion, and the tag can be attached to a corresponding gift.


I die cut two decorative shapes from the coordinating papers and ran them through my Xyron Creative Station.  Then I cut a piece of green card stock to 7" x 10" and folded in half to make a 5" x 7" card base.  The two layers where then adhered to the front.


I aligned the  heart shaped filigree frame over the face image and traced around it with pencil, then cut it out.
  

I colored the face with colored pencils, adding shading with the white gel pen, and outlining around the eyes with the black Micron pen.


Next, I inked the frame with with the yellow, red, and sienna chalk ink pads.  When the ink dried, I added a layer of Clear Rock Candy crackle paint over the frame and let it dry.  Then I added walnut stain over it to bring out the cracks.  When dry, I adhered the frame over the face image.


The propeller, gears, and "Timeless" were also inked with the chalk ink pads, but finished by embossing with the ocher embossing powder.  A big brush black pen was used to edge the word to help it show up better against the background.

I also fussy cut some of the flowers from one of the papers and layered them with foam dots for added dimension.

Metal stickers were adhered to the center of the propeller and around the edge of the frame.


I covered one of the small tags with coordinating G45 paper and used the reverse side of the paper for the opposite side of the tag.  Remember to punch the hole at the top before covering the second side so you can find the hole easily.


I covered the corset and hat from the Ladies Choice Miniatures Set with walnut stain.  Then I inked the corset with the yellow, red, and sienna chalk ink pads. ending with the yellow.  The hat was inked with alabaster, then green, while the feather was inked with alabaster, then blue.  I used the black Micron pen to add a little pen work to the hat.

I cut out a strip of images from the coordinating paper and adhered to the tag first, then I inked a small gear with black, then gold ink, cut it in half, and adhered all to the tag, as shown.

I added a metal gear to the end of a swivel clasp and added the swivel clasp through the tag hole.  

Front


Back (left blank to add recipient's name)
Supplies used:

Graphic 45 8x8 Paper Pad - Steampunk Debutante
Xyron Creative Station
Green card stock (7"x10"-fold in half to make 5"x7" card)
ColorBox Chalk Ink Pads: Yellow Cadmium, Warm Red, Burnt Sienna, Warm Green, Blue Lagoon
Faber-Castell Pitt Big Brush Pen: Black
Spellbinders S6-005 - 5x7 Elegant Labels 4
Ranger embossing powder: Antiquities Ocher
Ranger Distress Stain:  Walnut Stain
Tim Holtz swivel clasp with chain
Metal gear and round stickers

This was a bunch of fun to make.  I really love using chipboard shapes in my art work and card making projects.  I hope I have inspired you to give this a try and take a look at the Gypsy Soul Laser Cuts shop to see so much more fun shapes to suit every taste.  

Thanks for stopping by, and have a wonderful, creative day!

Barbara

Thursday, March 17, 2016

Holiday Cards with Gypsy Soul

Top o' the morning to you all.  Since today is St. Patty's Day, I thought I would make a couple of cards, but the first one is to wish you all a Happy St. Patrick's Day!  And since Easter is next week, I made an Easter card to wish you a Happy Easter!


So let's start with the St. Patrick's Day card.


I cut a piece of green card stock to make a folded 5"x7" card base.  I next cut a piece of green print paper to 4-1/2" x 6".  This leaves some card showing at the top, so I trimmed the print border and added it at the top of the card.


Cut decorative tags and layer onto purple print paper cut slightly smaller.  Adhere to card, as shown.


I chose these GSL chipboard pieces to use for my card.  (TIP:  I like to lay them out and see just how many I might need and how they will look.)  


I used chalk ink pads, direct to chipboard, to color my chipboard pieces.  The shamrocks were colored with two greens and then highlighted with the gold ink pad.  The wishbone charm was colored with the white and bisque chalk ink pad, while the mini bookplate was colored with the wisteria ink pad.  For the horseshoe, I used the silver and black ink pads.  


I adhered the chipboard pieces to my card front, as shown.  Lastly, I tied a bow and attached the wishbone charm to the bow with a vintage safety pin.

Now, for the Easter card, I was going for a more shabby chic look.  I made an A2 (4-1/4" x 5-1/2") size card from purple card stock.  I found this pretty laser cut white paper in my stash and adhered that, along with the purple decorative paper cut to fit in the space.


Once again, I selected my chipboard pieces that I thought would work, and I laid them out to see how I wanted to place them on the card.


I mixed the chalk paints on my craft sheet and applied two or more colors to each piece, withe the exception of the "Happy Easter" piece, which was computer generated onto a piece of purple paper and adhered to the label center.


Each piece was adhered to the card front, as shown.  A pretty lavender bow as tied and adhered at the bottom of the eggs.  One last tiny sentiment from the decorative paper was adhered beneath the eggs for balance.

Gypsy Soul Laser Cuts Products Used:

4 Leaf Clover Set (coming soon)
Other Products Used:
Paper: Olive Green card stock; Graphic 45 Time to Flourish; Secret Garden
Ink: Colorbox Chalk (Lime Pastel, Olive Pastel, Wisteria, Alabaster, Bisque); Brilliance: Platinum Planet, Graphite 
Black, Galaxy Gold
Chalk Paint:  Paper Artsy (Smurf, Hyde Park, Snowflake, Vintage Lace, Rose, Vanilla)
Mini glue dots; foam dots
Seam binding: Green, Lavender

I hope you enjoyed my cards today and are inspired to at least make a few Easter cards before the holiday.  In the meantime, have a wonderful and very holiday.

Thanks for stopping by.

Barbara