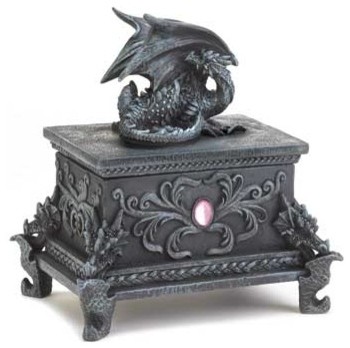
Hi everyone! Barbara here on the Gypsy Soul Laser Cuts blog today. I love this Treasure Chest, and had so many ideas running through my head. I finally settled on an oriental theme.
And here is my finished Black Dragon Treasure Chest I'm on the lookout for some small but really cool feet for it. Until then it will go without feet, but it still looks pretty good, nonetheless.
This was my inspiration piece:
1. Assemble bottom of chest. Set aside to dry.
 |
| bottom of chest pieces |
2. Assemble top. Adhere glue to center cut out piece only...
 |
| top pieces |
... and lay border and center cut-out rectangular piece on top of solid piece, using the border to help center the cut out rectangular piece.
Remove border.
Flip top over and put glue on border...
... and adhere to top, as shown. Set aside to dry.
3. Turn bottom of chest over and add glue.
 |
| Bottom of chest with slightly larger chipboard piece (left) |
Center and glue bottom of chest to slightly larger chipboard piece, as shown. Set aside to dry.
4. Place box top on box to check fit.
Glue chipboard strips around box bottom and top edges, as shown. Remove top to make sure the pieces are tight up against the top edge. Add clips to hold in place, if needed.
5. While bottom is drying, start painting the lid and two dragons with black chalk paint. Paint both sides of the top as well as the two dragons. Set aside to dry.
6. Paint box bottom with the black chalk paint, inside and out. Set aside to dry.
7. Mark the center of two pieces from the Punch Elements Deco set by drawing a pencil line from the points shown in the photo. Punch hole where the "X" crosses and use that as a template to mark the second piece. Paint the two pieces with the black chalk paint, as well as the corresponding circles. Don't punch holes in the circle pieces because they are going to be used behind the elements to level them when we glue them down.
8. Dry brush all pieces with Cascade chalk paint, or any color that looks like a blue patina.
 |
Remove most of paint from stencil brush onto paper towel
before dry brushing pieces |
9. Glue black lace around top and bottom of the box bottom.
10. Dry brush the lace with Cascade chalk paint, or whatever you used to dry brush your box.
11. Glue a second circle to the painted one. Insert butterfly embroidered fabric brad through deco element and add two brass pieces to each side, as shown.
Find the center of the box side and glue the double thick circle to the box.
This will give you a level area to glue the deco element. You may need to clamp in place while it dries.
12. Glue two dragons onto top, as shown. Let pieces dry before handling. A quick grab tacky glue works well at keeping the dragons upright while drying.
13. Add more metal embellishments to the sides and top, as shown.
Supplies Used:
GSL Treasure Chest
GSL Dragons Shape Set
GSL Punch Elements Deco
Chalk Paint (Black, Cascade)
Metal embellishments
Black lace
Butterfly embroidered fabric brad (Paper Studio)
Assorted Brushes
Quick Grab Tacky Glue
Stencil brush
Assorted paint brushes
I hope you enjoyed my project today. If you see something online that inspires you, why not give it a try to emulate it, as I have done with this Black Dragon inspired chest. Gypsy Soul Laser Cuts has a huge line of chipboard for you to work with, so go check it out and see what catches your fancy!!!
Thanks so much for stopping by, and always take time to play!
Barbara