Showing posts with label Decorative Windows 1 to 24. Show all posts

Thursday, October 11, 2018

Haunted Halloween Cabana Row House with Gypsy Soul Laser Cuts

Hi everyone!  I just love this time of year!  Halloween is  probably my favorite genre for art projects.  I have always been a horror movie enthusiast, and I guess I am just in awe of creepy, slimey, gorey things.  So, when I saw the Gypsy Soul Laser Cuts Cabana Row House Set, my first thought went to a haunted house rather than a beach house.  So, here goes.  Join me now on my macabre interpretation of these cute fold up houses. 


I chose the house and roof pieces labeled "D" and a couple of round windows for the peaked sides of the house. 


Cut up a piece of plank paper along the plank lines, as shown.


Fold the sides and tab along the score lines and glue the tab to the side of the house.  Use clamps to hold the piece together while the glue dries.


I folded the bottom tabs up and closed the bottom of the box without gluing it.  This will enable you to use it as a gift box, place a battery operated candle inside, or whatever you would like.

I ran my "plank" strips through my Xyron 1.5" sticker maker. 


Then, I started adding the "planks" paper to the sides of the house, varying the starting and stopping point, as shown. 


Continue layering the planks paper up towards the roof, cutting strips slightly larger as you go up to the peak.  Fold the tabs under and cut off the excess paper.


Glue a square scrap of grey paper to the box bottom.  Do not cover the tabs.


Paint the three circular window pieces with black chalk paint, let dry.  Punch two 1" circles from a yellow-orange piece of paper. 


Glue yellow-orange paper behind window pieces, center and glue windows to peaked area on each side of house.  (NOTE:  The open circle window piece was glued behind the four pane window piece.)


Cut a piece of corrugated card board the same size as the roof piece.


Paint top of corrugated roof with Timeless (beige) chalk paint and Carbon (black) chalk paint to give the roof a very grungy look.


Paint edges of roof along inside edge with same paint mixture.


Adhere the corrugated roof to the top of the house.  I found it easiest to glue one side of the roof first, let it dry, then glue the opposite side. 


I made a door by cutting striped print paper to 1" x 2", then adhered it to a piece of black card board.  Rough up the edges with sandpaper and add small snippets of black German Dresden border to the left edge to mimic hinges.  Snip off the brad prongs and adhere the brad top for a door handle.  Grunge up the whole door, hinges and brad handle with the paint mixture. 


Adhere door at slight angle to front of house.  Cut a piece of black card board to 3-1/4" square.  Adhere to base section of box.  


You will still be able to open the box bottom if you have not  previously glued it together.  This is optional, but I will be using it as a platform to add more embellishments along the bottom of the house.


Spread small splotches of crackle paste over the sides of the house with a small spatula, let dry.
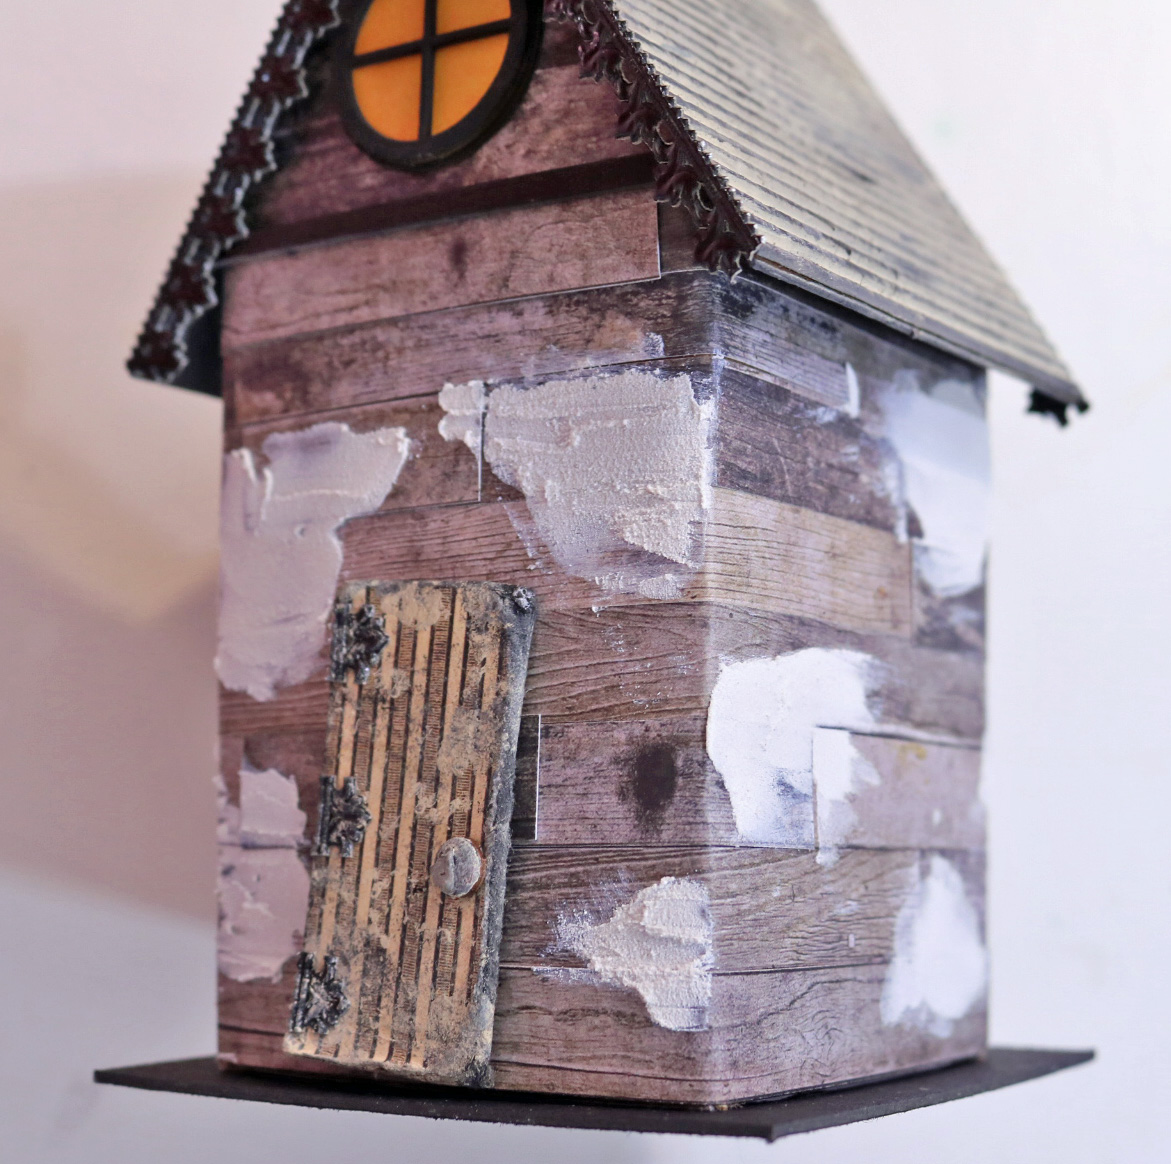


Spread Black Soot distress ink over crackled areas with a sponge to bring out the cracks and grungy up the siding.


Paint each chipboard piece with Carbon (black) paint and Black Soot distress glitter, or Heritage (orange) paint and Spiced Marmalade (orange) distress glitter.  I found it easier to mix the glitter with a clear glue and spreading it over the painted chipboard pieces.  Some pieces will need to be painted and glittered on both sides, if the back side will show.  The ghost was painted with the Timeless (beige) paint mixed with Carbon (black) paint.


Adhere the chipboard pieces to the house, as shown in the photos below.  The smaller spider web was cut in half and half was placed on the front of the house.  The large bat wings extend from one side of the roof to the other.  I added a blue patina paint to the black German Dresden border along the roof line to help the bat show up better.  One of the ravens was placed atop the roof, as shown.  I cut a tiny slit in the roof to allow the foot of the raven to be inserted with a bit of glue.


The other half of the spider web was placed below the roof line on the left side of the house, as shown below.  The black cat was adhered to the left side of the roof with it's tail hanging below the roof line.


The larger spider web was glued to the right side of the roof with an orange glittered spider, and the ghost was adhered towards the bottom of the house.


On the back the word "SPOOKY" was adhered between the roof line with one of the ravens sitting atop it.  


Fall and Halloween botanicals were added around the bottom of the house, along with some botanical mini pumpkins and a resin skull.

Supplies Used:

GSL Cabana Row House Set (C)
GSL Decorative Windows 1 to 24
GSL Spooky Shape Set
GSL Creepy Critters
GSL Spiders and Webs Shape Set (contact store)
Xyron 1.5" sticker maker
German Dresden borders
DecoArt Americana chalk paint (Timeless, Carbon, Heritage)
Golden Crackle Paste
Blue patina paint (Art-C)
Card stock (gray, yellow-orange, kraft corrugated)
1" circle punch
Plank printed paper (Tim Holtz Halloween paper stash)
Stripe printed paper (Graphic 45 Rare Oddities paper collection)
Tim Holtz Distress Glitter (Black Soot, Spiced Marmalade)
Clear glue (Paper Studio)
Aleene's Fast Grab Tacky Glue

Well, there you have it, a beach house turned haunted.  I hope you enjoyed my Halloween cabana row house as much as I enjoyed making it.  Be sure to check out the Gypsy Soul online store for more fun laser cuts to use in all your projects, and the blog is also full of inspiration from the design team.

Thanks so much for stopping by, and have a wonderful and crafty day!

Hugs,
Barbara

Thursday, May 24, 2018

A Vintage Door Hanger with Gypsy Soul Laser Cuts - Part 1 of 2

Hi everyone!  Today I am sharing another quick and easy project using one of the Gypsy Soul Laser Cuts Door Hangers.  Now these are so versatile and fun to decorate.  You can use just about anything to enhance a bare piece of chipboard to perfectly suit yourself or whomever you plan to give it to. You can use it to display on your door knob whether you are either "IN"or "OUT", "BUSY", ARTIST AT WORK", or plain ole' "DO NOT DISTURB".  What will you put on yours?


You can see my complete video tutorial below.  I've divided the tutorial into two parts to keep it short, so come back in a few weeks when I will finish up the reverse side in Part 2.


CLICK HERE TO SUBSCRIBE TO MY CHANNEL

Supplies Used:

GSL Door Hangers
GSL Cuckoo Clock
GSL Decorative Windows 1 to 24
GSL Punch Elements Deco
GSL Tiny Shingles Stencil
Quarterfoil 6x6 stencil (Clear Scraps)
Light Molding Paste (Golden)
Black Gesso
Gel Medium or Varnish
Krylon Crystal Clear acrylic spray
ColourArte Silks Acrylic Glazes
  Caribbean Mist
  Moss Green
  Bolivian Blue
  Golden Monarch
ColourArte Primary Elements
  Burnt Umber
Lumiere 3D Dimensional Paint (Brass)
Prima/Finnabair Art Alchemy Opal Magic Wax
  Green Brocade
  Vintage Silk
  Turquoise Satin
Vintage Photo Distress Ink
Blending tool
Aleene's Quick Grab Tacky Glue
Krylon Crystal Clear acrylic coating spray
Assorted Brushes
Spatulas
K&Co Metal Art stickers

I  hope you enjoyed today's project, and perhaps I've been able to give you some ideas for your very own door hanger.  Oh, and how about making some of these for friends and family.  Wouldn't they make great and unique gifts?  I think so.

Well, that's it for today.  Thanks so much for stopping by, and I hope you will come back for my second part of this video.  Don't forget to subscribe so you won't miss it, or any of my other videos.

Until next time, have a very crafty day!

Barbara

Thursday, June 22, 2017

Cabana Row House with Gypsy Soul Laser Cuts

Hi everyone!  Today, I want to share a fun little Summer project using these Cabana Row Houses from Gypsy Soul Laser Cuts.  Not only would these cuties make great mixed media projects or table decorations and favors, but they would also make wonderful gift boxes since the bottom folds up, but does not have to be glued in place.  Hmmmm ... think of the possibilities.  I'm sure you can come up with even more ideas. 


When you get the set, look for the tiny alphabet letters (A through E) on each piece to match up the house with its coordinating roof piece.  They are so simple to put together, just fold the house up and attach the roof. 


House E

Cut one paper strip 2-3/8" x 8-1/2" and one 2-1/8" x 2-1/8" square.  Cut two triangles for the eaves.  I used the box itself to measure and trace the eaves onto back of paper.  


Run paper through Xyron sticker maker and edge paper strips with Evergreen Bough distress ink and foam blending tool. 


Adhere paper pieces to bottom section of house. 


Place red liner tape along roof and side tabs, as shown.  


Adhere a  half round window on each side of house under eaves.  Set aside.


Cut a piece of print paper cut to 2-3/4" x 4-3/4".  Run strip through Xyron sticker maker and edge paper with Vintage Photo distress ink.


Adhere paper to roof top.


Spread a thin layer of  light molding paste through stencil, let dry.  


Lightly add Vintage Photo distress ink to paste with blending tool.


Now back to the house.  Remove red liner from taped sides.  Fold side tab in and attach to side of house.


Fold tabs in and close up bottom of house.  You can also tape this in place if you do not plan on using the house as a gift box.


Fold roof tabs in and attach roof.  Glue two small square windows from the Seaside Doors & Windows set to the sides of the house, as shown.


Cut bottom portion of smallest Vintage Ladies Silhouette.


Glue bottom portion that was cut off back onto silhouette, but higher up.  This will shorten the lady and make her size more appropriate for the size of the house.


Use a spatula to apply a thick coat of Heidi Swapp Hot Pink Metallic Texture Paste to vintage lady, disguising chipboard join and swiping lines in the paste to resemble folds of fabric in her dress.  Set aside to dry.


Paint both sides of the vintage bicycle with Vivid True Silver.  Let dry, then add Vintage Photo distress ink, which will give it a coppery look.  Don't cover all of the silver, though.  


Spread light molding paste over hot air balloon and draw lines through paste, as shown.  Set aside to dry.

Paint balloon with Vivid Ultra Metallics, first with Lemongrass, then African Jade, then Pink Azalea, and lastly with Teal Zircon.  Let dry, then lighten the color with African Jade.


Cut a 5" piece of 20 gauge copper wire and adhere to back of balloon.  I used a wet glue and a piece of tape.  Let glue dry before handling.


Turn balloon over and repeat process for opposite side, i.e., add light molding paste, draw lines through it, and color with the Vivid Ultra Metallics.  This will cover where you have added the coper wire on the back.


Make a little twist in the copper wire, as shown.  


Use a paper piercer or awl to make a tiny hole in the roof top and insert wire through it.  Add clear drying glue to hold in place.


Adhere vintage lady to left side of house.

Decorate house as you like.  I have added some flowers just below the half round window, and adhered the vintage lady to the left, and the vintage bicycle was added to the right with a foam dot to make it look like it was propped up against the house.


Here are a few views from different angles.


GSL Miniatures Shape Set - Guy Thing
Paper Studio Country Road 4.5" x 6.5" paper pad
ColourArte Vivid Ultra Metallics
  True Silver
  Lemongrass
  African  Jade
  Pink Azalea
  Teal Zircon
Evergreen Bough, Vintage Photo distress ink
Foam blending tool
Xyron 3"sticker maker
Golden Light Molding  Paste
Spatula
Tim Holtz Stripes stencil
Heidi Swapp Hot  Pink Metallic Texture Paste
20g copper wire
Quick Grab Tacky Glue (Aleene's)
Miniature flowers (Paper Studio)

I hope you enjoyed my project today.  Be sure to check out the fabulous laser cut chipboard from Gypsy Soul for even more ideas to decorate these Cabana Row Houses.  

Thanks for stopping by, and have a crafty day!

Barbara