Showing posts with label tutorial. Show all posts

Friday, June 23, 2017

#StudioABSeeSurf Video Hop - "Beautiful Seahorses" Mixed Media Canvas

Hi everyone.  So glad you stopped by today so I could tell you about another fun video hop from some of the gals over at Studio ABSee.  We often get together and make video tutorials to share with you, and we almost always have a giveaway from each channel.  So come on and join us for lots of fun ideas and inspiration, and a chance to win a prize.

Here is the link to my video in this hop.  When you get there, you can go to the description box below the video for all the links to each video in the hop.  Please leave a comment on each video for a chance to win, click on the like 👍button, and subscribe, if you don't already.


I hope you enjoy the hop, and thanks for stopping by.  

Have a wonderful, crafty day!

Barbara

Thursday, March 9, 2017

#ColourArteSpringHop - ATC Shrine for the Birds

Welcome to ColourArte's Spring Video Hop.  There will be lots of inspiration from the rest of the team, so grab a cup of your favorite beverage, sit back, and be inspired!  

Here is a quick peek at my project.  Find out more about it in my video below.


The winner from each participating channel will win a 6-piece Silks Sampler Set. 


ColourArte Supplies Used:
Vivid Ultra Metallics
  Siam White
  Pink Azalea
  Ginger Peach
  Red Poinsettia
  Teal Zircon
  True Metals Dragon Gold
Silks Acrylic Glaze
  Olive Vine
  Chestnut Brown

Other Supplies Used:
ATC Shrine - Leaves (gslcuts.com)
Crackle Paste (DecoArt)
Texture Sand Paste (DecoArt)
Dried Statice (Arnold Grummer)
Miniature Birds (Hobby Lobby)
Miniature Nest (Prima)
Reindeer Moss
Walnut Blossom Branches (Prima)
Aleene's Fast Grab Tacky Glue
Wood Plank mold (Wilton)
Delight Modeling Compound (CreativePaperclay)

See the description box below the video for giveaway instructions, and then click on the first video link to hop to the next designer. I would love for you to subscribe to my youtube channel.  As always, so glad you stoppesd by, and thanks for watching.

Good luck!

Barbara xo

Thursday, July 17, 2014

Sin City Stamps: Mixed Media Hot Air Balloon Chipboard Book

Happy Friday, everyone!  I have been a busy little beaver lately.  I finally decided to take the plunge and attempt to learn how to make a video.  I wanted to share with you this new Hot Air Balloon Chipboard Book from Sin City Stamps, as well as one of the newest stamp plates to go along with it, Up Up and Away 2.  There is lots of room to further embellish your book, add photos, quotes, or whatever you want to add to it.


Here is my first video attempt, and I hope you enjoy it as much as I enjoyed making it for you.


Supplies used:

Sin City Stamps:  Hot Air Balloon Chipboard BookUp Up and Away 2 stamp set; Gear 3 Die CutsGear 17 Die CutsGear 19 Die Cuts
Paper:  Carta Bella Well Traveled collection; 140 lb hot press watercolor paper (to stamp on)
Inks:  VersaFine Onyx Black; Distress Inks:  Evergreen Bough, Salty Ocean, Wild Honey, Brushed Corduroy, Peeled Paint
Ink Spray:  Maya Mist - Brown Mist
Acrylic Paint:  Fresco Blood Orange, Cinnamon (Paper Artsy); Malted Milk (Ranger-Jenni Bowlin);
Other:  White Gesso, foam brush, watercolor brush, matte medium, ink blending tool, Inka Gold: Gold, Copper (Viva Decor), Distress Markers, Derwent Inktense ink blocks, spinner, brad, various metal embellishments

Thanks for watching, and please be sure to visit the Sin City Stamps Online Store to see all the newest products, not only in new stamps, but also tons of new chipboard and die cut pieces for your crafting enjoyment.  And I hope you will visit the SCS blog often for lots of inspiration from the rest of the team.

Have a wonderful weekend, and happy crafting!!

Barbara

Wednesday, November 27, 2013

Christmas Triptych with Altered Pages Instructions

Hi everyone, Barbara here with one of my favorite art forms, the triptych.  With the Christmas holidays fast approaching, I wanted to make a Christmas triptych.  If you missed my post earlier this week, I did not give any instructions for how I made this.  So, I thought I would post them for you here today.  I hope you enjoy it and are inspired to give these beautiful art forms a try.

So,  some of you have asked, what is a triptych?  Wikipedia defines it:  
triptych (/ˈtrɪptɪk/ trip-tik; from the Greek adjective τρίπτυχον ("three-fold"), from tri, i.e. "three" and ptysso, i.e. "to fold" or ptyx, i.e. "fold")[1][2] is a work of art (usually a panel painting) that is divided into three sections, or three carved panels which are hinged together and can be folded shut or displayed open. It is therefore a type of polyptych, the term for all multi-panel works. The middle panel is typically the largest and it is flanked by two smaller related works, although there are triptychs of equal-sized panels.
Side 1 - Vintage Christmas
Side 2 - Traditional Christmas
Supplies used:

Altered Pages collage sheets:  Happy Holidays (AP-505), Holiday Postcards (AP-1155), Ivory Angels (AP 2090), 
Christmas Emporium 8x8 paper pad (Graphic 45)
Graphic 45 Coredinations Cardstock
Vintage Text Paper
Faber-Castell Big Brush Pen (Brown)
German Scrap
4x6 chipboard pennants (Paper Accents) (3)
Hinges (Tim Holtz)
Distress Stain:  Old Paper (Tim Holtz)
Copper Metallic acrylic paint
Ink Pads:  Dark Moss Chalk (Colorbox)
Doily die (My Favorite Things)
Ornate Frame die (Tim Holtz)
Mini Rosettes die (Tim Holtz)
Botanicals, decorative brads, bling

Directions:

Cover one side of three pieces.  This will be the front side of the triptych.

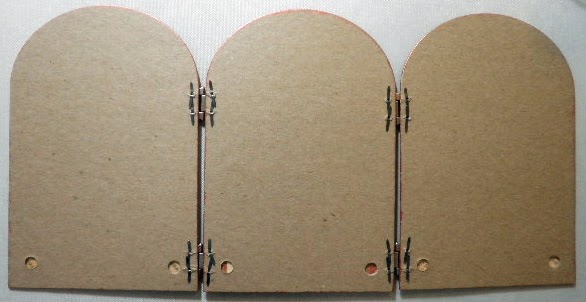
Attach hinges, as shown.  


Reverse side - brads holding hinges show
Cover the remaining sides of the three pieces, covering the brads that hold the hinges on.

Die cut ornate frame from Christmas Emporium red print paper and chipboard, adhere together.
Center holly flower girl (AP-1155) in center of frame and trim to fit inside opening.  Use brown big brush pen to finish off the frame edges.

Adhere to center panel with foam dots.  (see photo below)


Die cut one doily from Astroparche paper, distress edges with Vintage Photo, and cut in half.

Cut out two half circle poinsettia images (AP-505) and adhere to each half of the doily die.  

Adhere to both side panels, as shown.
Die cut two mini rosettes from vintage text paper.  Add a strip of washi tape to back of rosettes to give this fragile paper more strength.  
Form into rosettes following directions on die.

Stamp a "2" and a "5" onto a scrap piece of the vintage text paper with moss chalk ink.  Punch out with   1/2" circle punch, adhere each to center of rosettes.  Add 1/2" epoxy circle to center.

Add oval centers (removed from center of ornate frame die cut) and add to both outer panels, as shown.
Trim "Angels" image from AP-2090.  Adhere images to ovals, add botanicals and gem flourishes, as shown.  

close-up of decorative brad covering ends of botanicals
For reverse side, trim and distress edges of Climbing Santa, Merry Christmas Santa, and two ivy spray (AP-505-Happy Holidays), Santa with child  (AP-1155-Holiday Postcards).  Add Old Paper distress stain to edges and adhere to coredinations cardstock cut slightly larger than image.  Adhere to reverse side of triptych, as shown.

Adhere a strip of German scrap to the bottom of each panel.  If you want to tone down the bright gold color, you can apply a thin coat of a black metallic cream or black archival ink and wipe off excess.
A few close-ups of the botanicals and embellishments.

I hope you have enjoyed my Christmas Triptych and directions for making it.  These are very easy to make and are so beautiful as stand alone decorations for any occasion.

You can get all your supplies to make this at www.alteredpages.com.  And don't forget to stop by the Altered Pages Monthly Challenge Page to see all the inspiration from the design team, and go vote for your favorite in the side bar.

Thanks for stopping by.  Happy Thanksgiving to you all!

Barbara

Thursday, August 15, 2013

Altered CD Wall Hanging with Sin City Stamps

Hello everyone, and welcome back to the blog.  I am so glad you stopped by today because I have a really fun project to share with you.  If you are like me, you have a stockpile of blank or old CDs just waiting to be altered.  If you are intimidated by large canvases or art boards, then this is a good place to start because your "canvas" (CD) is small and easy to finish in a day or two, depending on drying time for your mediums used.  So let's get started.


Supplies Used:

Sin City Stamps:  Art Journaling with Terri Sproul,  A Wing Above the RestArt Journaling with Terri Sproul 2

Blank or used CD
Map Collage print paper (Paper Studio)
Rebel Teal Distressed print paper (Glitz Design)
Kraft-Core Nostalgic Collection card stock (Tim Holtz)
White Gesso
Twinkling H20's (Mustard Green, Cranberry, Snap Dragon, Irish Mist)
Black India Ink pad (Stewart Superior)
VersaMark ink pad (Tsukineko)
Gold detail embossing powder
Distress Paint (Wild Honey, Broken China, Fired Brick, Vintage Photo)
Distress Ink (Black Soot, Vintage Photo)
Workable Fixatif (Krylon)
Grunge Paste (PaperArtsy)
8" black nickel fine cable chain (Hobby Lobby)
7/8" circle punch
Fast Grab Tacky Glue (Aleene's)
Embellishments (Tim Holtz Idea-ology)

Directions:

Trim a piece of map collage print paper to fit over the CD.


Adhere paper to CD using gel medium or your favorite wet glue.  Trim around CD, and use a piece of sandpaper or nail file to sand edges smooth.


Apply a thin coat of gesso over paper, leaving some of the image showing through.


Stamp focal image (A Wing Above the Rest) onto CD using Black India Ink or any archival, waterproof ink.  You do not want your stamped images to bleed.


To make a mask, stamp the same image onto a piece of notebook or plain paper, cut out, and apply a removable glue to the back.  (I used Zig 2-way glue for this.  If you let the glue dry first, it becomes removable.)  Use the mask to cover the image and protect it from further stamping.  This also allows it to remain in the foreground.  All images stamped over the mask will appear to be behind this image.


Begin stamping images on the CD and over the masked image.  I used the honeycomb ( Art Journaling with Terri Sproul), the bricks and flourishes (Art Journaling with Terri Sproul 2) and STEAM (A Wing Above the Rest), in Black India Ink.


Spread a bit of grunge paste or heavy gel medium along the edges and stamp into the wet paste with the honeycomb image.  Immediately wash off your stamp under running water and use a soft brush to remove all of the medium.  Remove the mask and color the focal image with Twinkling H20's.


Spray CD with a workable fixative and allow to dry to protect what you have done so far.  The Twinkling H20's are water-based, and my next step will make them run.

Replace the mask over the focal image, but cut away the wire dress form beneath the bodice so that your background colors will show through this section.


Dab wild honey distress paint over the honeycomb images, spritz with water and allow to drip a bit.  Lightly dab some paint off and heat set.  These paints react with water until you heat set, then they become permanent.


Dab broken china and fired brick over the remaining portions of the CD and spritz with water.


Lightly dab some of the paint again and heat set.  Dab vintage photo distress paint around the edges of the CD and heat set.  Gently remove your mask.  I will tell you that I found the Zig 2-way glue became more stubborn to remove after heat-setting the paints.  In this picture, you can see where it removed some of my image, but there are a few ways to fix this.  Yay, isn't that good to know?


One way to fix this is to re-paint the wing with the Twinkling H20's.  I decided to repaint the whole image to bring it back to life.  I want my winged dress form to really stand out.


If you don't like this (because it did remove some of the stamped detail in the wing) you can always stamp the wings onto another piece of paper, cut them out, color them, and glue them over the original wings.  You see, no sweat.  There is always a way to fix things, and sometimes you like the "fix" better than the original.

I decided to leave it the way it is because I like the distressing in the wing, and to make it pop even more, I used a technique I learned from Terri Sproul in her art journaling videos about using black and white around an image to bring it to the forefront.  To do this, I replaced my mask, including the bottom  part I previously cut off, and lightly dabbed black soot distress ink around the dress form and wings.  Start the inked sponge on top of the mask and pull outwards away from the masked image.  I also used my finger to feather some of the ink out.


Now, that looks better, but I think it needs a bit of refining.


So, if you have a charcoal pencil, you can run the point along the outline and feather the charcoal more.  I decided to use my black Pitt pen and feather it with my fingers before it dried.


If you want to bring back some light on one side, you can then run a white Pitt pen along one side and feather it before it dries.  Determine where your "light source" is coming from and color only on that side.


Now, these colors are a bit bright for me, so I sponged vintage photo distress ink over the whole CD, which brought out the dimensional honeycomb.  I really like this look better.

Now let's embellish the CD.  It first needs a hanger, so punch two holes in the top of the CD.  A crop-a-dile works really well for this.  Set eyelets if you like.  I think it finishes it off.


At this point, I decided to cover the back of my CD with the rebel teal distressed print paper, just to finish it off.  That way, I could punch my hanger holes before inserting the chain, and my CD will be flat when I do it.  Once I add my dimensional embellishments, it won't be so easy.


Thread the fine cable chain through the holes, front to back, and close ends with a small jump ring.


Stamped winged clock (A Wing Above the Rest) onto a scrap of aqua and tan Kraft-Core card stock using Versamark ink and gold detail embossing powder.


Fussy cut the entire aqua image, and only the tan pocket watch image.  Save those tan wings for another project.


Adhere tan pocket watch over aqua image, using foam dots for added dimension.


Use a quick grab tacky glue to adhere winged clock to hanging chain.


Punch a 7/8" hole from the same tan card stock and cover the glue and hanger with the circle.


Dab tarnished brass distress ink and broken china distress paint over the number "3", let dry.  Glue embellishments to the front, as shown.


I hope I have inspired you to dig out those old CDs and make some wonderful art with them.  You can make a wall hanging, as I did, or mini book covers for a mini album, or even an entire book using them.  There is no limit, except your imagination.

As always, thanks so much for stopping by, and I hope you will take some time to visit the blog to see more creative works from the fab design team.  Also, be sure to check out the newest stamp releases this month, as well as the special promotion going on now over at the  Sin City Stamps store.  They have the most wonderful stamp images that I know you are going to love, and coupons to boot.  All you need to do is visit the coupon page and scratch off the blocks to reveal a random discount code.

August promotion the customer will go to the coupon page and scratch off the blocks to reveal a random discount code.
http://www.sincitystamps.com/index.php/sin-city-stamps-coupons


Have a wonderful, creative weekend, and go do some SCS shopping!!

Barbara