Hello everyone, and welcome to my blog. This is a really exciting day for me. I have the great honor and pleasure of sharing with you the first post as a member of the newly-formed design team for Sin City Scraps.
Sin City Scraps has a beautiful selection of rubber stamps and accessories, and I hope you will take some time to visit their online store. I guarantee you will love their products as much as I do.
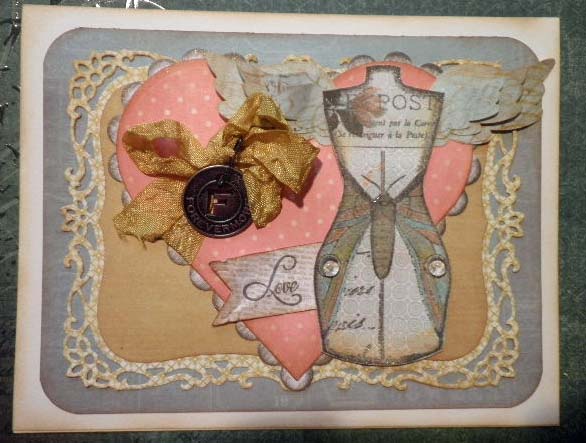
Since Valentine's Day is just around the corner, I naturally chose to make a couple of Valentine's Day cards. I call my first card "Love Forevermore".
1. Adhere 4-1/2" x 6" piece of blueish green print paper to ivory card base. Round corners.
2. Use largest size of decorative labels eight die to cut green print paper.
3. Use next to largest size of labels eight die to cut olive green print paper.
4. Use largest scalloped heart die to cut off white print paper.
5. Use largest classic heart die to cut pink polka dot paper.
6. Ink scalloped heart edges with Brilliance lightning black ink.
7. Distress edges of remaining papers with brushed corduroy distress ink.
8. Adhere paper layers as shown in photo.
9. Stamp
mannequin tags 2 image onto a piece of green print paper using Brilliance lightning black ink. Emboss with clear embossing powder.
10. Color image using Distress Markers.
11. Trim image and adhere to card with pop dots.
12. Punch two sets of wings. Remember to turn the paper over when punching the second set of wings.
13. Stamp any small scroll image onto each wing using scattered straw distress ink.
14. When dry, layer the wings and attach beneath the stamped mannequin image.
15. Color off-white seam binding using Scattered Straw distress stain. Bunch up and allow to dry to achieve the vintage, crinkled look.
16. Tie ribbon around one edge of the pink polka dot heart and tie in a bow.
17. Attach the "Forevermore" metal tag to the bow using a mini safety pin.
18. Stamp "Love" onto another scrap of printed paper and cut out. Trim one edge into points and distress the paper.
19. Adhere beneath the mannequin image.
20. Add two clear dew drops to mannequin image, and add a layer of 3D crystal lacquer to moth body only.
Supplies used:
Sin City Scraps Rubber Stamp Plate
mannequin tags 2 (mannequin tag) (Love)
MME 6x6 paper pad - Market
Ivory Card folded in half to measure 5" x 6-1/2"
Tim Holtz Idea-ology mini safety pin and Forevermore metal tag
Distress Ink (Old Paper, Scattered Straw, Brushed Corduroy)
Distress Stains (Scattered Straw, Shabby Shutters)
Distress Markers (Pumice Stone, Spun Sugar, Weathered Wood, Old Paper, Scattered Straw, Picket Fence, Tattered Rose, Tumbled Glass, Bundled Sage, Shabby Shutters)
Brilliance Lightning Black ink pad
Spellbinders Decorative Labels Eight (largest size)
Spellbinders Labels Eight (next to largest size)
McGill Punch - Angel Wings
Sakura 3-D Crystal Lacquer
Any scroll image rubber stamp
Off-White 1/2" seam binding
Foam pop dots
My second card is entitled, "Time Spent With You". I plan on giving this one to my sweet husband.
1. Cut 5" x 6-1/2" printed paper from Timeless Type paper pad to cover front of ivory folded card.
3. Adhere to ivory folded card front.
4. Use largest scalloped heart die to cut off white print paper from MME Market pad.
5. Use largest classic heart die to cut pink music background paper from MME Market pad.
6. Ink scalloped heart edges with Brilliance lightning black ink.
7. Distress edges of remaining papers with brushed corduroy distress ink.
8. Adhere heart layers as shown in photo.
9. Stamp clock face image from
Clocks and Birds stamp plate onto white card stock using Archival black ink pad.
10. Color image using Distress markers. Blend colors with a water brush.
11. Cut pocket watch using Spellbinders die several times onto thin chipboard and gold hammered card stock. Glue pieces together for dimension.
12. Cut out a template using 1-3/4" circle punch. Place over center of pocket watch and line up punch with template to punch out center.
13. Adhere pocket watch over clock face. Fill center with 3D Crystal Lacquer to give the appearance of glass.
14. Punch two sets of wings. Remember to turn the paper over when punching the second set of wings.
15. Mix Terri Sproul's Pearl Garnet Mixer with water in a mini mister bottle and spray the wings.
16. Allow wings to dry. Layer wings and attach beneath pocket watch.
17. Sprinkle a few Robin's Nest Soil dew drops for added interest.
I computer-generated the sentiment inside the card, as follows:
"Time spent with you is time well spent.
Happy Valentine's Day!"
Supplies Used:
Sin City Scraps Rubber Stamp Plate
Clockworks Inspired by Terrri Sproul (Roman Numerals - 14)
Sin City Scraps Rubber Stamp Plate
Clocks and Birds (clock face)
DCWV Timeless Type 8x8 paper pad
MME 6x6 paper pad - Market
Robin's Nest Dew Drops - Soil
Distress Markers (Pumice Stone, Spun Sugar, Weathered Wood, Old Paper, Scattered Straw, Picket Fence, Tattered Rose, Tumbled Glass, Bundled Sage, Shabby Shutters)
Spellbinders Die - Pocket Watch
EK Success 1-3/4" circle punch
HOTP Gold Hammered Cardstock
Quickutz 4x12 double-sided adhesive chipboard
Ranger Archival Black ink pad
Versamark ink pad
Gold Pearl Lustre embossing powder
Well, I hope you enjoyed my project cards this week. Thanks so much for stopping by, and please be sure to visit the
Sin City Scraps blog to see what the other extremely talented design team members have prepared. Inspiration awaits you.
Have a happy crafting week!
Barbara