Showing posts with label dew drops. Show all posts

Thursday, December 11, 2014

Day 11: Unruly Paper Arts 12 Days of Christmas Link Up Party

Hello all!  So glad you stopped by for Day11 of the Unruly Paper Arts 12 Days of Christmas Link Up Party.

This Christmas card was super simple to make.


Die cut rectangle frame from red card stock, print hot air balloon snowman to fit inside frame and adhere.  Add gold glitter straight line stickers around inside frame and gold star brads on each corner.

Fussy cut "Believe" from paper stack, and use one of the print papers for your base layer over a red top-folded card.

Ink chipboard snowflake with Delicata Golden Glitz ink, add red dew drop to the center, and add holly leaves beneath it.

Voila, you are done!

Supplies:

Altered Pages collage sheet:  AP-153 Santa Clause; Chipboard Snowflakes
DCWV Christmas Made paper stack
Red card stock
Quickutz 4x4 rectangle frame die
IMAGINE Crafts:  Delicata Golden Glitz ink pad
The Robin's Nest:  dew drops
Bazzill holly leaves
Gold straight line stickers
Gold star brads

If you have not linked up, there is still one more day to do so.  Otherwise, sit back and enjoy all the creative talent being shared and visit all the blogs in the Unruly Paper Arts 12 Days of Christmas Link Up Party you can to get as much inspiration as you can handle, and enjoy.

Have a good day, and see you again tomorrow!

Barbara

Thursday, October 30, 2014

The Robin's Nest Witch Hat Contest and Smeared and Smudged 31 Days of Halloween 2014 Blog Hop- Day 30

Welcome to Day 30 of the 31 Days of Halloween Blog Hop. As you know by now, I am participating in this month-long blog hop with some extremely talented artists.  The complete list of Wicked Bloggers (that's what we are called) are in my side bar.  There are lots of prizes in the daily scavenger hunt, and a Grand Prize worth over $300.

To see all of the rules and regulations for 31 Days of Halloween 2014, please visit THIS POST.
To see Scavenger Hunt winners from previous days, please visit THIS PAGE

Today, I want to share my witch's hat that I am also entering into The Robin's Nest Witch Hat Contest. All that was required was to use 50% or more of their products.  Apologies in advance.  There are lots of photos in this post.

Oh look, there's Skully again. I guess he got tired of sitting on top of the apothecary jar.   Looks like he's hitching a ride on that witch's hat!


There are lots of patterns and templates for making your own witch hat, but I chose to start with this paper maché hat I found at my local craft store.  I wanted it to be sturdy, and I think this will do it.
Next, I chose this beautiful Stencil Green/Plum paper for my hat.  I took a 12x12 piece of it, gently folding in half both directions to find center, and made a cut in both directions.
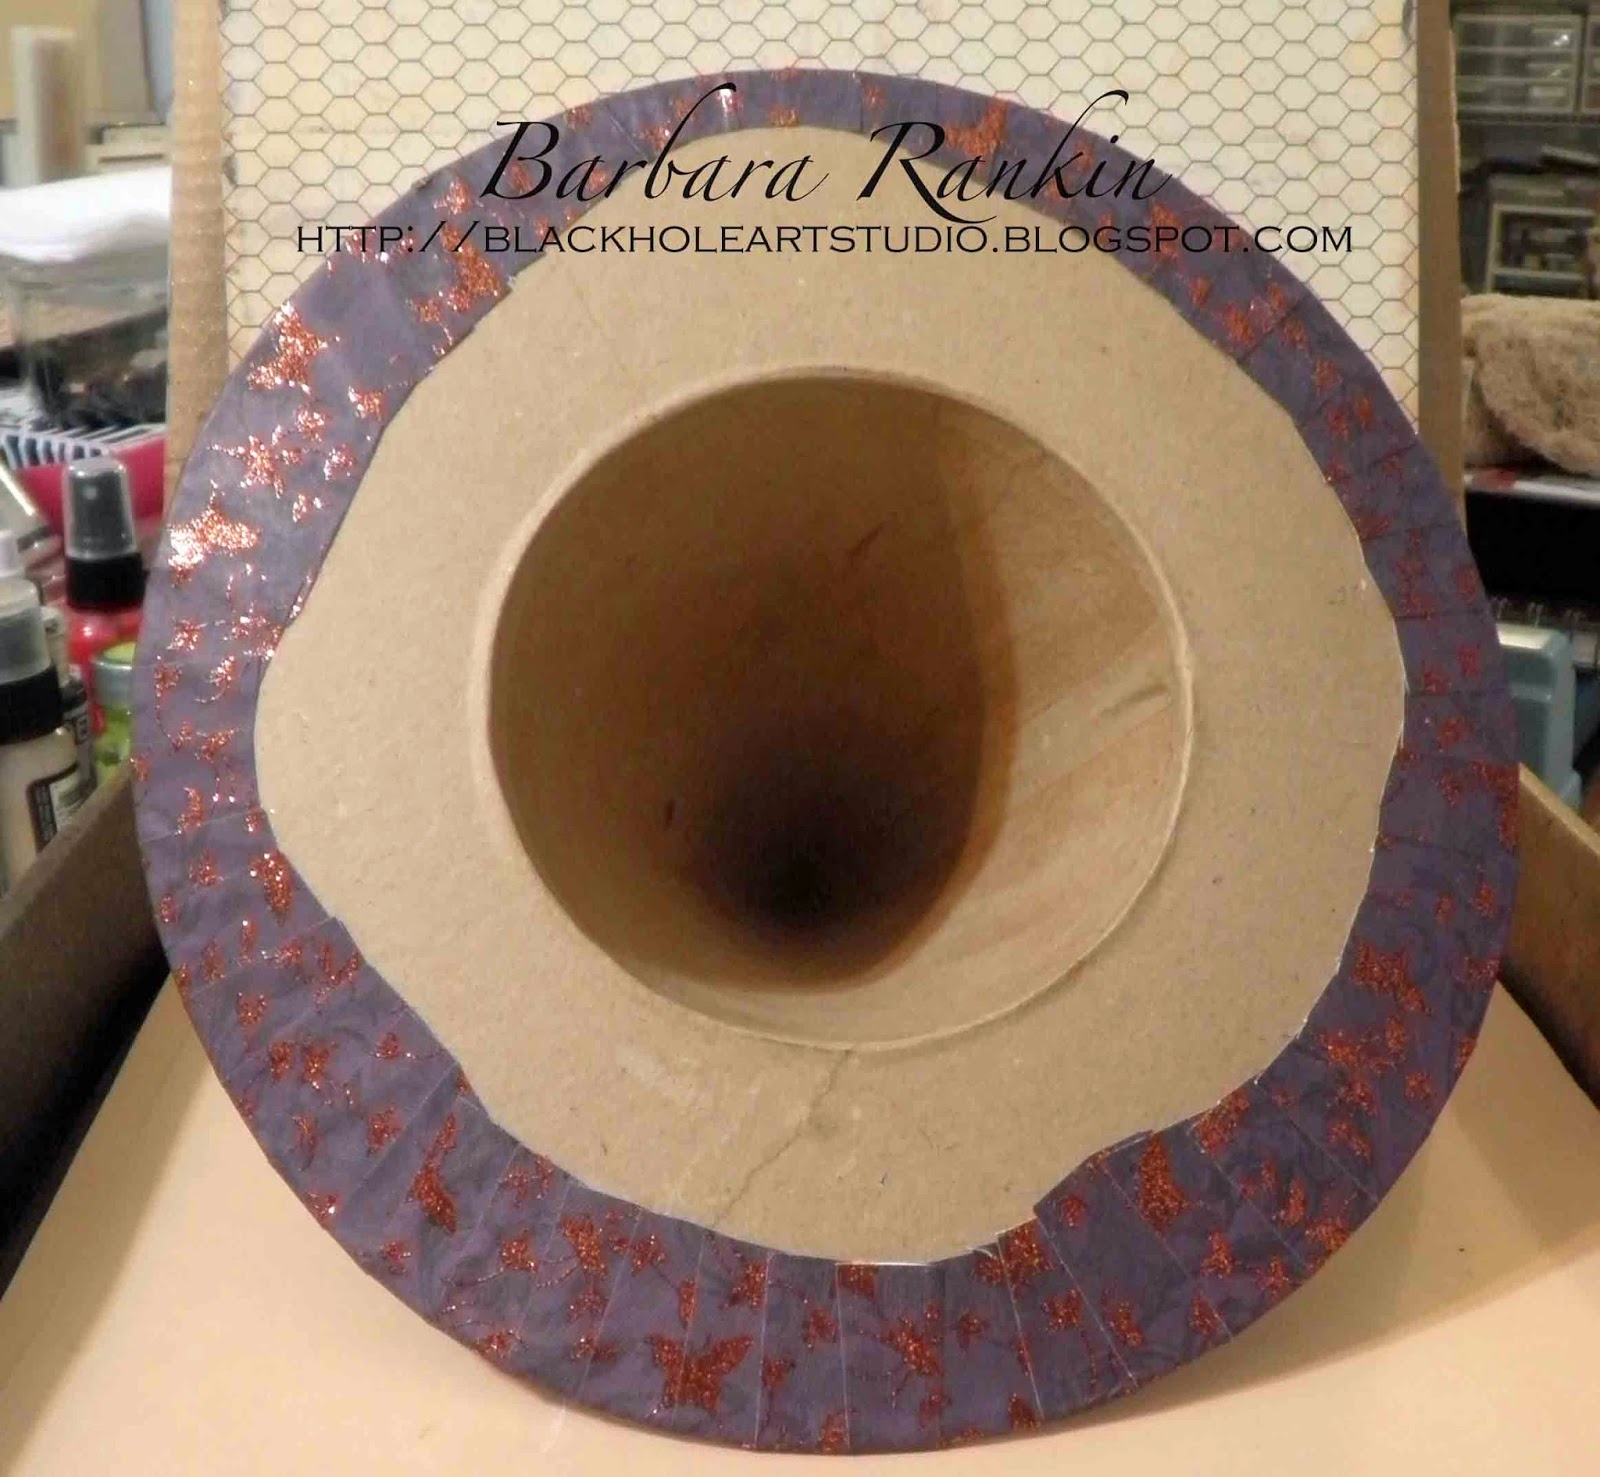
I pushed the center of the hat through the opening, adjusting my cuts as needed to get the paper to lay flat on the brim.  
I adhered the paper to the brim with PPA bookbinding glue, smoothing the paper with my fingers and a bone folder.  As you can see, I had to make some more snips in the paper to get it to lay flat against the brim.
I trimmed the paper around the outer edge of the brim, leaving approximately 1" - 2", snipping every 1/2" or so around the circumference.  I turned the edges of over and adhered to the underside of the brim to make a neat edge.  
To cover the cone shaped top, first measure the circumference (16") and the height (8").
Height = 8"

Circumference = 16"
Begin adhering each triangle to the cone shaped top, overlapping, if necessary.
Luckily, 16" divides easily into four 4" strips, 8" long.  Make yourself a couple of templates from computer printer paper.  First, fold the paper in half along the 8-1/2" side.  Mark 2" out from the center fold and make a pencil mark.  Use a ruler to draw a line from the 2" mark up to the top of the fold.  When you open it up, you will have a triangle.  Do this twice to have two templates.  Now you can get all four triangles from one piece of 12x12 paper.
Cut the four triangles out from your paper, as shown, turning the template point up, then point down, to get the most from your sheet.
Trace around the brim of the hat and cut out another piece of the Stencil Green/Plum paper.  Adhere to the underside of the brim with the PPA glue.  Cut slits in the center towards the brim.
Make as many slits as necessary to allow the paper to easily fold inward.
Adhere the slits to the inside with more PPA glue.
Paint the inside of the hat with black gesso.  I used the same sponge brush that I used for the PPA glue.
I applied a coat of Copper Gilder's Paste around the edge of the brim to hide the white edges of the paper after being cut.
I used Dusty Concord distress stain to disguise the cut white edges where I had joined the four triangles on the top of the hat.  It matched perfectly when it dried.

I next tried to adhere black netting that held produce to the bottom section of the hat.  
I used too much adhesive and removed the netting.  Much to my surprise, it left this awesome texture, as though the netting was still attached.
So, I used my happy accident and simply added more Dusty Concord distress stain over the adhesive.  Some of the ink is not dry yet, but it will match very well when it does.  You have to admit, it does look like the netting is still adhered, doesn't it?
Now to start making the embellishments.  Stamp Vintage Florets in different sizes onto the gold glitter card stock with Spiced Chai StazOn,  
Die cut each flower with the matching die.

Shape flowers with large ball stylus and glue petal layers together.
Add Champagne Stickles glitter glue to the petals.  I also added a Goldenberry dew drop to the center of the smallest flower.
Punch multiple sizes of daisies from the Brick Glitter Cardstock.  Shape each one, pinching the ends to make them more spiky looking, and adhere layers together.  Mist with the Coral glimmer mist.
Spray a length of creepy cloth with water and Dylusions Fresh Lime ink spray.  When dry, adhere to band of hat, overlapping ends.
Use dies to cut six bats from the black glitter chipboard.  Cut a length of wire and sandwich the wire between two bats.  You will make three bats total.
Die cut a couple of bare trees and twigs from the gold glitter chipboard.  Use the Orange Zest StazOn to give it a more copper color.

Die cut two spiders to adhere together, and enough of the fence edge from black glitter chipboard to go around the hat.

Arrange and adhere the embellishments as shown in the photos below.
Uh oh, what's that?  Is that spider creeping up on skull?  Ewwwwww!
And a bit of a closer look at my flower bouquet.
A look at the back.  There are spiders crawling all over this hat!
And here are those bats flying around like gnats on something with a stench.  Ewwww again!
And here is a better look at those spiky flowers.
I used the twigs instead of leaves between my flowers.


Supplies:

The Robin's Nest:  Gold with Gold Glitter Cardstock; Brick Glitter Cardstock;  Very Black Glitter Chipboard;  Gold Glitter ChipboardGoldenberry Dew Drops;
Heartfelt Creations:  HCPC3500-Open Vintage Floret PreCut stamp set and matching dies;
IMAGINE Crafts/Tsukineko:  Orange Zest and Spiced Chai StazOn midi ink pad;
Sizzix/Tim Holtz dies:  Mini Bat & Skull Set; Mini Branch & Leaf Set; Mini Spider & 31; On the Fence; Branch Tree (Bigz);
1", 1-3/8", 2" daisy punches (Paper Studio)
Dylusions ink spray:  Fresh Lime
Tattered Angels Coral Glimmer Mist
Stickles Glitter Glue: Champagne
Copper Gilder's Paste (Baroque Art)
24g Black Artistic Wire
Creepy Cloth (Michaels)
Plastic Skeleton (Dollar Tree)
Green glitter spider stickers (Recollections)
USArtQuest PPA (Perfect Paper Adhesive)
Black Gesso; black produce netting

Whew, that was a doozy.  I hope you are still hanging in there with me and that you enjoyed my project today.  I have to say, I had an awfully fun time making this hat, and I hope I have inspired you to try making one for yourself.

I hope you are still enjoying the hop, and tomorrow is the last day.  I will be sad to see it go, but will take a few days to rest after this fun-filled, but busy, month.

Thanks for stopping by, and as always, have wonderful week.

Barbara Rankin

Friday, March 28, 2014

Art Anthology Sorbet Acrylics Card

Hey there everyone.  I have an extra Altered Pages project for you this month.  For this post, I wanted to share some tips and techniques using a new product at Altered Pages called Art Anthology Sorbet dimensional acrylics.   I started out with a blank manila tag, but I could not stop at just showing you the techniques on the tag.  I had to finish it, and here is the result.


Supplies:

AP 467 Mystic Asian collage sheet
Vintage Text Pages
Art Anthology Sorbet Dimensional Paint:  Kenyan Copper, Blue Eyes, Mint Julep, Kona,
Red Velvet, Orchid
Blue/green cardstock (8" x 9-/4")
Distress ink:  Vintage Photo
Punches:  Hydrangeas, Mini Butterflies, Sakura (Martha Stewart)

These paints are awesome to use. They are so creamy and thick, yet they go on translucent.  They have a beautiful shimmer, and some have a bit of glitter included.  I just had to share a pic of the paint in the jar.
I have posted a complete tutorial on the Altered Pages blog for you, complete with some tips and techniques I discovered along the way.  I hope you will pop on over there to see what I learned.

Be sure to visit Altered Pages for all of your art supplies, and The Robin's Nest (our cross promoter this month) for their papers and, of course, those wonderful dew drops.  And many thank to them for the wonderful products they sent for us to work, I mean play, with!

Have a wonderful, creative weekend!

Barbara

Monday, March 24, 2014

Springtime Card with Altered Pages and The Robin's Nest

Hey there everyone.  So glad you stopped by.  Since we all have been really looking forward to Spring, I could not resist making a lovely Spring card for you today.  Altered Pages has everything you need to make your own Spring creations, and more.  I also used some of those fabulous papers and dew drops from The Robin's Nest  our cross-promoter this month.  Here is the card I made for Spring!

Supplies:

AP 467 Mystic Asian collage sheet;
Art Anthology Sorbet Dimensional Paint:  June Bud, Coral
White Gesso (Ranger)
The Robin's Nest papers: Cream Watercolor Glitter; Robin's Egg Glitter, Lavender Watercolor Glitter, Kiwi Sorbet
The Robin's Nest dew drops:
Silhouette machine and cut design:  lattice frame
Mini punches:  flowers and leaves (Carl)
Distress Ink: Ripe Persimmon
Viva Decor Pearl paint pen

First, cut lattice frame from Lavender Watercolor Glitter card stock using Silhouette machine.  Size frame opening to fit the image, in this case, 3" x 4".   Trim image from collage sheet and adhere frame.

 Trim Robin's Egg Blue card stock to 5-¼" x 6-½", adhere frame and image.
 Make card from Cream Watercolor Glitter card stock cut to 6-¾" x 11-¼", fold in half, adhere blue layer to front.
 To make some little flowers to go with my Asian image, I first used this awesome new paint that Altered Pages is now carrying.  I am so in love with this paint.  It is called Art Anthology Sorbet Dimensional Paint and comes in many beautiful colors.   This paint is gorgeous, shimmery, translucent, and dimensional.  A few of the colors even contain glitter.  I wanted to add more color to my Cream Watercolor Glitter card stock to make my flowers and leaves pop.    So, I brushed on a light coat of the Coral, leaving some areas with more paint than others.  This gave me some color variations for my punched flowers and leaves.
Paint applied to right side of paper
 I colored Kiwi Sorbet Glitter card stock the same way using Art Anthology June Bug.
Paint applied to lower half of paper
 Do you remember these?  Before there were electronic cutting machines and Sizzix dies galore, there were hand held punches.  And yes, I still have my entire, vast collection of these little rarities.  And frankly, I'm glad I hoard some things.  I used these little flower and leaves punches to punch out a lot of these for my next step.
 After I punched out the two sizes of Sakura flowers, I added a tiny amount of gesso that I watered down to make a wash.  I brushed this lightly over the Coral paper scrap, which gave me a bit of a pinkish color, and then I punched out the tiny star shaped flowers.
Gesso wash applied over Coral scrap
 Here is my collection of flowers and leaves that I punched out.  Believe it or not, I needed more than this to finish.
 Next, I cupped the flowers with the use of my large ball stylus and a piece of fun foam. I have to tell you how sturdy the Anthology Arts paints made this paper.  It gave it super strength and the paper held its shape very well.  It honestly did not take very long to do this.
 I started laying out my flowers and leaves in a pleasing manner and glued them down as I went.  Then I added some mini dew drops in orange and pink to each of the Sakura flower centers.  I used a Viva Decor pearl paint pen to make centers for the tiny pinkish star flowers.
 
I hope you enjoyed my Asian Springtime card and painted flowers.  I love this technique for adding more dimension and beauty to my cards.  So be sure to visit Altered Pages and The Robin's Nest for all your card making and creative projects.  

Thanks for stopping by, and have a wonderful and creative week!  Bring on Spring!

Barbara