Showing posts with label 3-D Crystal Lacquer. Show all posts

Thursday, July 4, 2013

Altered ATC Box with Sin City Stamps

Hey there, Sin City Stamps fans!  How was your 4th of July?  I hope everyone had a memorable holiday.  As for me, it was quiet, but I did get to create, which always keeps me happy.  

Today, I want to share with you my altered ATC (Altered Trading Card) Box.  Here is a picture of my finished box.
Supplies:

                             Art Journaling with Terri Sproul 2
                             Love of Butterflies
                             Rosette Hearts
                             A Wing Above the Rest
Dew Drops (Fall) (The Robin's Nest) 
Black archival ink
3-D Crystal Lacquer
Distress inks:  Evergreen Bough, Spiced Marmalade, Shabby Shutters, Peeled Paint,                        Picked Raspberry
White Gesso
Woodsies wooden shapes
Paper Artsy Fresco Finish Acrylic Paints:  Vintage Lace, French Roast
Ultimate Glue
Flourish gem stickers

Directions:

I bought this bare wooden box at my local craft store.  It is supposed to hold playing cards, but ATCs will also fit in the openings.
Remove the tiny brass hinges and box closures.  This will make it so much easier to decorate the box.  (NOTE:  Put the tiny parts somewhere safe until you need them).
Sand, then paint box, inside and out, with a coat or two of white gesso.  Sand again, if necessary.
Paint box, inside and out, with Vintage Lace acrylic paint. Dry brush all edges, inside and out, with French Roast acrylic paint.  Set aside.
Pick out some woodsies shapes and lay them out on your box in a configuration that is pleasing to you.  
Paint the wood shapes with gesso on top and sides.  (TIP:  Adhere double sided tape to a piece of card stock.  Attach your shapes to it and paint them.  Not only will you keep the paint off of your fingers, but I found it to be much faster.  Also, you can quick dry the paint with your heat gun and the wood shapes will not blow away.)
Re-arrange your wood shapes onto the sticky card stock, the same way you plan to adhere it to your box.  Stamp your images onto the shapes.   (NOTE:  Use an archival ink for this so that it will not run.)  If some of the images seem too dark, use a very dry brush (or your finger) and add tiny dabs of gesso over that area.
Add color to your pieces.  I sponged on various colors of distress ink.
Use a brush to seal each piece with a light coat of 3D Crystal Lacquer.  Since both the distress inks and the 3D Crystal Lacquer are water-based, the lacquer intensified the colors, just like when you use watercolor pencils and a wet paintbrush.  Pretty cool, right?  (TIP:  I like to run a bead of lacquer around the edge of my pieces, then fill in the center, as shown in the photo below.)
Once the lacquer has dried, remove the pieces and edge each one with black archival ink.  You can also edge the pieces before adding the lacquer, as shown in the photo.  Lay them flat onto a non-stick craft sheet and apply a liberal coat of 3D Crystal Lacquer, set aside to dry.  (NOTE:  I edged a second bare wooden oval piece (undecorated) with black ink so that I can layer it beneath the ART label and raise it up for interest.)   
Now that you have your embellishments made, you can begin adding them to the front of your box.  I first added my corner pieces.  

Next, I glued down my remaining pieces in the same arrangement as I had laid them out previously.  
Add some flourish bling and you are ready to fill it with your favorite ATCs.  (See photo of finished box above). Here are a couple of close-ups of the stamped woodsies.  

I hope you enjoyed my altered ATC box project.  Now that we have the box decorated, we need to add some ATCs.  So please check back in a couple of weeks when I show you how to make some ATCs to keep in your box. I would also like to invite you to visit the Sin City Stamps blog for more inspiration from the design team.  

In addition, I want to tell you about these two fabulous stamp plates that are now available; Nautical 1 and Nautical 2 are ready for shipping.  I love both of these sets and I think they would make great summer page layouts for those beach vacation pictures, as well as making great masculine cards.  Or how about a mini album for saving your beach treasures.  Check these out in the Sin City Stamps store.  
Best of all, you can get 20% off your entire purchase during the month of July.  Just use the coupon code:  nautical20 .  So go stock up now!  And with every purchase, you are entered into the Sin City Stamps $1,000 Giveaway.  Click here for the official rules.

Thanks so much for stopping by, and have a wonderful weekend.  See you in a couple of weeks.

Barbara

Wednesday, April 10, 2013

Creative Paperclay DT Tryout


Hello everyone, and welcome to my blog.  Today, I am trying out for the Creative Paperclay design team.  Creative Paperclay® is a non-toxic modeling material that can be sculpted, molded or shaped, and air dries (no baking!) to a hard finish that can be carved or sanded.

The idea for my project was inspired by Terri Sproul's weekly live show, Mix It Up With Terri Sproul, at http://www.linqto.com/rooms/terrisproul, where she teaches new techniques each week.  She is teaching us about the basics of Zentangle, and we are all encouraged to play along and try this fun art form in our own art journals.  I have tons of mixed media type paper pads, so I decided to make my own art journal. But, I needed a special embellishment for the cover. Hmmmm......   what to do, what to do?

I did not want the whole cover done in Zentangle, but instead, I wanted something representative of Zentangle.  Then I got this wonderful idea to make a focal piece for the cover using Creative Paperclay.  I am so excited to share this with you.  I call this my faux zentangle technique.

How perfect is this for the cover of my book of Zentangle patterns?

1.  Using the plastic packaging from a 7Gypsies embellishment package as a mold, I pressed Paperclay into the largest opening.

2.  Remove the Paperclay from the package and trim with a craft knife.

3.  Make tiny tick marks around the circumference using a toothpick or skewer.

4.  Remove the ink cartridge from a ballpoint pen and use the empty tip to make circular indentations just inside the tick marks previously made.

5.  Make more textures, as shown, using various metal texture tools.  (Note:  Cake making tools, as well as clay tools, also work well for this.  Let your imagination lead you.)  Allow Paperclay to dry.

6.  Spray piece with Glimmer Mist colors.  You can speed up the drying time with your heat gun.

7.  I am crazy for weathered copper.  I love the greenish blue patina color that develops on the metal.  That is the look I was going for.  I achieved these colors by lightly applying Copper gilder's paste with my finger, just highlighting the high spots.  Next, I used a water brush to apply Black Soot distress stain, then dry brushing Tarnished Brass distress stain over the top.  There is no real recipe.  Just play with the colors until you like it.

Voila!  My focal image is finished.

Now, I need a book to adhere it to.

8.  To make the book, I cut two pieces of heavy duty chipboard to measure 8-1/4" x 8-1/4".

9.  Cover both sides of each piece of chipboard with printed papers.  Distress edges with Aged Mahogany distress stain.

10.  Cut drawing paper to 8" x 8".  Cut as many pieces as you want for your book.

11.  Follow the directions on your binding tool to punch holes in the chipboard and pages to bind your book.

12.  Die cut pearl gold specialty paper using lacy oval die.

13.  Adhere oval to center of book cover.  Center and adhere Paperclay focal piece to the center of the oval.  I added a light coat of 3D Crystal Lacquer to the top of the piece, which gives it this nice shine and a deeper color.

14.  Add trims, flowers, leaves, and gem flourishes to embellish the cover as desired.

Supplies Used:

Creative Paperclay air dry clay
Tattered Angels Glimmer Mist (Dragonfly, Mistletoe, Crushed Shells)
12x12 Printed Scrapbook Paper (My Mind's Eye)
MercArt metal embossing tools (clay or cake making tools can be used)
Empty ball point pen
Toothpick or wooden skewer
Copper Gilder's Paste (Baroque Art)
Distress Stain (Black Soot, Tarnished Brass, Aged Mahogany)
Water brush (or paint small brush)
Lacy Oval die (Spellbinders)
3D Crystal Lacquer (Sakura)
Chipboard
80 lb Drawing Paper (Strathmore)
Binding Tool (WRMK Cinch)
Red O-Wires (WRMK)
Alphabet stickers (Prima)
Various trims, flowers, leaves, and gem flourishes from Prima, Paper Studio, Michaels

I hope you have enjoyed my faux zentangle technique using Creative Paperclay.  This is such a fun product and so easy to use.  There are so many wonderful things you can make with it, and you are only limited by your imagination.

Thanks for stopping by, and remember to come back tomorrow, April 12,  for The Daisy Days blog hop, sponsored by The Robin's Nest.  Each blog will be giving away a Daisy Package worth $15, and there will also be one grand prize worth $25 from The Robin's Nest online store.

Have a wonderful, creative week!

Barbara

Thursday, February 28, 2013

Gentler Times Vintage Card

Hello everyone, and happy March!  I can hardly believe it is March already.  I guess time flies when you are having fun, and I am certainly doing just that when I get to play with these fabulous stamp plates from Sin City Scraps.    Today, I am using one of the images from the Sin City Scraps Clocks and Birds Rubber Stamp Plate.  I also made another wonderful discovery.  I found yet another die that fits another clock on this plate.  So, check out your own inventory of dies and see what you can come up with to work with these wonderful stamp images. 


1.  Stamp image onto Specialty Stamping Paper using Black archival ink.  You want to use a waterproof ink so that it will not bleed during the coloring process.


2.  Pick up various colors of Terri Sproul's Mixers with a water brush and color the image.  You can see where I was testing my color choices out on the perimeter of the paper before actually coloring my image.  


Terri Sproul's Mixers used:
Dress:  Pink Sapphire Pearl and Shimmer Garnet
Chair:  Aquamarine Pearl
Ladie's fan:  Citrine Pearl & Garnet Pearl
Skin:  Shimmer Garnet
Cheeks:  Shimmer Rose
Gentleman's Suit:  Silver
Background:  Aquamarine Peal & Citrine Pearl

3.  Blend Bundled Sage and Evergreen Bough distress inks to image.  Add Old Paper Distress Ink to image to make it more vintage looking.  Apply a coat of 3D Crystal Lacquer to both the man and woman images. The dimension it gives is subtle, but very effective.  

Colored image, pencil marks show where to trim away excess

4.  Die cut weathered clock from chipboard.  I ultimately did not use the two elegant scrolls pictured.  
5.  Paint the clock and clock hands (not pictured) with burnt umber paint, let dry.
6.  Cover the clock with one step crackle medium, let dry.  
7.  Add a light coat of metallic copper acrylic paint, let dry. 
8.  Use a foam blending tool to apply Black Soot distress ink.  This step really gives the clock a distressed and aged look. 


9.  Place clock diecut over stamped image and draw pencil marks around the clock to determine where to trim the image.  (See photo above).


10.  Glue die cut over image, as shown.  Attach both clock hands to center of image with a brad.


11.  Choose a piece of coordinating printed scrapbook paper, trim to 4-3/4" x 6-1/4".  Dry brush edges with copper metallic paint.  Adhere to card front.  
12.  Distress edges of card front with Old Paper Distress ink.
13.  Glue clock piece to front of card.

Close-up of 3D Crystal Lacquer applied to man and woman images

Supplies Used:

Sin City Scraps Rubber Stamp Plate Clocks and Birds
White A7 Card (6-1/2" x 5")
DCWV 8x8 Stack-Timeless Type
Specialty Stamping Paper (Ranger)
Archival Black Ink
Distress Ink (Bundled Sage, Evergreen, Old Paper, Black Soot)
Chipboard
Terri Sproul's Mixers (Sakura)
3-D Crystal Lacquer (Sakura)
Weathered Clock die (Sizzix-Tim Holtz)
Acrylic Paint (Burnt Umber, Metallic Copper)

I hope I have been able to inspire you to try some of Sin City Scrap's wonderful stamps, and shown another way to make them really stand out on your art work.  So go on over to their online store and check out their fantastic products.  And while you are there, you might like to visit their blog to see what else the design team has made to further inspire you and get those creative juices flowing.  

Thanks so much for stopping by.  

Barbara


Thursday, January 31, 2013

Love Forevermore and Time Well Spent Cards

Hello everyone, and welcome to my blog.  This is a really exciting day for me.  I have the great honor and pleasure of sharing with you the first post as a member of the newly-formed design team for Sin City Scraps. Sin City Scraps has a beautiful selection of rubber stamps and accessories, and I hope you will take some time to visit their online store.  I guarantee you will love their products as much as I do.

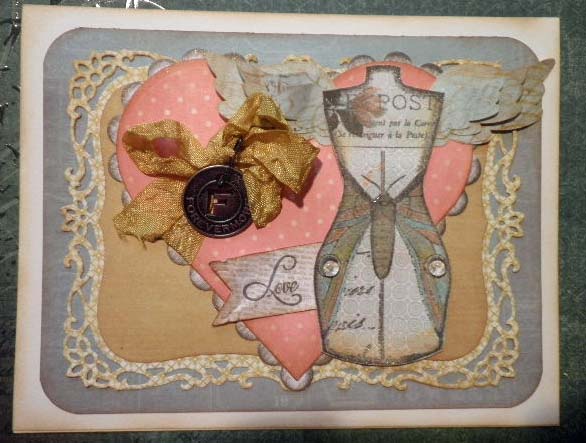
Since Valentine's Day is just around the corner, I naturally chose to make a couple of Valentine's Day cards.   I call my first card "Love Forevermore".


1.  Adhere 4-1/2" x 6" piece of blueish green print paper to ivory card base.  Round corners.
2.  Use largest size of decorative labels eight die to cut green print paper.
3.  Use next to largest size of labels eight die to cut olive green print paper.
4.  Use largest scalloped heart die to cut off white print paper.
5.  Use largest classic heart die to cut pink polka dot paper.
6.  Ink scalloped heart edges with Brilliance lightning black ink.
7.  Distress edges of remaining papers with brushed corduroy distress ink.
8.  Adhere paper layers as shown in photo.


9.  Stamp mannequin tags 2 image onto a piece of green print paper using Brilliance lightning black ink.  Emboss with clear embossing powder.
10.  Color image using Distress Markers.
11.  Trim image and adhere to card with pop dots.


12.  Punch two sets of wings.  Remember to turn the paper over when punching the second set of wings.
13.  Stamp any small scroll image onto each wing using scattered straw distress ink.


14.  When dry, layer the wings and attach beneath the stamped mannequin image.


15.  Color off-white seam binding using Scattered Straw distress stain.  Bunch up and allow to dry to achieve the vintage, crinkled look.


16.  Tie ribbon around one edge of the pink polka dot heart and tie in a bow.

17.  Attach the "Forevermore" metal tag to the bow using a mini safety pin.


18.  Stamp "Love" onto another scrap of printed paper and cut out.  Trim one edge into points and distress the paper.
19.  Adhere beneath the mannequin image.


20.  Add two clear dew drops to mannequin image, and add a layer of 3D crystal lacquer to moth body only.


Supplies used:
Sin City Scraps Rubber Stamp Plate mannequin tags 2 (mannequin tag) (Love)
MME 6x6 paper pad - Market
Ivory Card folded in half to measure 5" x 6-1/2"
Tim Holtz Idea-ology mini safety pin and Forevermore metal tag
Distress Ink (Old Paper, Scattered Straw, Brushed Corduroy)
Distress Stains (Scattered Straw, Shabby Shutters)
Distress Markers (Pumice Stone, Spun Sugar, Weathered Wood, Old Paper, Scattered Straw, Picket Fence, Tattered Rose, Tumbled Glass, Bundled Sage, Shabby Shutters)
Brilliance Lightning Black ink pad
Spellbinders Decorative Labels Eight (largest size)
Spellbinders Labels Eight (next to largest size)
McGill Punch - Angel Wings
Sakura 3-D Crystal Lacquer
Any scroll image rubber stamp
Off-White 1/2" seam binding
Foam pop dots

My second card is entitled, "Time Spent With You".  I plan on giving this one to my sweet husband.


1.  Cut 5" x 6-1/2" printed paper from Timeless Type paper pad to cover front of ivory folded card.


2.  Stamp "IV" and "X" from Clockworks Inspired by Terrri Sproul stamp plate, as shown, with Versamark ink.  Emboss with Pearl Gold Lustre embossing powder.  
3.  Adhere to ivory folded card front.

4.  Use largest scalloped heart die to cut off white print paper from MME Market pad.
5.  Use largest classic heart die to cut pink music background paper from MME Market pad.
6.  Ink scalloped heart edges with Brilliance lightning black ink.
7.  Distress edges of remaining papers with brushed corduroy distress ink.
8.  Adhere heart layers as shown in photo.


9.  Stamp clock face image from  Clocks and Birds stamp plate onto white card stock using Archival black ink pad.
10.  Color image using Distress markers.  Blend colors with a water brush.


11. Cut pocket watch using Spellbinders die several times onto thin chipboard and gold hammered card stock.  Glue pieces together for dimension.


12.  Cut out a template using 1-3/4" circle punch.  Place over center of pocket watch and line up punch with template to punch out center.


13.  Adhere pocket watch over clock face.  Fill center with 3D Crystal Lacquer to give the appearance of glass.  

14.  Punch two sets of wings.  Remember to turn the paper over when punching the second set of wings.


15.  Mix Terri Sproul's Pearl Garnet Mixer with water in a mini mister bottle and spray the wings. 

16.  Allow wings to dry.  Layer wings and attach beneath pocket watch.
17.  Sprinkle a few Robin's Nest Soil dew drops for added interest.


I computer-generated the sentiment inside the card, as follows:

"Time spent with you is time well spent.  
Happy Valentine's Day!"


Supplies Used:
Sin City Scraps Rubber Stamp Plate Clockworks Inspired by Terrri Sproul (Roman Numerals - 14)
Sin City Scraps Rubber Stamp Plate Clocks and Birds (clock face)
DCWV Timeless Type 8x8 paper pad
MME 6x6 paper pad - Market
Robin's Nest Dew Drops - Soil
Distress Markers (Pumice Stone, Spun Sugar, Weathered Wood, Old Paper, Scattered Straw, Picket Fence, Tattered Rose, Tumbled Glass, Bundled Sage, Shabby Shutters)
Spellbinders Die - Pocket Watch
EK Success 1-3/4" circle punch
HOTP Gold Hammered Cardstock
Quickutz 4x12 double-sided adhesive chipboard
Ranger Archival Black ink pad
Versamark ink pad
Gold Pearl Lustre embossing powder

Well, I hope you enjoyed my project cards this week.  Thanks so much for stopping by, and please be sure to visit the Sin City Scraps blog to see what the other extremely talented design team members have prepared.  Inspiration awaits you.

Have a happy crafting week!

Barbara