Showing posts with label Distress stains. Show all posts

Thursday, October 26, 2017

Three Creepy Halloween Tags with Distress Oxides

Hi everyone! Barbara here on the Gypsy Soul Laser Cuts blog.  Well, Halloween is nearly here, and I have a few last minute tags you can make using the new Tim Holtz Distress Oxides (DO) and the cool chippies from GSL.


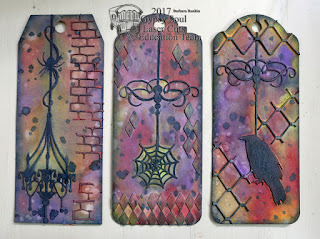
Before I ever glue anything down, I like to do what I call a "dry-fit" to check how things will look.


I decided on this placement of the String Alongs - Gothic onto each Chipboard Decorative Tags X Large.  For the two tags on the right and in the middle, I simply cut the "string" section above the hole, glued that tiny piece and then moved the rest of the string along down below the hole.


Next, I used clear gesso to prime the front and back of each tag.  I used clear gesso to "seal" the chipboard, but leaving the brownish background to add the color to.  The gesso will also keep the chipboard from acting like a sponge and sucking all the paint or color up, thereby using less paint or inks.

adding gesso to back of tags first

Next, I used the Distress Oxides with a blending tool to cover the background, as shown.  I spritzed with water and used my heat tool to dry the ink.


Then I hit the chippies and the edges with the black DO and blending tool.  I spritzed with water and used my heat tool to dry the ink.


I used a soft brush to add the green DO inside and next to the chandelier, then spritzed water droplets over the background to form these circular ripples, using my heat tool to dry it.


To intensify the colors, I used the soft brush to pick up the colors from the ink pads and brushed it randomly over the tag, blending some as I went along.  The brush allows you to get close to the chipboard and to control where you put the colors.  Spritz droplets over background again and dry with heat tool.


Cut a random shape from the Brick Wall Small, lay onto Candied Apple DO pad and, using blending tool, add color to the chipboard.  Dry with heat tool.


Lightly add Black Soot DO with blending tool, just to add dimension.


Glue pieces to left side of tag, as shown.  I also darkened the chandelier string along with Black Soot distress ink, then picked up more colors with my brush and deepened the colors where I felt it was needed.


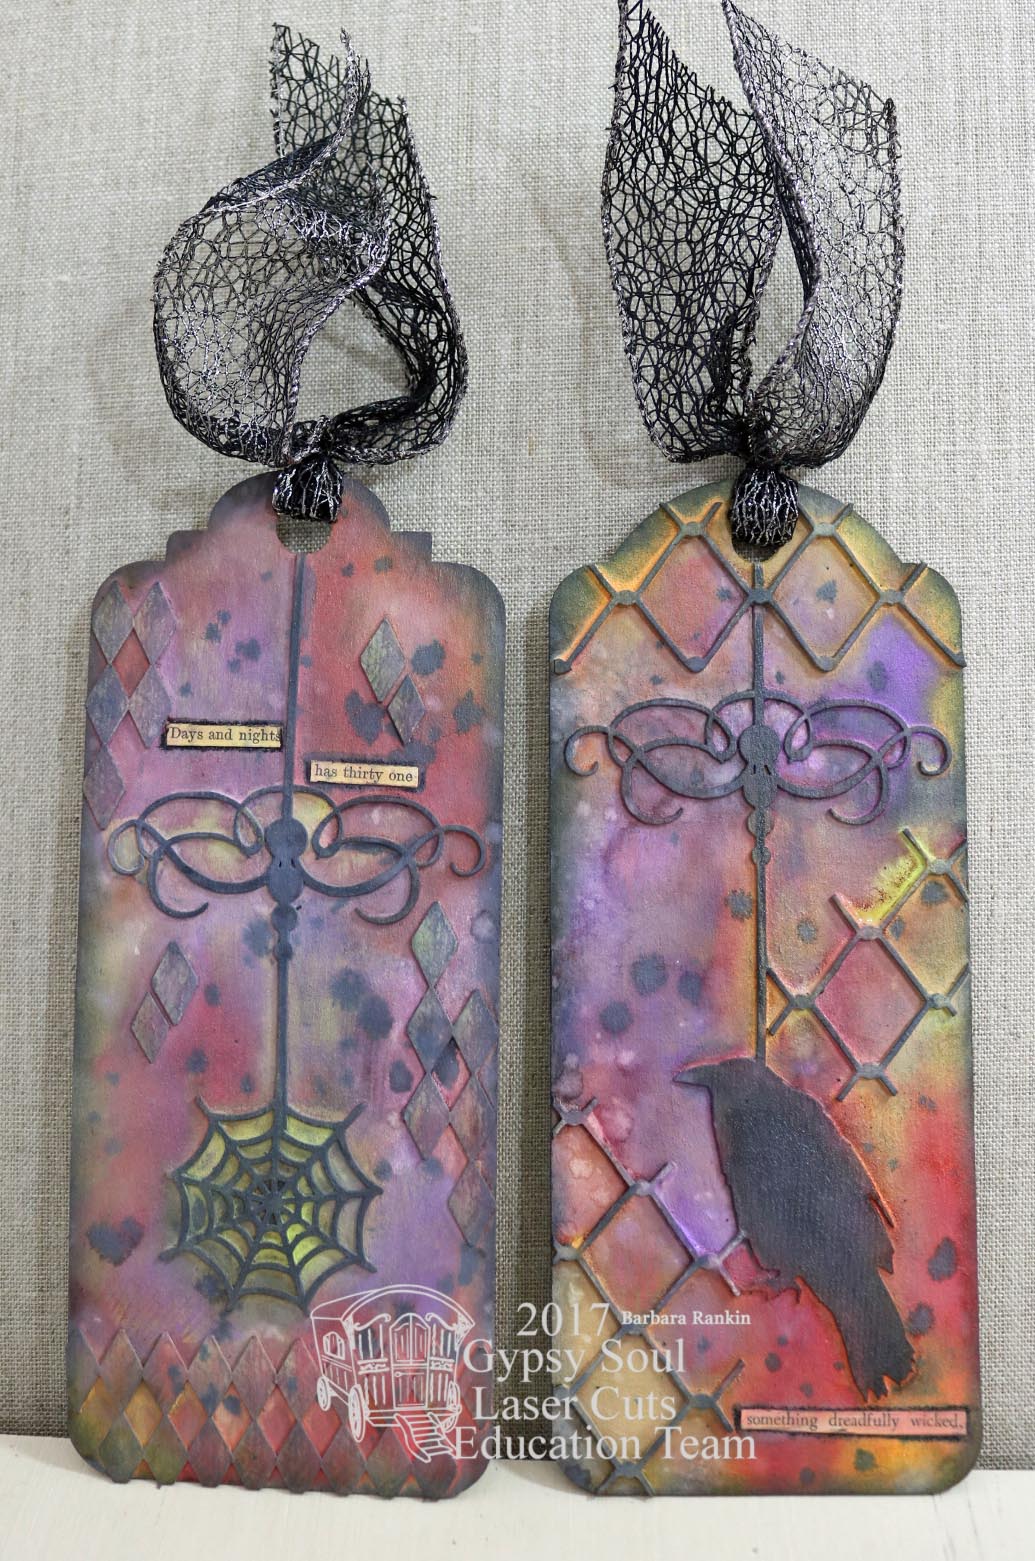
Now that I knew I wanted to adhere pieces of texture sheets to the remaining two tags, I went ahead and glued them down before adding the colors.  I used pieces cut from the Texture Sheet Diamonds on the left tag, and pieces cut from the Chainlink 8 by 8 Inch Panel on the right tag.  I also painted the texture pieces with a coat of clear gesso to prime them, just as before.


On these two tags, I added the same Distress Oxide colors using a reinker, a brush, and water.  I liked this technique a lot because I could get stronger colors down much quicker than I was able to achieve with the pads.  If you don't have the reinkers, you can still pick up the colors from the ink pad, as before.


Continue adding colors with the brush and reinkers.


Next, use blending tool to add Black Soot DO to the edges and chipboard embellishments on top of the tags.


Mist backgrounds with water and water droplets for the organic look from the Oxides and dry with heat tool.  Use brush to pick up any colors and "dry brush" any areas that you feel need improvement, such as blending or deepening colors.


Place a drop of Black Soot DO from reinker onto craft sheet.  Use wet paint brush to make a wash and flick drops of the black over the backgrounds.  If you don't have reinkers, just rub the pad onto the craft mat and make a wash with the ink from the pad.


Add spooky phrases to each tag.  You can computer generate them if you don't have these stickers from Tim Holtz.  Use a black pencil to shade around each sticker, and add distress oxide colors to blend in with the background.


Supplies Used:
GSL Chipboard Decorative Tags X Large
GSL String Alongs - Gothic
GSL Brick Wall Small
GSL Texture Sheet Diamonds
GSL Chainlink 8 by 8 Inch Panel
Distress Oxides Ink Pads & Reinkers
  Spiced Marmalade
  Wilted Violet
  Twisted Citron
  Candied Apple
  Fossilized Amber
  Black Soot
Distress Ink - Black Soot
Blending Tools (Ranger)
Tim Holtz Halloween Clippings Stickers
Paint Brush
Water mister bottle
Wire edged ribbon

I hope you enjoyed my creepy Halloween tags, and that you will be inspired to make some for yourself with any of the laser cuts available from Gypsy Soul.

Thanks so much for stopping by, and have a super safe and fun Halloween!

Barbara

Monday, September 9, 2013

Birds and Bees Coaster Tiles Wall Hanging

Hello Paperclay® fans, and welcome back.  It is so hard to believe that the Summer is almost over and Fall is just around the corner.  It is plenty hot here, so it still feels like Summer to me.  And there are plenty of bees buzzing around, so I wanted to do something cool (no pun intended) with the honeycomb pieces I showed you how to make in my last post.  If you missed it, you can click here to see it.  This project is so easy to make, "even a caveman can do it".


Supplies Used:

Creative Paperclay® modeling material
Delight™ air dry modeling compound
Three 4"x 4" square coaster tiles
Six 4" x 4" squares print paper (Close To My Heart-Buzz and Bumble)
Push Molds (Mod Podge)(Premo)
Flexible plastic texture sheets - Music Background, Honeycomb (Carolee's Creations)
Distress ink (Wild Honey, Black Soot, Vintage Photo, Tarnished Brass, Brushed Pewter, Antiqued Bronze)
Acrylic Paints (Folkart Yellow Ochre)(Ceramcoat Charcoal)
Twinkling H20's (Mandarin Citrine, Golden Monarch, Ginger Peach, Mystic Blue, Iridescent Blue, Key Lime, Golden Jade, Rose Petal, Jasmine, Wild Plum)
Cropadile
3/8" gold metallic eyelets (8)
4 large jump rings, 2 small jump rings (Tim Holtz)
Decorative hanger (Melissa Frances)

Directions:

Make a 4" x 4" template from a scrap of printer paper, fold in half, and punch a hole through both halves near the edge, as shown.
Use this to mark placement of your holes for hanging your three coasters together, as shown in photo.
Cover each coaster, front and back, with the CTMH print papers, reversing the patterns, as shown.  (TIP:  Re-punch your holes each time you add the paper so you can find them easily.)  Now is a good time to distress ink the coaster edges.
Add eyelets to each hole, not only for strength, but to also finish off the holes.

Paint the honeycomb pieces first with Charcoal paint, then hit the tops with Yellow Ochre.
For the music background, spread a very thin layer of Paperclay® over the texture plate, the same as done for the honeycomb.  Allow it to dry before removing from the plate.
I was going for an old parchment paper look, so I added a very watered-down wash of Yellow Ochre, dabbing with a paper towel to get the color variations desired.  
Hit the high spots (the music notes) with Charcoal.
Next, I had made quite a few embellishment pieces using the Delight™ modeling material and various push molds.  Delight™ dries more flexible, even when it is a bit thick, so I used it for my embellishments in case I needed the flexibility.  So I laid out my three coasters, arranging my tiny pieces to see how I want to place them.  Nothing is glued down at this time.  
Color the various pieces to your liking.  I had a blast coloring these, and my inky fingers were a testament to that fun.  I colored the pieces using not only the acrylic paints, but also the distress stains and Twinkling H20s.  If my colors were too bright to my liking, I added a light coat of Vintage Photo distress stain.  That always tones down the brightness of colors.  And if you look carefully, you can see that the bird on the branch is so delicate and it broke apart into three pieces.  I am still going to use it and I am going to show you later on.

Now the fun of seeing your piece come to  life begins.  Adhere your Delight™ pieces in a pleasing arrangement, as shown on each of the three tiles below.


Add your jump rings through each of the eyelets, as shown below.  The larger jump rings go through the eyelets, then a smaller jump ring is used to join them.
Here are some close-up views of the pieces.  Don't you just love this little bird nest?
My cute little bumble bee.
And how about the rusty look on this key?
I was going for a bit of a rusty wrought iron look on these flourishes.
And remember the broken branches on this piece?  Normally, this would be my little secret, but I really wanted to show you to never give up because so many things in our art work can be "fixed" or "covered up".

Here is an example of where I layered one piece on top of another.  I love how the tiny pink flowers add to the piece.  I used them as fillers to bring all three coasters together.

These flowers and leaves were a bit too bright for me, so this is an example where a light coat of the Vintage Photo distress stain toned down the brightness.
Whew, I know this is a long post, but I have to admit, I had a blast making this piece.  I absolutely love working in mixed media, and Creative Paperclay® and Delight™ are certainly going on my list of mixed media to use for my altered art.   So, what will you make with it?  Well, you have a chance to show us.  

We are having a Halloween blog link up on 5 October.  What better way to showcase your work and share it with the world!!!  And you never know, you could win one of the prize giveaways.  So go ahead, give it a try.  Create something with Creative Paperclay® products and link up to the blog to enter to win!  
I am so glad you stopped by today, and I hope you enjoyed my project.  Please check out the Creative Paperclay® online store, and visit the blog for more inspiration.

Have a wonderful week, and play with some clay for the link up!

Barbara

Monday, September 2, 2013

Pumpkin Patch Halloween Card

Happy September, Robin's Nest fans.  I hope everyone had a safe and relaxing holiday weekend.  It is a new month, and a new theme for the Design Team.  This month, we will be showcasing the Halloween collection.  I am a spooky movie freak, so Halloween is one of my favorite genres.  I had a blast making this card, and it was so easy with the products from The Robin's Nest.  And I know you have been hearing all of us here at The Robin's Nest go on and on about how much we love the dew drops.  Well, I hope my "before" and "after" pictures below will help you see why we think they add so much to your pieces with very little effort.
Before dew drops
After adding dew drops
Supplies used:

The Robin's Nest : Pumpkin Heads cardstock
                               Halloween Glitter Stripe cardstock
                               Spiderweb Glitter cardstock
                               Orange Glitter Crackle cardstock
                               Chipboard Pumpkins
                               Bats Chipboard
                               Black Tear Drops
                               River Bed Tear Dew Drops
Spider and Web die (Quickutz)
On the Fence die (Sizzix-Tim Holtz)
Distress Paint: Weathered Wood
Distress Stain:  Antique Linen

Directions:

Trim Pumpkin Heads cardstock to 5-1/2" x 12" and fold in half to make side fold card.  (Note:  This paper is double-sided and has the cutest rows of pumpkins on the opposite side.  Therefore, you will want to make a note of this when cutting your paper to make a card.  Otherwise, your pumpkins may be upside down.)
Cut 2" x 6-1/4" piece of chipboard with the On The Fence die.  Paint with weathered wood distress paint and distress with sandpaper.
Apply antique linen distress stain direct to paper on the fence.  The color will appear a bit darker where the paint has been sanded away.
Trim 6" x 3/4" pumpkin border section from Halloween Glitter Stripe cardstock and adhere over bottom section of fence.
Adhere fence piece to bottom of card.
Adhere two chipboard pumpkins to lower left bottom of fence, using a pop dot to raise the taller pumpkin.
Add olive green tear-shaped dew drops to the pumpkins for leaves.
To make the squiggly spirals you always see on pumpkins (sorry, I don't know what they are called) I trimmed tiny slivers off of the Halloween Glitter Stripe cardstock and wrapped it around a toothpick.  It is not as hard as it may sound.  In fact, it was quite easy.  I glued those above the tear drops, as shown in the photo. 
Cut one spider web from a corner of the Spiderweb Glitter cardstock and adhere to the top right.
Adhere three  purple chipboard bats to the front, as shown.  For dimension, use a pop dot behind the larger bat.
Once again, I added some black tear shape dew drops to the bats' bodies.  
For the inside, I computer generated the saying, which I found online, and printed it onto the reverse side of a 5-1/4" x 5-3/4" piece of Orange Glitter Crackle cardstock.  Adhere to card inside, with one more purple chipboard bat upper left.  This will also give you a clear space to sign your card.

So,  I hope you enjoyed my Halloween card today and will give this fun paper a try.  And did I convince you how much those dew drops add to your art?  The Halloween papers are 20% off this month.  So go ahead, check out the Robin's Nest online store, and be sure to come back to the Chattering Robin's blog for more inspiration from the Design Team using these fabulous papers!  If you get a chance, I would also love for you to stop by my blog, Black Hole Art Studio, to see what I am up to.  As always, thanks tons for stopping by, and have a wonderfully creative week!

Barbara