Showing posts with label Distress Inks. Show all posts

Tuesday, December 19, 2017

How to Enhance Your Gypsy Soul Laser Cuts Chipboard

Hi everyone!  Barbara here today with a card project using Gypsy Soul Laser Cuts "Special Delivery" chipboard and Graphic 45 Once Upon a Springtime paper collection.  The colors in this paper are nice and soft and perfect for welcoming a cute little newborn baby.  My main focus today is sharing some fun and easy techniques for bringing your laser cut chipboard piece(s) to life. 


Make a 5"x7" top folded card using a peach colored card stock.  I cut two additional layers, each 1/4" smaller.  So the second layer measures 6-3/4" x 4-3/4", while the third layer measures 6-1/2" x 4-1/2".  The edges of each layer were heavily distressed.


Adhere each layer to the base card and set aside.


Paint Special Delivery chippie with Timeless chalk paint.   You could also use white gesso, so use whatever you have.


Dab Picket Fence distress stain (DS) over stork, and Brushed Pewter DS over "Special Delivery".  Let dry.


Color stork's beak, legs and feet with Wild Honey and Mustard Seed distress markers.  Color top of stork's head with Barn Door and Worn Lipstick distress markers.  Let dry.


Trace around the chipboard pouch, as much as you can, onto a piece of sticky back canvas.  You can also use a scrap piece of canvas without the sticky back, and just use white glue to adhere it.


Cut out sticky back canvas pouch and dry brush over it with a very tiny amount of Frayed Burlap DS that has been watered down. 


Remove adhesive backing and adhere over chipboard pouch.


Brush on a coat of white glue to stork and cover with Ivory Flower Soft.  (I did not have white Flower Soft, but you can use either color.  As always, use what you have.)  Add Baby Peach Flower soft to stork's head and add a bit over his tail feathers.  It looks funny right now, but let the glue dry and then gently brush excess flower soft away. 


Rub Tarnished Brass DS over "Special Delivery" for a vintage feel.  Fill in any areas that may need more Flower Soft.  Add a dot of Black Enamel Accents for the stork's eye.


Die cut a piece of the same peach card stock with a decorative die, such as the one I used (Timeless Heart).

Adhere to card front so that it sits centered beneath the words "Special Delivery".


Punch some leaves from a piece of the green print paper.


Adhere Special Delivery chippie, some fussy cut stamp images from the paper collection, paper flowers and craft punched leaves.


Here are a few closeups of some of the details added to the card and chipboard.

Baker's Twine tied around top of pouch


Gold Pearl 3D paint added to flower centers
Three stamp images cut from paper collection
Flower Soft added to stork, black enamel dot for eye
Supplies Used:

GSL Special Delivery
G45 Once Upon a Springtime paper collection
Spellbinders S6-126 Timeless Heart Die
Americana Timeless chalk paint
Distress Stain
  Picket Fence
  Brushed Pewter
  Frayed Burlap
  Tarnished Brass
Distress Markers
  Wild Honey
  Mustard Seed
  Worn Lipstick
  Barn Door
Ranger Black Enamel Accents
Five Leaf craft punch
Paper Flowers (Prima)
Flower Soft
  Ivory
  Baby Peach
Baker's Twine (pink & white)
Adhesive-backed Canvas (Ranger)
Gold Pearl Metallic Dimensional Paint (Jacquard)

I hope you enjoyed today's project and perhaps have been inspired to use some of your products you have laying around in your stash to further enhance your chipboard embellishments. 

As always, thanks so much for stopping by, and have a wonderful and craft-filled week!

Barbara

Wednesday, May 13, 2015

Gina's Designs Is Turning Three

Hello everyone, and thanks for stopping by.  Today, I want to share a birthday card I made for Gina's Designs' third birthday.  I am also entering it into their May Facebook Challenge, which is appropriately birthday themed.


Paint hand mirror with Nougat paint.  Die cut a small oval from a scrap of cream card stock.
Use die to mark where to cut away your acrylic sticker so it fits perfectly inside the cream die cut.  I removed the liner so I could stick it to my craft sheet while I marked it, then returned the liner to cover the adhesive while I cut away the excess.  If needed, you can smooth the edges with sandpaper, but I like to use emery boards.
Edge hand mirror chipboard base and cream card stock center with Vintage photo, adhere to center of mirror, then adhere acrylic sticker.
Paint thin lines across the top and handle with Emperor's Gold Silks to bling it up.  Add some shabby chic to the handle by scruffing it up with some sandpaper.
Paint decorative border with Vintage Lace paint.  Sponge lightly with Seedless Preserves DI, then blend in some Ripe Persimmon DI to get the right color.
Paint chandelier with white gesso, let dry.  Paint crystals with Stargazer Radiant Gel, let dry, then add 3D crystal lacquer.  Doesn't it look amazing?  Just like crystal.
Paint flames with Yellow Rose Silks, then a touch of Ginger Peach Silks at the bottom of each flame.
Paint chandelier base with Harvest Sol Silks, then top it off with Emperor's Gold Silks.  This makes the gold less brassy and bright, and more vintage and antiqued.
Paint the chair with white gesso, let dry.  Use a foam blending tool to add Forest Moss Distress Ink (DI) to the chair seat, back, and arms.  Scruff up the legs with sandpaper for a shabby chic look.
Paint fleur de lys with white gesso, then use a foam blending tool to add Dried Marigold DI, followed by Ripe Persimmon DI, and finally Seedless Preserves DI.  Adhere fleur de lys to back of chair.
Add Vintage Photo DI to the lace doily.  Paint Beautiful banner with Vintage Lace paint.  Sponge Forest Moss DI around the edges, then hit the high spots with Persimmon and Seedless Preserves DI.  
A few close ups of the card.
I also added the acrylic "Celebrate" sticker to the lower right on the card.
Use the Adorning Squares die to cut and emboss the inside piece of card stock.  Stamp the sentiment in the center with black ink.


Supplies:

Gina's Designs:  Cardstock Doily Set - Intricates; Parisian Shape Set
Cardstock:  Medium Gray, Joy Crafts Romance print paper, mauve
ColourArte Silks:  Harvest Sol, Emperor's Gold, Ginger Peach, Yellow Rose
Paper Artsy Fresco Finish paint:  Nougat, Vintage Lace
Dies:  Tonic Butterfly Bracelet Strip Die Set (oval), Spellbinders Adorning Squares (inside)
Distress ink:  Vintage Photo, Forest Moss, Dried Marigold, Ripe Persimmon, Seedless Grape
Birthday phrase rubber stamp (The Artful Stamper)
Black VersaFine Ink pad
Acrylic stickers (my stash)

I hope you enjoyed my "beautiful" birthday wishes card for Gina and Gina's Designs.  May you have many, many more.  

Hugs,
Barbara

Thursday, May 1, 2014

Mail Art Envelope with a Template

Hello everyone.  I have some mail art inspiration for you today using Sin City Stamps and wonderful envelope templates from Green Sneakers, our co-sponsor this month.  So, without further adieu, here is my my mail art envelope.

Envelope Front

Envelope Back
 Supplies used:

Sin City Stamps:  Natural Beauty; Art Journaling with Terri Sproul 2
Green Sneakers:  PL4x6 Kreate-a-lope Envelope Template
Tan card stock
Black VersaFine ink
Distress Ink:  Dried Marigold, Weathered Wood, Fired Brick, Faded Jeans, Vintage Photo
1/4" Scor-Tape

For a quick video tutorial, here is the link to a short video about how these wonderful envelope templates work.  You are shown how easy it is to make an envelope from any kind of print paper, even gift wrap.

http://www.greensneakers.com/EnvelopeTemplates/

For my project today, please visit the Sin City Stamps blog  for step-by-step directions showing you how to plan your stamping project to fit properly inside the template window so that your best work shows on the front.

It is so easy to make beautifully stamped envelopes to give with a matching card, or how about making your very own envelope book with several of these works of art as your book pages.  With the stamps from Sin City Stamps and Green Sneakers fabulous templates, it will make this project so simple to complete.

I hope you will visit the Sin City Stamps blog for more inspiration from the design team, and be sure to stop by the online shop for all your stamping needs.  In addition, Green Sneakers has a variety of templates to use for your paper crafting needs, so I hope you will visit them, too.

Thanks for stopping by, and have a wonderful, creative weekend.

Barbara

Thursday, April 3, 2014

Card Fun with Sin City Stamps and Ecstasy Crafts

Hello there SCS stampers. This month, we are being sponsored by Ecstasy Crafts, a fabulous company with some of the most gorgeous products.  The best part is we get to combine their products with Sin City Stamps products.

For my first project, I made this beautiful birthday easel card.  Easel cards are so simple to make, yet really make a statement when the recipient can sit it out for display without it falling over.
Supplies used:

Sin City Stamps:  Steampunk Circus; Metal Madness; Pam Bray's Fall Collection
Ecstasy Crafts:  Reddy Flowers & Cross 3D Die Cuts No. 83703; Starform 1290 Gold Floral Rectangular Frame Stickers
Cardstock:  Vineyard Weave (Bazzill), Ivory, Lavender (Paper Studio)
Ink pads: Versamark, Gold Encore, Old Paper Distress Ink,
Silhouette and cutting file:  Easel card, Egg shaped card
Spellbinders Die:  Lacy Labels Two
Detail clear and gold embossing powders
3/16" square adhesive foam (Darice)

For my next card, I used the same papers and my Silhouette to cut out an egg shaped card.  If you google egg shaped cards, you should be able to find templates online.
I hope you enjoyed my cards today and will give these products a try.  You can get all you need from both Sin City Stamps and Ecstasy Crafts to complete them and many more.  I have a complete tutorial on how I made these over on the SCS blog. 

Have a wonderful, creative weekend!  

Barbara

Thursday, March 20, 2014

Mixed Media Journal Fun with Sin City Stamps and ComposiMold

Hello everyone.  Today I am going to share a project I made using Sin City Stamps and a really fun product  called Composi•mold reusable mold making material.  I started this Faber-Castell mini mixed media journal in a previous post, entitled Things I Love.  You can see my previous post by clicking here.

To learn more about Composi•mold, I found a wonderful video tutorial here which explains how easy it is to use.

Here is the first side:


Here is what I did to the reverse side.


Supplies:

Sin City Stamps:  Dressforms; Wing-It 
Composi•mold reusable mold making material
Mixed Media Mini Journal (Faber-Castell)
Burnt Umber acrylic paint (Plaid)
Copper Gilder's Paste (Altered Pages)
German Scrap (Altered Pages)
Scor-Tape (Altered Pages)
Versamark Ink
Black embossing powder
Distress Inks, Stains, and Markers:  Rusty Hinge, Brushed Corduroy, Antique Linen, Scattered Straw, Peeled Paint; Tea Dye, Tattered Rose, Vintage Photo (Tim Holtz)
Crackle Accents, Glossy Accents (Ranger)
Niji Water Brush (Altered Pages)
Metal embellishments (various)
Helmar 450 glue


Complete directions for how to make these embellishments can be found on the Sin City Stamps Blog.

I hope you are enjoying all of this month's DT posts and inspiration using stamps, embellishments, and Composi•mold.  As I said before, this is so easy to use and lots of fun.  I hope you will give it a try.  Be sure to pop on over to the SCS Store to see all the new products and the SCS Blog for tons of inspiration.

Thanks for stopping by, and have a wonderful and creative weekend.

Barbara

Wednesday, November 27, 2013

Christmas Triptych with Altered Pages Instructions

Hi everyone, Barbara here with one of my favorite art forms, the triptych.  With the Christmas holidays fast approaching, I wanted to make a Christmas triptych.  If you missed my post earlier this week, I did not give any instructions for how I made this.  So, I thought I would post them for you here today.  I hope you enjoy it and are inspired to give these beautiful art forms a try.

So,  some of you have asked, what is a triptych?  Wikipedia defines it:  
A triptych (/ˈtrɪptɪk/ trip-tik; from the Greek adjective τρίπτυχον ("three-fold"), from tri, i.e. "three" and ptysso, i.e. "to fold" or ptyx, i.e. "fold")[1][2] is a work of art (usually a panel painting) that is divided into three sections, or three carved panels which are hinged together and can be folded shut or displayed open. It is therefore a type of polyptych, the term for all multi-panel works. The middle panel is typically the largest and it is flanked by two smaller related works, although there are triptychs of equal-sized panels.
Side 1 - Vintage Christmas
Side 2 - Traditional Christmas
Supplies used:

Altered Pages collage sheets:  Happy Holidays (AP-505), Holiday Postcards (AP-1155), Ivory Angels (AP 2090), 
Christmas Emporium 8x8 paper pad (Graphic 45)
Graphic 45 Coredinations Cardstock
Vintage Text Paper
Faber-Castell Big Brush Pen (Brown)
German Scrap
4x6 chipboard pennants (Paper Accents) (3)
Hinges (Tim Holtz)
Distress Stain:  Old Paper (Tim Holtz)
Copper Metallic acrylic paint
Ink Pads:  Dark Moss Chalk (Colorbox)
Doily die (My Favorite Things)
Ornate Frame die (Tim Holtz)
Mini Rosettes die (Tim Holtz)
Botanicals, decorative brads, bling

Directions:

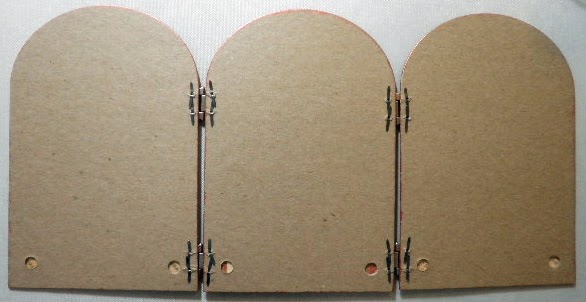
Cover one side of three pieces.  This will be the front side of the triptych.

Attach hinges, as shown.  


Reverse side - brads holding hinges show
Cover the remaining sides of the three pieces, covering the brads that hold the hinges on.

Die cut ornate frame from Christmas Emporium red print paper and chipboard, adhere together.
Center holly flower girl (AP-1155) in center of frame and trim to fit inside opening.  Use brown big brush pen to finish off the frame edges.

Adhere to center panel with foam dots.  (see photo below)


Die cut one doily from Astroparche paper, distress edges with Vintage Photo, and cut in half.

Cut out two half circle poinsettia images (AP-505) and adhere to each half of the doily die.  

Adhere to both side panels, as shown.
Die cut two mini rosettes from vintage text paper.  Add a strip of washi tape to back of rosettes to give this fragile paper more strength.  
Form into rosettes following directions on die.

Stamp a "2" and a "5" onto a scrap piece of the vintage text paper with moss chalk ink.  Punch out with   1/2" circle punch, adhere each to center of rosettes.  Add 1/2" epoxy circle to center.

Add oval centers (removed from center of ornate frame die cut) and add to both outer panels, as shown.
Trim "Angels" image from AP-2090.  Adhere images to ovals, add botanicals and gem flourishes, as shown.  

close-up of decorative brad covering ends of botanicals
For reverse side, trim and distress edges of Climbing Santa, Merry Christmas Santa, and two ivy spray (AP-505-Happy Holidays), Santa with child  (AP-1155-Holiday Postcards).  Add Old Paper distress stain to edges and adhere to coredinations cardstock cut slightly larger than image.  Adhere to reverse side of triptych, as shown.

Adhere a strip of German scrap to the bottom of each panel.  If you want to tone down the bright gold color, you can apply a thin coat of a black metallic cream or black archival ink and wipe off excess.
A few close-ups of the botanicals and embellishments.

I hope you have enjoyed my Christmas Triptych and directions for making it.  These are very easy to make and are so beautiful as stand alone decorations for any occasion.

You can get all your supplies to make this at www.alteredpages.com.  And don't forget to stop by the Altered Pages Monthly Challenge Page to see all the inspiration from the design team, and go vote for your favorite in the side bar.

Thanks for stopping by.  Happy Thanksgiving to you all!

Barbara