
Sabor Papel is a brand new company that makes these beautiful and bright papers and embellishments. Their papers are high quality and double-sided, heavyweight card stock. We are sharing lots of ideas and inspiration for using their products in your own celebrations, along with the fabulous products by Craftwell USA! So sit back and enjoy!

Supplies used:
Craftwell USA eBrush
Sabor Papel: Ole 107 Dulces; Celebrar label
Copic Marker: BG18-Teal Blue
Spectrum Aqua Markers: Spice, Wildflower, Meadow, Bud Green
Scoring tool
3" Blue doily
Flowers and foliage dies
Decorative edger punch
Coffee filter paper
Wavy wood stick
White glue
Score 12x12 Ole 107 Dulces paper every half inch with score tool.

Cut paper in half horizontally for this particular paper, since it has a directional design.

Accordion fold each section of paper, as shown.

Glue both pieces together to make one long strip. Use a decorative edge punch along one edge.

Add dots of glue to bottom edge of strip between each fold.

Make scores in center of decorative doily 1/2" apart, as shown.

Squeeze accordion folds together along bottom where glue was added, center and adhere doily along bottom, wrapping around the fan shape, as shown. Use clips to secure while glue dries.
 |
| Front |
 |
| Back |

Color larger petals with Spectrum Aqua Spice marker. Since these markers are water-based, you can spritz the paper with water, if you like, to help the color spread.

Cut petals apart and pinch at the bottom to make flowers. These remind me of Bougainvillea flowers.

Next, eBrush small petals with the Wildflower marker, again spritzing with water to help the colors spread easily.

Use eBrush to spray Wildflower marker over them, again spritzing with water if you like.

If you do not clean your craft mat before beginning to spray your next set of lighter colored flowers, you will pick up the previous color from the mat. In this case, the flowers picked up the Wildflower color. I kind of like the variegation as it looks more natural.
Make the rest of the flowers the same way as before, pinching at the bottom and twisting to get your flower shapes.

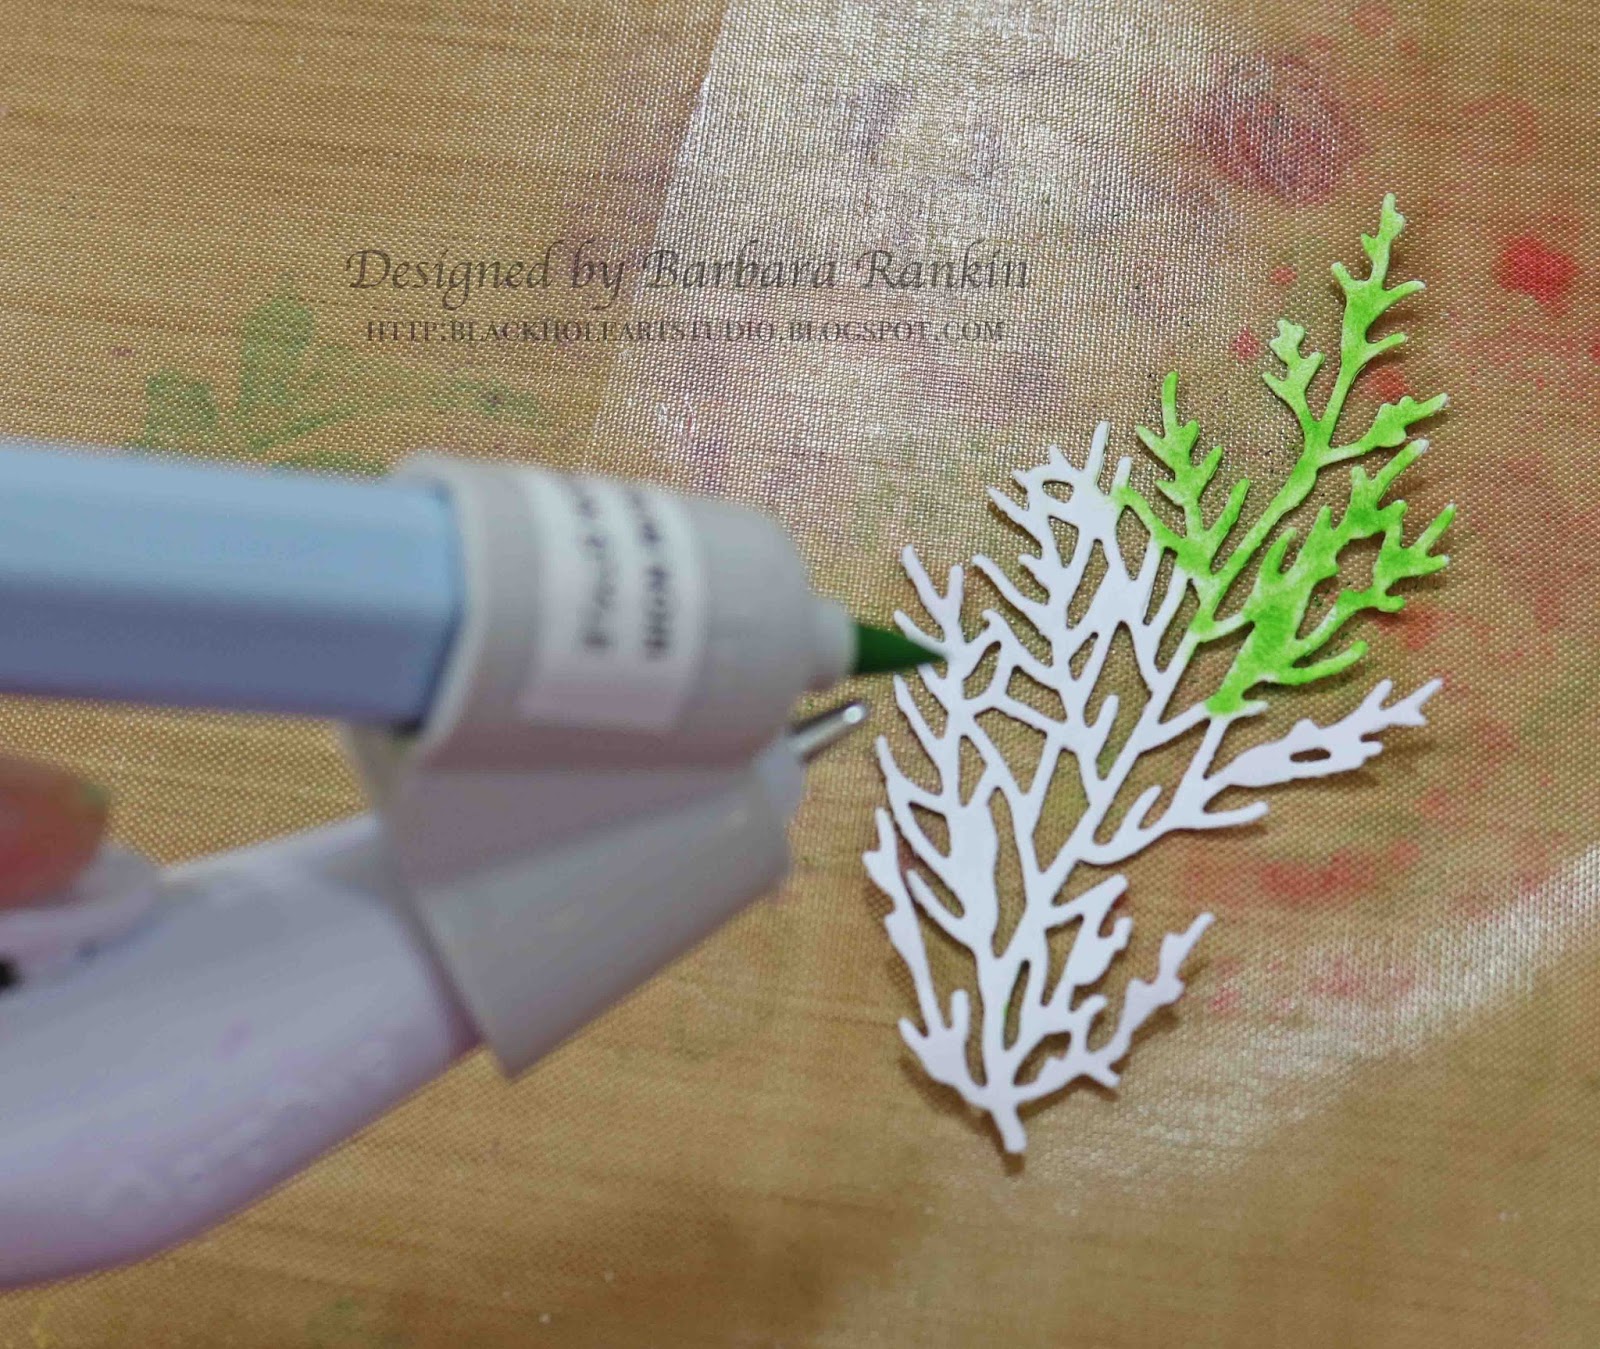
eBrush a piece of white card stock with the Bud Green marker.

Die cut the foilage piece over the colored paper.

Alternatively, you can simply die cut your paper first, then color the delicate foliage leaves. The eBrush is perfect for coloring this way as you are not touching the delicate fronds with a sponge or ink pad and possibly ripping them apart.
Add foilage and flower petals to base of fan, as shown.

To make the fan free-standing, eBrush a wavy wood stick with Copic BG18 marker.

Center and glue the stick along the bottom of the fan. As you can see, the fan is now free-standing and can be used as a table decoration, but can also be used as a traditional fan, as well.

And here is a close-up of the flowers and foliage. I also added the Sabor Paper embellishment "Celebrar!" in the bouquet.

Now, we are ready to celebrate Cinco de Mayo!!! Let the festivities begin!
I hope you are enjoying the hop today, and be sure to leave comments along the way for your chance to win some really great prizes! The complete list of bloggers is included for your convenience.
Have a wonderful Cinco de Mayo!!!!
Barbara
Wowzers!!! This fan is BEAUTIFUL!! Love the eBrushed flowers!! Divine!!!
ReplyDeleteLovely idea!
ReplyDeleteVery pretty fan. I know that was a lot of work and it looks great.
ReplyDeleteYour fan is awesome!
ReplyDeleteThanks for showing
how to make one.
Carla from Utah
I would love to have a beautiful fan like that to cool me off!!
ReplyDeleteI really love this idea. It would be great to hand out these out to family at a picnic so they can keep cool.
ReplyDeleteAnother Great idea! Fabulous job Barbara!
ReplyDeleteThis is amazing!! I love how you describe Sabor's paper. You are right on with that description. I lovvvve their collections. I will have to try this fan project. Thank you so much!!!
ReplyDeleteThis is amazing!! I love how you describe Sabor's paper. You are right on with that description. I lovvvve their collections. I will have to try this fan project. Thank you so much!!!
ReplyDeleteLove your project!
ReplyDeleteAmazing!
ReplyDeleteAmazing!
ReplyDeleteBeautiful fan. #CreativeGoodness
ReplyDeleteQuiltShopGal
www.quiltshopgal.com
Seriously GORGEOUS!
ReplyDeleteSeriously GORGEOUS!
ReplyDeleteBeautiful!
ReplyDeleteMkschmidt4atgmaildotcom
Wow this is stunning - I might have to have a go at using your tutorial to make these with my daughter
ReplyDeleteBeautiful fan.
ReplyDeleteBeautiful fan.
ReplyDeleteAmazing! Thank you for the tuto, great job!!
ReplyDeleteHermoso abanico, el detalle de perforarle el borde lo hace lucir de época.
ReplyDeleteBeautiful fan!
ReplyDeleteVery pretty fan! I love how you punched the border edges, they look so beautiful! The papers are so gorgeous and I love the ebrushed flowers, they look so amazing! Fabulous project idea!
ReplyDeleteBarbara, love the fan -- great details and rich colors!
ReplyDeleteThis is really a beautiful fan, it would look gorgeous on my mantle.
ReplyDeleteFabulous fan, love the wonderful flowers you created using the eBrush. They look fabulous on your Sabor Fan.
ReplyDeleteaww, nice!
ReplyDeleteSimply beautiful!! I LOVE this!
ReplyDeleteAbsolutely gorgeous fan! Excellent idea to use coffee filters for the flowers!!
ReplyDeleteCarmen L
I love!!! your fan and all the pretty flowers!!!
ReplyDeleteLook at that eBrush go! Love these fans and thanks for all the fabulous ideas!!
ReplyDeletevery creative!!!
ReplyDeleteBeautiful fan! That eBrush looks like a ton of fun!
ReplyDeleteThis is fbulous fan! Love the flower cluster too!
ReplyDeleteLove that paper and the coloring with the eBrush!
ReplyDeleteAmazing
ReplyDeleteYou've created a beautiful fan, but I love the detailed and up-close instructions even more!
ReplyDelete