Thursday, May 25, 2017

Mixed Media Canvas Tutorial: Why Birds Can Fly

Hi everyone!  Barbara here today with some more mixed media canvas art.  I cannot think of anything better for my focal images than the beautiful selection of laser cut chipboard from Gypsy Soul Laser Cuts.  There is so much to choose from and I  find it so easy to get a project started using the GSL Cuts as my starting point.


Here is what I mean.  Instead of starting with that scary, blank white canvas, just choose some chipboard you think you might use and start laying out the pieces.  Voila!  No more scary, blank white canvas.  Now I have my jumping off point.


Next, I adhered my chipboard to the canvas and then gave it a quick coat of white gesso.  The little bird on the cage has not been adhered yet, only gessoed.  I may need to change my mind about placement.  Let gesso dry.  


Place canvas inside a box to catch the extra spray from the misters.  Use ColourArte Shimmering Mists to add color to background, as follows:

Bashful Blue

Teal Zircon - Upper Half of Canvas

Fern - Lower Half of Canvas

Seafoam - lower half 

More Bashful Blue - upper half

More Fern - lower half

Even More Fern - Lower half

Mists dried naturally

Paint chipboard as follows:
Tree branch - Burnt Umber H20
Leaves - Rainforest H20
Birds - Beachouse Blue H20
Bird Cage - Ancient Coin H20

Leaves - Key Lime H20, let dry, add Crazing Collage Medium
Bird Cage - Bronze H20
Birds - Water H20
Spritz background with water, manipulate colors with brush

Bird Cage - Patina Gilding Wax
Add shading beneath branches, leaves, birds, and bird cage with charcoal pencil and smudge with finger or blending stump


Closeup of patina gilding wax


Glue standing bird to front of bird cage

Computer generate the quote using a font of your choice onto parchment card stock.  Here is the actual quote I got my wording from.

“The reason birds can fly and we can't is simply because they have perfect faith, for to have faith is to have wings.”
―  J.M. Barrie,  The Little White Bird    


Cut apart and test pieces to fit in open areas.


Adhere card stock to slightly larger black chipboard that has been painted with the Ancient Coin and Bronze Twinkling H20s ... 


... and adhere to canvas.


Use a stencil brush to add a light brick background with Moss gilding wax through brick stencil.   


Edge canvas with Black Gold gilding wax and the same stencil brush.  Blend wax out with your fingers, if necessary.


Finish off canvas with flowers and leaves around the bird cage, and a butterfly just above the cage.


And a few closeups from different angles.  I really love the dimension from the chipboard. 


Supplies Used:

GSL Birds Shape Set
GSL Doodled Cage with Solid Back
GSL Leafy Branches with Birds (contact store)
ColourArte Radiant Rains Shimmering Mists
  Bashful Blue
  Teal Zircon
  Fern
  Seafoam
ColourArte Twinkling H20s
  Key Lime
  Rainforest
  Raspberry Wine
  Ancient Coin
  Bronze
  Burnt Umber
  Beachouse Blue
Tim Holtz Brick Stencil
Miss Lillian's Gilding Paste (Moss, Black Gold, Patina)
White gesso

Thanks so much for stopping by, and I hope you feel inspired to make your very own chipboard embellished mixed media canvas.  

Have a wonderful day, and remember to take time to play!

Barbara

Saturday, May 20, 2017

How to Make an Acrylic Skin for Jewelry Making

Hi everyone!  I just wanted to take a moment to share my newest video tutorial using ColourArte's Vivid Ultra Metallics to make a marbelized acrylic skin to use in a bezel for a beautiful necklace, but it doesn't stop there.  These skins can be used in a wide variety of mixed media and art applications and sized to your needs.


See how easy it is to make!


I hope you  enjoyed my project and video.  If you liked it, I would really appreciate a thumbs up, and comments are always appreciated.  If you would like to see more videos like this, please consider subscribing to my YouTube channel.


ColourArte Supplies Used:
Vivid Ultra Metallics:
  Bolivian Blue
  Solar Gold
  Teal Zircon
  Jasmine
  Snap Dragon
  Wine & Roses
  Siam White
  China Black

Other Supplies Used:
1" square Silve Bezel
Golden Polymer Medium (Gloss)
Clean Water
Mini Cups for Mixing
Food skewers or craft sticks (for stirring)
Pin or Needle
Craft Mat
Ice Resin

As always, thanks for stopping by, and remember to take time to play!

Barbara

Thursday, May 11, 2017

Rusty Steampunk Altered Notebook Tutorial

Hi everyone!  Barbara here again with another fun project using Gypsy Soul Laser Cuts.  I found this inexpensive little hardback notebook in the $1.50 bin of my local craft store.  I am always making notes of things I want to create, or things I want (need) to do, and so, a notebook with a hard cover is the perfect substrate to add layers chipboard embellishments.

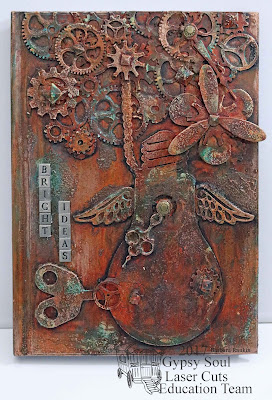
This is my finished "Bright Ideas" notebook, hence, the light bulb, which suggests that there just might be some good ideas hiding inside this little book.  And, as you can see, it is rusty and very Steampunk!  So scroll down for more information on l how I made this rusty, crusty and dusty cover using Andy Skinner's rust technique with and a few added products for even more crustiness.


Cut two pieces of paper to measure 4-3/4" x 7-1/8" for this particular book.  If your book is a different size, cut the paper slightly smaller than the front of the book, without covering the spine.   Adhere the paper to the front and back of the book.


I cut the gears texture sheet apart, leaving the top and left edges straight to line up against the edge of the book.  The bottom edges were cut more randomly between the gear shapes. 


Adhere this piece to  the top of the book, a shown.


Arrange and adhere the chipboard pieces to your liking.  I layered some of the gears, clock hands, and propellers for added depth and dimension.


Paint front and back of book with a wash of white gesso.  Remove some of the gesso from the script paper with a damp paper towel if you want to see more of the print show through.  Place a piece of paper between the book covers and the pages to protect them during this process. Let gesso dry.
front cover


back cover
Spread splotches of texture sand paste randomly over the chipboard and open areas of the book cover.  Let dry.


front cover

Turn book over and spread modeling  paste through gears stencil.  Let dry.


back cover

Let modeling paste dry.  This is how your back cover will look.
back cover

Paint front and back covers with a wash of Paynes Grey + water.  In the photo of the front, you can see the gritty texture left by the texture sand paste.


front cover

The back cover shows the stenciled gears and the texture sand paste I added after painting.  I simply used my finger to apply a very thin, random coat over the background.  Let paste dry.


back cover

Paint both front and back cover with a wash of Quinacridone Gold and let each side dry.  Then paint both sides again with the Quinacridone Gold direct from bottle for a deeper tone.  Let dry.


front cover

back cover
Add highlights by painting covers with Translucent Yellow Iron Oxide, concentrating on the sanded sections.  This adds a really subtle color variation.  


front cover


back cover


Next, add splotches of Titan Buff randomly over covers by applying with finger and very little paint.  Let dry.


Apply Cobalt Teal Hue in the same fashion as previously done with Titan Buff.  Let dry.


Now apply a wash of the Quinacridone Gold + water over the entire cover, front and back. This will tone down the colors and make them look more grungy.


Apply small amounts of Rusty with finger, just hitting high spots and edges very randomly.


Highlight high spots and edges with Rose Quartz Treasure Gold.  Use sparingly and apply with your finger.


Shade chipboard pieces with a slightly watered down Paynes Grey, allowing the paint to collect in the nooks and crannies.  Glue metal letters "Bright Ideas" along the left edge of front cover, as shown.


Repeat shading process on back cover with slightly watered down Paynes Grey, allowing the paint to collect in the nooks and crannies.


Finish off inside covers by adhereing print scrapbook paper of your choice to the inside, as shown.


Supplies Used:

GSL Steampunk Lightbulb Set
GSL Texture Sheet Gears 6x6
GSL Steampunk Shape Set
GSL Gears Shape Set
GSL Propellers
Hardback note book (5"x7")
7Gypsies print papers
White gesso (Liquitex)
Mixed Media Adhesive (Derivan) (or any white glue or gel medium)
Light Molding Paste (Golden)
Texture Sand Paste (DecoArt)
DecoArt Media Fluid Acrylic Paints 
  Quinacridone Gold
  Transparent Yellow Iron Oxide
  Paynes Grey
  Titan Buff
  Cobalt Teal Hue
Rust Effect Paint (Viva Décor)
Rose Quartz Treasure Gold metallic wax
Metal Embellishments (from my stash)

I hope you enjoyed my remake of a fairly non-descript notebook into something  you just might want to record your "Bright Ideas" for posterity.  Of course, if Steampunk is not your thing, I would suggest that you check out the Gypsy Soul Laser Cuts online shop to see the wonderful selection of chipboard in just about any theme you can imagine.  Make it your own!

Thanks for stopping by, and have a great day!

Barbara