Observation is the act or instance of noticing or perceiving. It is also something that is learned in the course of observing things. For me, as I journey through this life, attempting to create my kind of art, I use observation as a tool for learning. So I decided to make my own Observations Notebook as a kind of reference book to help me remember those things I may have learned along the way.
 |
| Front |
 |
| Back |
I found this Heidi Swapp mini album in the clearance section of my local craft store. It has fabric on one side and bare wood on the other.
Paint the fabric side of the front cover with clear gesso through the ripped fishnet stencil, and paint the fabric side of the back cover completely with clear gesso. Let dry.
Spray both covers with water first, then Radiant Rains Peach Fuzz, Soft Lemon, and Pewter shimmering mists. Let dry.
Use a spatula to spread Emperor's Gold Radiant Gel through the "Art Is" stencil on both front and back covers. This dimensional paint is very thick and holds its shape. I love its superior quality and the Gold is amazingly beautiful.  |
| Front cover |
 |
| Back cover |
While I loved my background so far, I could not stop. I was in a more vintage mood, so I needed to tone things down and make them look older. To do this, I first added some Primary Elements (PE) Buttercup and Mandarin Citrine, mixed with PE Clear Glaze Medium, and painted it randomly over the covers. I also picked up the tiniest amount of PE Apple Blossom and mixed that in a few areas as well. Before drying, I spritzed it with lots of water to disperse the color and allow it to blend and run, all while using my heat gun to dry it.
Next, I sprayed both covers again with the Radiant Rains in Pewter, Honeydew, and Ginger Peach, to give it this warmer look. I also distressed the edges with Charcoal chalk ink. (See photo of finished covers).
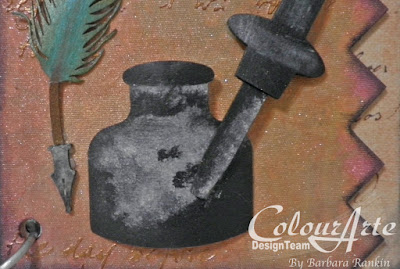
While the covers are drying, decide what embellishments you want to use on your book cover. I chose these chipboard shapes from Gina's Designs.
After covering each shape with clear gesso, I painted each piece as described below:Ink bottle and eye dropper: Silks Black Ice, PE Vanilla Bean mixed with PE Glaze Medium
I was not sure just how I wanted to color my ink bottle. I knew I wanted it to look old, and I found this photo on Pinterest for my inspiration. What do you think?
Writing Quill: Silks Black Ice, topped with PE Vanilla Bean mixed with PE Glaze Medium (nib), Silks Sea Spray edged with Silks Olive Vine (feather), Silks Nutmeg (stem and up center of feather),
Stackable Label: Silks Yellow Rose, edged with Silks Black IceMetal Observations Label: Silks Black Ice. When dry, I wiped off the excess, leaving the black in the word crevices. Attach the metal piece to the chipboard rectangle, then adhere that to the frame piece.
Here is each piece after painting.
Since they are just raw wood, I chose a piece of 12x12 scrapbook paper to cover them.
 |
| Raw wood inside covers |
 |
| Script Paper adhered to inside covers |
 |
| Front cover, inside cover page, back cover |
ColourArte:
Primary Elements Arte Pigments: Mandarin Citrine, Buttercup, Apple Blossom
Radiant Rain Peach Fuzz, Sour Lemon, Pewter
Radiant Gels Dimensional Paint Emperor's Gold
Silks Acrylic Glaze: Black Ice, Olive Vine, Sea Spray, Yellow Rose
Primary Elements: Vanilla Bean
Primary Elements Clear Glaze Medium
Gina's Designs: Pen and Ink Shape Set; Stackable Labels Shape Set
Heidi Swap Mini Album
Clear gesso
Prima Ripped Fishnet stencil (Finnabair)
Prima Ledger Pad 3 (12x12)
Art Is 6x6 stencil (The Crafter's Workshop)
Spatula
Beacon Quick Grip Glue
I hope you enjoyed my little mini album. Be sure to check out the great products that ColourArte offers, and the chipboard from Ginas Designs.
Thanks for stopping by, and have a crafty weekend!
Barbara


Wow, and wow again! This album is gorgeous - you do such amazing work. I love the colors you have used and blended and the backgrounds and pages are awesome.
ReplyDeletejust gorgeous! xo
ReplyDeleteThis is absolutely just gorgeous Barb!!! I love what you have done with those ColourArte colors and Gina's parts!! Stunning work my friend- your observation book is a masterpiece!! xo
ReplyDelete