Friday, July 29, 2016

Happy Sunshiny Day Mini Tag Booklet with Altered Pages

Hi everyone!  Barbara here with my last post as part of the Altered Pages design team.  I am saddened to leave this fabulous group, but never fear, I've been asked to come back on occasion as a guest designer, and I happily agreed!

I decided to make a cute little accordion style mini note book with tags using simple coin envelopes. And, best of all, these are so quick and easy to make.  I love quotes and used some on the back of my tags, along with some fab collage images for the tag fronts.  Altered Pages has a great selection of collage images, too! 


Cut a strip of gray card stock 2-1/2" wide by 11" long.  Use a scoring tool, like the Scor-Pal, to score at 1", 1-3/8",  5-1/2", 5-7/8", and 9-3/4".  Cut off excess paper at the 9-3/4" score line.


Fold top flaps to inside and place double-sided tape down the center of each coin envelope.


Adhere coin envelopes together.  Make sure they are going in the same direction, with the opening at the top.  Then adhere them to the back section of the card stock.   Place one more strip of double sided tape down the center of the top coin envelope.


Fold front of cover over.  It should look like this.


Trim a print paper from the pad slightly smaller than the front cover (2-1/4" x 3-1/2").  Distress edges with blending tool and black ink.


Adhere to front cover.


Trim a coordinating piece of print paper slightly smaller than the back cover (2-1/4" x 4-1/4), distress edges with black ink, and adhere to back cover.


Remove paper line from double sided tape and close front of cover over the coin envelopes.  When you open the booklet, your envelopes will open like an accordion.


To make tags, cut five pieces of coordinating papers 2-1/8" x 3-5/8",  round corners and distress edges with black ink.  Cut five 7/8" circles from scraps of paper, edge each with the black ink.


Fold each circle in half and adhere to top of tags.  Resize ATC Cards 2 1318 Collage Sheet images to 75% and print.  Cut each image out, adhere to slightly larger piece of gray card stock, then adhere to tag front.

Tag Fronts

Resize Pocket Quotes 2367 Collage Sheet images to 75% and print.  Cut each image out and adhere to tag backs.  Stamp floral image from Muse Altered Artist stamp set with black Stazon ink.  Use a water brush with gelato to color the images.

Tag Backs

Insert tags into each envelope, add tiny magnet (or velcro) for closure, and adhere a pen nib with dimensional adhesive to the front.  


Stamp "Altered Artist" onto a scrap of matching card stock with black ink, trim to size of front flap, round bottom corners, and adhere to front flap.


SUPPLIES USED:

8x8 Glitz Paper Pads (Sunshine in my Soul)
Coin Envelopes
Create Your Flowers (Create Me Crazy)
ATC Cards 2 1318 Collage Sheet
Pocket Quotes 2367 Collage Sheet
Muse Altered Artist stamp set
Double Side Tape 1/4 inch
Mixed Media Salazar Inkx (Black)
StazOn Midi ink pad (Jet Black)
Ranger Blending Tool
Gelatos
Water brushes
Pen Nibs
Scor-Pal Mini tool
Dimensional Adhesives
Gray card stock
Corner Rounder
7/8" circle punch
Mini magnets (or velcro)

Thanks for stopping by, and have a wonderful and creative Summer.  And until next time, I won't say goodbye, but instead, see you soon!

Barbara

Thursday, July 28, 2016

Vintage Feminine Card with Gypsy Soul Laser Cuts

Hi everyone!  Barbara here on the Gypsy Soul Laser Cuts blog.  I want to share a card today with a very feminine, and a bit shabby chic, feel.  I have birthdays coming up in the next few months, so cards to send are on my mind.  Laser cut chipboard is a real pleasure to work with, and I love how they add so much dimension to a card without adding too much bulk.


I used a pink card base and print paper layer cut slightly smaller.   I painted the Flourished Frame Connie with pink acrylic paint and distressed it with gelatos.


Next step, adhere the layers, as shown, including the print post card from the paper.


I painted all pieces with a coat of acrylic paint before adding color with gelatos to give added depth and dimension to the pieces.  The perfume bottle was run through an embossing folder (just the bottle portion) and then I hit the high spots with a gold ink pad.  I also added some gold to parts of the bird cage, as well.


Next step, adhere the bird cage with the postage stamp image over the opening.


Adhere the remaining pieces to the card front, as shown.


Lastly, I added a few gem stickers to the fleur de lysdressform, and perfume bottle top.


Supplies Used:

GSL Flourished Frame Connie
GSL Ornamental Bird Cages Shape Set
GSL Dressforms 2 Shape Set
GSL Parisian Shape Set
Pink card stock 
Print papers and die cuts (3 Birds - Estate Collection)
Embossing folder
Acrylic paint
Gelatos
Gold ink pad
Makeup sponge
Gem sticker embellishments

I hope you have been inspired, at least a little bit, to give laser cut chipboard a go on your next card project.  You won't be disappointed, and your recipient will be so impressed.  

Thanks for stopping by, and have a wonderful, crafty day!

Barbara

Cards to Remember with Craftwell USA and Clearsnap

Hi everyone!  Barbara here on the Craftwell Blog with some Remembrance Cards using my Craftwell eBrush, along with stamps and ink pads from our partner, Clearsnap.  

The style and theme of these are perfect for making inspirational cards for gift giving, birthday, and special occasions.  As I was making these cards, using the skyline stamp and the Remember dies, I couldn't help but think about 9-11.  But on a happier note, it would be perfect to say to someone, I remembered your birthday or anniversary, and have the Best Day Ever.   


The first card is the one that reminded me so much of 9-11, but I think I brightened it up enough with sunny colors that it is quite suitable for a birthday or any special occasion.  


Of course, I used my Cut n' Boss to die cut several of my Teresa Collins dies.  I also used her paper pad, Sweet Afternoon.


I stamped the skyline image twice, in line, onto a scrap of the yellow paper with the Pink Passion ink pad.  I embossed it with clear embossing powder, and it turned the images to a beautiful peach color.  I think the yellow paper was helping do that.  


I put some glue on the back of the Remember die and adhered it over the stamped image, as shown.  Then I cut the excess yellow paper from around the die image.


Next, I used the Teresa Collins Deco Circles embossing folder with white card stock.  These embossing folders are large enough to emboss an entire sheet of 8-1/2 x 11 paper.  What I don't use in my project today will be saved for later.


I cut a rectangle to measure 3" x 4", then cut it on the diagonal from point to point.  If you want an equilateral triangle, then cut any size square first.  I wanted this uneven triangle, however.


Now comes the fun. I love my eBrush because I get to make my own background papers (or embellishments) to match.  One triangle was colored with a combination of the pink and yellow marker.  The second triangle was simply colored with the blue marker, leaving it darker in some places for dimension.  I inked both triangles with the Gold Shine ink pad for some extra shine.  I love how it turned out.  It actually gave it a bit of a vintage feel.


When all was finished, I added my pieces to the card front, as shown in the finished photo above.

The second card was really fun and simple, too.  The papers were adhered to the card front, as shown, along with a bow and some bling.  The die cut key was cut from blue card, but inked with the Gold Shine ink pad.  You'd never know it wasn't cut from gold card.


A little tip to share:  When you cut your dies with the removable alphabet, such as these, but you want to keep them in tact, before removing the paper from the die, lay a piece of scor-tape, or any double sided adhesive with a paper liner on one side, over the back of the paper.


When you remove the label/letters from the die, the alphabet remains in tact, and you have a ready made sticker with the adhesive on the back.  Fun?


Supplies Used:

Craftwell USA eBrush
Craft well Cut n' Boss
Teresa Collins Today Project Dies
Teresa Collins Remember This Project Dies
Teresa Collins Honeycome Project Die
Teresa Collins Deco Circles embossing folder
Teresa Collins 6x6 paper pad - Sweet Afternoon
Clearsnap Skyline rubber stamp (Teresa Collins)
Clearsnap pigment ink pads Passion Pink, Gold 
Card stock - Textured White, Blue
Prismacolor Markers - Pink, True Blue, Spanish Orange
Clear embossing powder
White ribbon

There will be more fun projects featuring the Clearsnap., so make sure to check out the Craftwell Blog all month long for more inspiration from the team. 

Thanks for stopping by, and have a crafty day!

Tuesday, July 26, 2016

DecoArt Media Under the Sea Challenge and Video Tutorial


Hello everyone!  Are you ready for another DecoArt Media challenge? This challenge will be an Under the Sea theme, anything from bright and fun fishies to dark and mysterious sea monsters and submarine stuff. The Design Team has been busy creating some great inspiration pieces that will be featured throughout the challenge, which started July 11th and closes on August 12th.  

So, here is my Design Team inspiration project for the DecoArt Media Under the Sea Challenge.  I made this fun "Under the Sea" canvas using pieces I made or molded from clay, and of course, using all of the fabulous products from the DecoArt Media line.  


To better show you how I put this together, I made a video tutorial to share with you.  It is a little longer, but there were a lot of things to show you.  I hope you enjoy it.


Products Used:

DecoArt Media Fluid Acrylics Titanium White
DecoArt Media Fluid Acrylics Prussian Blue
DecoArt Media Fluid Acrylics Cerulean Blue
DecoArt Media Fluid Acrylics Dairylide Yellow
DecoArt Media Fluid Acrylics Quinacridone Burnt Orange
DecoArt Media Fluid Acrylics Cadmium Red Hue
DecoArt Media Fluid Acrylics Titan Buff
DecoArt Media Fluid Acrylics Blue Green Light
DecoArt Media Fluid Acrylics Burnt Umber
DecoArt Media Fluid Acrylics Interference Gold
DecoArt Media Fluid Acrylics Green Gold
DecoArt Media Fluid Acrylics Raw Sienna
DecoArt Media Fluid Acrylics Quinacridone Violet
DecoArt Media Specialty Products  White Molding Paste
DecoArt Media Specialty Products Texture Sand Paste
DecoArt Media Specialty Products White Gesso
DecoArt Media Specialty Products Clear Crackle Glaze
Antiquing Cream Titanium White
Antiquing Cream Raw Umber
DecoArt Liquid Glass
Metallic Lustre Fab Fuchsia
Metallic Lustre Champagne Ice


Americana Classic Brocade & Berry Borders Stencil

Other Products used:

12x12 denim canvas
Polymer Clay 
Clay molds
Wooden laser cut word
Wooden anchor embellishment
Fish images
----------------------------------------------------------

The challenge opened for entries on July 11th and closes on August 12th. The winner of this challenge will be chosen by the DecoArt Media Design Team on August 15th and announced on the  DecoArt Media Blog and on the DecoArt Social Media Channels August 19th. The winner will receive a $100 DecoArt Gift Card for use in the DecoArt Online Store so you will certainly want to submit a piece or two! Don't forget to share with your friends so everyone can join in the fun!

All the details pertaining the the challenge can be found here, at this link:  


We can’t wait to see where all your creative ideas take you! 

Thanks for stopping by, and have a wonderful, creative week!

Barbara

Monday, July 25, 2016

Be Brave Art Journal Page with Dixie Belle

Hi everyone!   I am working in my Dylusions Small Journal today.  Art journaling is really fun, and gives you permission to do your own thing without rules.  So let's play!


Tape the seam in your journal to keep the paint from seeping down into the pages below.  Paint both pages with a coat of the Liquitex Gesso and let dry.  Tear a few pieces of paper from the Authentic Accomplished 6x6 pad and adhere to the page randomly.


Add a wash of gesso over both pages to push the darker paper into the background.


Resize and print the hand with palette and brushes collage image, fussy cut and adhere to journal page.  Print  Pocket Quotes 2 collage image, cut out quotes for your journal.  Coat paper with Dixie Belle Clear Coat Satin to protect the inkjet printer ink from bleeding.


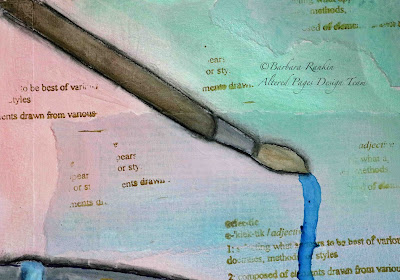
Cut the quotes apart and adhere them, along with the paint palette image, to the page, as shown.  I also penciled in a hand-drawn image of a paint brush at the top right.


Paint background with the Dixie Belle Soft Pink paint, watering it down a bit as you go over the images.  If you get too much on an image, use a damp baby wipe and wipe away any excess before it dries.  It will be very easy to remove because the images are sealed.


Paint the images and color the background with Gelatos using a Water brush, your finger, and a damp baby wipe to spread and blend the colors.


Stamp randomly over the background with StazOn Spiced Chai.  Draw a line with the blue Gelato from the brush tip, wet line with water brush and allow the color to drip from the image.


Shade around images using black Gelato and a Tortillion to blend the color out.


Cut strips of Adhesive Corrugated card stock, glue down to lower left side of page.   Hand write "Be Brave!" above card stock with black Pigma Micron Pen 01 and outline with Uniball white gel pen.


And here is the finished page.  I really like how this turned out.  No rules, no pressure, just fun!


SUPPLIES USED:

Dylusions Small Journal
Liquitex Gesso
Authentic Accomplished 6x6 pad
Collage Sheets:  Pocket Pages 2I Create, Therefore I Am
StazOn Spiced Chai
Water brushes
Muse Altered Artist rubber stamp set
Ranger Blending Tool
Mixed Media Salazar Inkx (Leather)
Uniball white gel pen
Pigma Micron Pen 01
Adhesive Corrugated card stock
Tortillion

Dixie Bell Paints (Pale Pink, Clear Satin Sealer)


Dixie Bell Paints are not just for home decor!  I found this product to work extremely well in my mixed media art, and you can see how well it smoothly glides over paper.  Just imagine how well it works on wood and furniture.

I hope I have inspired you to create something fun in your art journal and try new things in your mixed media art projects.  Be sure to stop by Altered Pages to see what else is available for your use.

Thanks for stopping by, and have a wonderful, creative week!!!

Barbara

Thursday, July 21, 2016

Botanical Memo Board with Gypsy Soul Lasercuts

Hi everyone.  It's Thursday again, and that means I am up on the Gypsy Soul Laser Crafts blog!  When I got this Memo Board, I knew I was going to love it.  I am sure you will, too.  Just think of all the uses.  You can hang it on the wall, set it on an easel, add magnets to the back to hang on your fridge.  The possibilities are endless.


Lay your pieces out to determine how to glue them together.


Paint portions of chipboard that will not be covered with paper.  I mixed two colors of pink and salmon chalk ink to get a color to match my paper.


Cut scrapbook paper of your choice to size and adhere pieces to front and top and bottom of tray section.  Leave back uncovered for now.  (Be sure to cut out the holes you may have covered with paper so that you can still glue the pieces together.)


Now glue the tray shelf to the bottom of the board, as well as the trim pieces.  


I cut thin 1/4" strips of the same paper to add to the bottom of the tray shelf to cover where the chipboard joins.   I think it gives it a really nice finish.


Next, lay out your chipboard pieces to see how they will look, as well as the clip that will be placed in the center.


I first gave my chipboard pieces of coat of chalk paint in the color I wanted as an under tone.


Next, I gave details and dimension to the pieces, first with ColourArte Twinkling H20s, and then some extra shading was added with Gelatos.  I computer-generated "MEMO" onto a scrap of my paper to fit inside the miniature bookplate.


Before adhering any chipboard, I wanted to get the clip attached.  I centered it and penciled in where I needed to punch my hole for the brad to go through.  I used my Big Bite crop-a-dile to punch the hole.  Then I used some quick grab glue on the back, as well as inserting the brad through the clip and the board to hold it in place.  


Then I covered the back of my memo board with another coordinating paper.  Now it is nicely finished off on the back, as well.


I started adding my chipboard pieces, as shown in the close-ups below.  You can see where I added the MEMO bookplate to the clip, and some flower embellishments to my leaves. 


Supplies Used:

GSL Memo Board
GSL Bird on Branch Assortment
GSL Butterflies and Dragonflies
GSL Fern Fronds
GSL Skeleton Leaves
GSL Miniature Bookplates Shape Set
ColourArte Twinkling H20s
Folk Art chalk paints
Faber-Castell Gelatos
Metal clip and flowers

I hope you are inspired a bit to try creating your very own memo board.  Wouldn't this make a beautiful gift for someone.  Christmas is not too far off.   So pop on over the the Gypsy Soul Laser Cuts store and see all the fab choices there.  

Thanks for stopping by, and have fun crafting!

Barbara