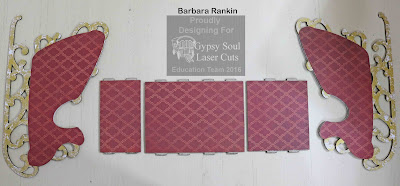
First, I recommend a dry fit of the pieces to make sure they will go together properly.
Then you may want to number or letter them to keep them straight. I used letters for the inside pieces.
 |
| Fig. 1 |
Paint the sleigh parts with ColourArte Vivid Solar Gold Ultra Metallic using a sponge applicator. Use a dabbing motion with the sponge for a smooth application without allowing the paint to get into the openings and holes. Paint the edges of both sleigh pieces and one side of each of the frame (open) pieces. These will be glued down later, so the unpainted side will not be seen.
My inspiration for the next step is this piece of paper I found in my stash. I think I was able to come close. What do you think?
Add the white specks of paint by picking up a very small amount of white acrylic paint with a wad of plastic wrap. Dab most of the paint off before dabbing the chipboard sleigh frame and sides.
While the paint is drying, you can trace around the chipboard template and cut out your side pieces, as shown.
For the bottom of the sleigh, trim papers to fit the C, D, and E pieces (Fig. 1) on both sides, leaving the tabs free for assembly. I have chosen the green papers for the inside and the red papers for the outside. Remember, when I did the dry fit of these pieces, I labeled the inside (green paper) as C, D, and E. Always check yourself first before gluing your papers down.
Checking my assembly again.
Remove the sides in the same order as the dry fit assembly, and lay your papers out to match. Now you are ready to glue them down.
Glue your side pieces to the sleigh now. Before assembling the parts, cut out the holes in the sleigh pieces.
Turn the pieces over and repeat the previous steps to cover the opposite sides, as shown.
However, DO NOT cut out the holes for assembly. Leave the paper intact to cover the entire outside, as shown.
Glue the frame piece to the outside, matching up the chipboard, as shown. Let one side dry first before turning it over and gluing the opposite side to ensure the frame piece does not slip out of position. When the glue dries, you can turn it over and glue the opposite side.
Glue inside pieces to one of the sides of the sleigh.
Cut Snowflake Border apart into pieces that will fit on the sides of the sleigh.
Paint snowflakes with white acrylic paint, and while still wet, dust with a holographic glitter.
Adhere to sides of sleigh, as shown.
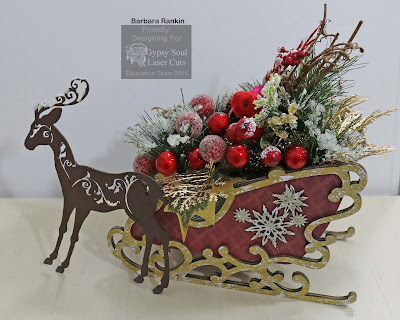
Paint both sides of Deer with brown acrylic paint, and paint the hooves black. Add snow writer paint along tips of antlers, as shown.
Supplies used:
GSL Santa's Sleigh
GSL Deer
GSL Snowflake Border
My Mind's Eye Lost & Found Christmas paper pad
ColourArte Vivid Solar Gold Ultra Metallic acrylic paint
White and brown acrylic paint
Foam blending tool or makeup sponge
Snow writer paint
Hologram glitter
Floral embellishments
I hope you have been inspired to make one of these beautiful Christmas sleighs for your holiday decorating, or to give as gifts.
Thanks for stopping by, and don't forget to check out all the fabulous inspiration from the rest of the team.
Barbara


No comments:
Post a Comment