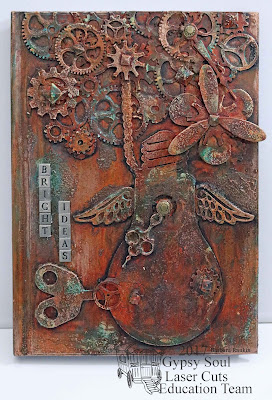
This is my finished "Bright Ideas" notebook, hence, the light bulb, which suggests that there just might be some good ideas hiding inside this little book. And, as you can see, it is rusty and very Steampunk! So scroll down for more information on l how I made this rusty, crusty and dusty cover using Andy Skinner's rust technique with and a few added products for even more crustiness.
Cut two pieces of paper to measure 4-3/4" x 7-1/8" for this particular book. If your book is a different size, cut the paper slightly smaller than the front of the book, without covering the spine. Adhere the paper to the front and back of the book.
I cut the gears texture sheet apart, leaving the top and left edges straight to line up against the edge of the book. The bottom edges were cut more randomly between the gear shapes.
Adhere this piece to the top of the book, a shown.
Arrange and adhere the chipboard pieces to your liking. I layered some of the gears, clock hands, and propellers for added depth and dimension.
Paint front and back of book with a wash of white gesso. Remove some of the gesso from the script paper with a damp paper towel if you want to see more of the print show through. Place a piece of paper between the book covers and the pages to protect them during this process. Let gesso dry.
 |
| front cover |
 |
| back cover |
 |
| front cover |
Turn book over and spread modeling paste through gears stencil. Let dry.
 |
| back cover |
 |
| back cover |
Paint front and back covers with a wash of Paynes Grey + water. In the photo of the front, you can see the gritty texture left by the texture sand paste.
 |
| front cover |
The back cover shows the stenciled gears and the texture sand paste I added after painting. I simply used my finger to apply a very thin, random coat over the background. Let paste dry.
 |
| back cover |
Paint both front and back cover with a wash of Quinacridone Gold and let each side dry. Then paint both sides again with the Quinacridone Gold direct from bottle for a deeper tone. Let dry.
 |
| front cover |
 |
| back cover |
 |
| front cover |
 |
| back cover |
Next, add splotches of Titan Buff randomly over covers by applying with finger and very little paint. Let dry.
Apply Cobalt Teal Hue in the same fashion as previously done with Titan Buff. Let dry.
Apply small amounts of Rusty with finger, just hitting high spots and edges very randomly.
Highlight high spots and edges with Rose Quartz Treasure Gold. Use sparingly and apply with your finger.
Repeat shading process on back cover with slightly watered down Paynes Grey, allowing the paint to collect in the nooks and crannies.
Finish off inside covers by adhereing print scrapbook paper of your choice to the inside, as shown.
Supplies Used:
GSL Steampunk Lightbulb Set
GSL Texture Sheet Gears 6x6
GSL Steampunk Shape Set
GSL Gears Shape Set
GSL Propellers
Hardback note book (5"x7")
7Gypsies print papers
White gesso (Liquitex)
Mixed Media Adhesive (Derivan) (or any white glue or gel medium)
Light Molding Paste (Golden)
Texture Sand Paste (DecoArt)
DecoArt Media Fluid Acrylic Paints
Quinacridone Gold
Transparent Yellow Iron Oxide
Paynes Grey
Titan Buff
Cobalt Teal Hue
Rust Effect Paint (Viva Décor)
Rose Quartz Treasure Gold metallic wax
Metal Embellishments (from my stash)
I hope you enjoyed my remake of a fairly non-descript notebook into something you just might want to record your "Bright Ideas" for posterity. Of course, if Steampunk is not your thing, I would suggest that you check out the Gypsy Soul Laser Cuts online shop to see the wonderful selection of chipboard in just about any theme you can imagine. Make it your own!
Thanks for stopping by, and have a great day!
Barbara


Wow - really interesting tutorial Barbara. It's amazing to me how you creatively find just the right place for ever piece and then doll it all up so BEAUTIFULLY. Xj.
ReplyDeleteThanks so much for your kind comments, Joi. You always know just the right things to say to make me feel special. And coming from such a wonderful artist as yourself, it is so appreciated. xo
Delete