Thursday, April 26, 2018

How to Make Gypsy Soul Laser Cuts' Tablet/Ipad/Phone Holder

Hi everyone!  Today I have a super fun and easy project that is going to be a must-have in every home.  Lately, I've decided I am tired of holding my phone or Ipad while I'm working, and I remembered seeing this nifty Tablet/Ipad/Phone Holder in the Gypsy Soul Laser Cuts online store.  It's easy to put together, and can be embellished or left plain.  Of course, I am going to embellish mine.


There are only three pieces to put together. 


Cut two pieces of paper the same size as the bottom of the holder.  Glue one paper to the top, cut out the slots, turn over and glue the second paper to the bottom.  Do not cut out the slots again.  You will want complete coverage on the bottom.


All three pieces are now covered with the paper.  Notice that the paper on the two side pieces are not covering the dovetails. You will want to keep them free so that they will still fit inside the slots on the bottom piece.


Distress all the edges with Frayed Burlap distress ink.  This will give a nice finish and cover the white edges on the paper.  In the photo below, the top piece has not been distressed, while the bottom piece has been.  Can you tell the difference?


Before gluing the pieces together, I used a gloss varnish to cover both sides of the paper on each piece.  This will protect the paper from use and abuse while using the holder, such as coffee spills or food stains.  


Glue the two sides to the bottom piece, as shown.  I like to use a fast grab tacky glue for this.  Let the glue dry before handling it


Use a craft knife to cut away the "chads" that hold the laser cuts in place.  There are only two holding this Leafy Corner intact.  


I decided to emboss my leafy cuts with a blue patina that matched the colors in my paper.  You can you any kind of embossing ink, or Versamark if you have that.


I embossed two leafy cuts and adhered one to the front and back of the larger back piece.


front side
back side

On the front, add flowers and berries, etc. along the front section, being careful not to place the flowers too high or it will obstruct your view of your phone or tablet.


However, embellish away on the back side.  


Here are a few shots from the side, and  how it looks when in use with a phone or tablet.


Supplies Used:
GSL Tablet/Ipad/Phone Holder
12x12 Print Paper (Stamperia SBB520)
PVA (white) glue
Fast Grab Glue (Aleenes)
Gloss Varnish (DecoArt)
Frayed Burlap distress ink (Tim Holtz)
Foam blender tool (Ranger)
Rustique Patina Azure embossing powder (Judi-Kins)
Clear Emboss It Dabber (Ranger)
Floral embellishments

I hope you enjoyed today's project.  Wouldn't these make such wonderful gifts to give to all your family and friends.  It would be so much fun to decorate each one differently to suit the recipient, after you've made one of your very own, of course.  So check out Gypsy Soul Laser Cuts for more inspiration and ideas.

Thanks so much for stopping by, and have a wonderful, creative day!

Barbara

Friday, April 20, 2018

Let the Fleur Fly Mixed Media Canvas

Hi everyone!  Lately, I've been purging my supplies, and I came across some items that I thought would add some great texture to a mixed media canvas.    I found some thumb tacks, some old buttons, and even some broken molded pieces I had made from plaster on a texture sheet.    Some of these things are quite old, but I'm pretty sure if you don't have the same exact things, you can find something similar in your own craft studio.   


CLICK HERE TO SUBSCRIBE TO MY CHANNEL

ColourArte Supplies Used:
Silks Acrylic Glaze
  Olive Vine
  Emperor's Gold
  Solar Gold
  Orange Peel
  Cinnamon Brown
  Jasper Red
  Stargazer
Vivid Ultra Metallics
  China Black
  Siam White

Other Supplies used:
8x12 Canvas
DecoArt Media Modeling Paste
DecoArt Media White Crackle Paste
Treasure Gold Metallic Wax (Classic)
Fleur de lys resin piece (hobby Lobby)
Large metal key (hobby lobby)
20 gauge wire
Prima #599409 wings mold
Faster Plaster
Buttons, thumb tacks (my stash)
Floral embellishments
Metal embellishments
Bee charms
Faber-Castell Texture Gems (Pearl)

I hope you enjoyed my video project today and maybe you've been inspired to go through your stash and make use of some of those things that have been forgotten and abandoned.

Thanks so much for stopping by, and have a wonderful, creative day!

Barbara

Thursday, April 19, 2018

Gypsy Soul Laser Cuts Shabby Chic Mask Tutorial

Hi everyone!  Barbara Rankin here on the Gypsy Soul Laser Cuts blog.  Today, I want to share this pretty, shabby chic mask using the Masks Shape Set,  along with Prima's new Lavender paper, and lots of lace and trims.


Trim a piece of 12"x12" paper to 7-3/4" x 12".  I used the mask shapes to get this measurement.


Run paper, right side up, through Xyron Creative Station.


Place paper with sticky side up.  This paper is double sided, so the script you see in the photo is actually the sticky side now.  Lay right side of each mask onto sticky side of paper.


Trim excess paper around each mask and cut out inside eye holes.  Repeat process to cover back of each mask with solid purple card stock.


Run purple card stock through Xyron Creative Station.


Adhere back of each mask to sticky side of cardstock.  Trim excess paper and cut out area inside the eye holes.  If needed, you can use sand paper, an emery board, or sanding tool, like the one shown, to smooth any rough edges.


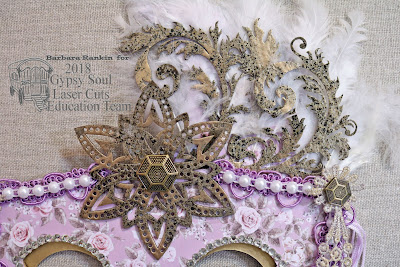
Choose three feathery flourishes and the smallest star medallion from each set.  Ink with Versamark ink and heat emboss each piece with Charred Gold embossing powder first.  Reheat the embossing powder and while embossing powder is still hot, randomly sprinkle a small amount of Queen's Gold embossing powder and quickly reheat until melted.  Repeat process for back of each piece.  You only need to cover the parts of these pieces that might extend past the mask and be seen from the back.


Adhere pieces to each mask, as shown.  The star medallion is centered and attached to the top mask, while the flourishes are adhered to the bottom mask, just above where the top mask will sit.


Cut a piece of 4" long white fringe to 13".  Place onto a craft mat and spray with water first,  Then spray both Shaded Lilac and Spun Sugar Distress Spray Stains over the fringe.  Spray more water to help the colors lighten as well as blend.  Allow the fringe to dry.  It will dry to a lighter color.  Then cut off any excess trim.


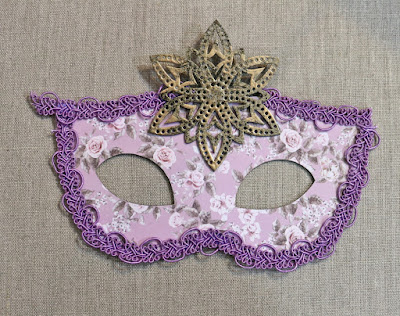
Glue purple trim around bottom mask, as shown.   I also outlined the eye openings on the bottom mask with the gold Krylon pen, as shown. 


When the top mask is placed over  the bottom mask, you will be able to see the gold outline around the eyes, as shown below.  


However, before we glue the two masks together, let's finish the top mask.  Glue purple trim around the edges of the top mask.  When glue dries, cut off any excess trim.


Next, glue a line of flat back pearl trim centered over purple trim. 


Cut two dangle daisy pieces from dangle daisy trim.  Lay onto craft mat and spray with Ranger Heirloom Gold Perfect Pearls Mist.  Then dab ColourArte Solar Gold onto each piece.  Let dry.
Glue dangle daisy trim piece to each side of top mask, as shown. 


Spread a thick bead of fast grab tacky glue along outer edge of bottom mask, as shown.  Let set for a minute or two.  Gently curve upper mask, and have a few clamps nearby and ready to use.


Align both top and bottom masks together and clamp along edges until glue dries. 


You may need to insert something between the two masks to keep the upper mask curved.  I used an extra clamp and shoved it between them.  Let the masks sit until the glue is dry.


Next, I inserted and glued small white feathers between the feathery flourishes to soften the top edges.  I glued matching gold buttons to the two daisy dangles and start medallion, as shown.  You may need to cut the shank off of the buttons before glueing them down.


Now, we need to add a handle.  I painted a 12" dowel that is 1/4' wide with  pearl paint.  You may need two coats for good coverage.  If you are right handed, you will want the handle to be on the left side of the mask so that when you are holding the mask, your right hand is free to use.  If you are left-handed, then place the handle on the right side of the mask. 


Use a good glue to attach the handle to the back of the mask, and cover the top of the handle with a small piece of the solid purple card stock to help keep the handle in place.


Here are a few closeups for you.  


Supplies Used:

GSL Masks Shape Set
GSL Star Medallions
GSL Feathery Flourishes Set
Lavender paper collection (Prima)
Coordinating purple card stock
Lumiere Pearl White paint
Tim Holtz Distress Spray Stains (Shaded Lilac, Spun Sugar)
Ranger Perfect Pearls Mist (Heirloom Gold)
ColourArt Radiant Rain Solar Gold Dauber
Krylon 18kt. Gold Leafing Pen
Embossing Powders
  Charred Gold (Emerald Creek)
  Queen's Gold (Ranger)
Xyron Creative Station
E-6000 Fabri-Fuse fabric glue
Aleene's Fast Grab Tacky Glue
Various ribbons, lace, trims, buttons, and embellishments
Diamond gemstones (Paper Studio)
Small Clamps
12" wooden dowel (1/4" wide)

Thanks for stopping by, and be sure to check out the Gypsy Soul Laser Cuts online store to see more of the fabulous laser cuts available for all your art needs.

Have a wonderful, crafty day!

Barbara
Thursday, April 12, 2018

Geisha Trifold Pocket Mini with Gypsy Soul Laser Cuts

Hi everyone!  Barbara here today on the Gypsy Soul Laser Cuts blog.  I want to share with you one of the newest laser cuts from Gypsy Soul called the Trifold Pocket Mini.  I love how it folds up into a small notebook, yet has pockets to hold all sorts of memorabilia.  Here is a picture of the finished cover.


Cut a piece of handmade paper to fit the front of the trifold mini and use a white glue to adhere the paper.  Trim excess paper away.


Cut strips of the same paper to cover the inside flaps and score lines and adhere with white glue.  This will cover the inside of the pockets where it opens and also strengthen the score lines.


Apply a fast grab tacky glue along the two long edges of each pocket, as shown.  


Fold them up and clamp each pocket together until the glue dries.  I used a heavy weight for the center pockets since I didn't have any clamps long enough to reach.


I used an Adirondack Gold paint dabber to edge the two side edges and the edges along the flaps.  


Cover the front of each stagger tag with notecards from the Tea-Thyme collection, cutting off the excess paper.  Be sure to punch the center hole before covering the other side.  Here you can see how the notecards looked before they were glued to the tags. 


Turn tags over and cover the back  of each stagger tag with a print paper from Tea Thyme.


I printed these collage images of Geishas, trimmed them, then layered each onto a piece of gold paper, then onto black card stock, before gluing them to the inside pockets, as shown.  I also added the large photo clips with brads, which will work to keep the flaps closed.  (NOTE:  I should have done this before gluing the pockets, but with determination, I was able to carefully get inside the pocket to spread the brad prongs.)


The three tags will fit nicely inside the three pockets.  You can add small photos, collage images, quotes, or add some personal journaling to the tags. 


I finished off the front and back of the trifold pocket min with a few more Geisha collage images, flowers, and a few metal embellishments I had on hand.  I used a piece of gold elastic to keep the mini book closed.


And for the inside, I added a few square metal embellishments to the flaps, as shown.  I did not add any 3D embellishments to the inside as it would make it quite difficult to close.  Once I inserted the tags into each pocket, I slid the photo clips into place to hold the flaps closed.  Each picture was offset, rather than centered, to accommodate the clips.  You could also use small velcro tabs or magnets, which would be adhered to the trifold before covering it with the paper.


Supplies Used:

GSL Trifold Pocket Mini
GSL Stagger Tags Small
Japanese handmade paper
Prima Tea-Thyme Paper Collection
  Linsey 12x12 paper
  Journaling Notecard set
  Flowers
King's Gold card stock (Neenah)
Collage Images - Geishas (Altered Pages)
Black card stock 
Metal photo clips
Metal embellishments
PVA Glue (or white glue)
Fast Grab Tacky Glue
Gold elastic

I hope you enjoyed today's project.  Thanks for stopping by, and have a super creative day!

Barbara