Showing posts with label Activa. Show all posts

Tuesday, December 29, 2015

Happy New Year Dimensional Card

Happy Holidays, friends!  I hope everyone had a very Merry Christmas!  I want to share a mixed media card with you today using molded embellishments made with  PermaStone Casting Compound from Activa® .  This product is quite versatile and very easy to use.


I mixed the PermaStone casting compound per the package directions and poured it into my roses and frame molds. I got busy making multiple pieces because I was having so much fun.  The PermaStone dries pretty quickly, in about 20-30 minutes.  


When completely dry, I removed from the mold and gave each piece a coat of glaze medium.


Next, I coated each piece with Timeless DecoArt Chalk Paint.


I painted three roses with Red Velvet Art Anthology Sorbet paint.  This paint is dimensional and thick, and has a beautiful glitter in it.  It even has a translucency to it if painted on thinly.  


I added water to a blob of burnt umber acrylic paint to make a wash to cover the frame.  Set frame aside to dry.


Resize and print lady on telephone from the Very Vintage New Year collage sheet and glue behind frame opening.


Now let's make the card base.  Cut blue card stock to 10" x 7", fold in half to make 5" x 7" card base. Remove world map page from the Happy Travels 6x6 Paper Pad and cut at 4-3/4" x 6", and the extra strip needs to be trimmed at 4-3/4", leaving a small square piece.


Ink up the edges with Leather Mix'd Media ink pad using the Blending Tool.


Glue large piece to card front, as shown.  


Glue small strip to bottom over the first piece.  Do not worry about the seam.  It will be covered up in later steps.


Cut a Kraft Paper Clock in half and adhere to card front, as shown.


Die cut or punch some foliage from green card stock and begin gluing the pieces, as shown.  Center and glue the framed piece, as shown.


Punch some holly leaves from green card stock and bling them up with a wash of the green and gold mica paints from the Mica Paint Palette using a Waterbrush.  Let dry.


Arrange and adhere the leaves with the red molded roses, as shown.  Aleene's Tacky Glue works really well for holding everything in place.


Here are a few more close-ups of the card.


Altered Pages Supplies:

Very Vintage New Year collage sheet
6x6 Glitz Paper Pads  (Happy Travels)
DecoArt Chalk Paint (Timeless Cream)
Art Anthology Sorbet Paint (Red Velvet)
Mica Paint Palette  (Pearlescent & Metallic)
Waterbrushes
Mix'd Media Salazar Inkx (Leather)
Ranger Blending Tools
Kraft Paper Clock
Gel Medium

Other supplies:

PermaStone Casting Compound
Blue card stock
Green card stock
Sizzix 658759-Holiday Greens die
McGill Holly leaves punch


I hope you enjoyed my heavily embellished card today.  I love making dimensional cards as long as I can either send it to the recipient in a box full of goodies, or hand deliver it.  They are always wowed by cards with such dimension and never throw these in the trash can.  Well, having said that, I hope I have inspired you to try making one for a special person in your life.  

Remember, the Altered Pages design team shares even more inspiration daily on the Altered Pages blog.  Stop by and see what they are up to.  Many thanks to Activa® , our sponsor this month.  Check out their website for a complete look at all of the products they carry. 

Thanks for stopping by, and have a very Happy New Year!!!

Barbara

Monday, December 28, 2015

A Merry and Bright Holiday Canvas

Happy Holidays, friends!  I hope everyone had a very Merry Christmas!  The Altered Pages team has been working all month with some really cool products from Activa® .  Today, I want to share a project, not only using Altered Pages products, but also two Activa® products, Lumina Air Dry Polymer Clay and PermaStone Casting Compound.  Both products give fine detail from these molds, but each one works a bit differently.  Complete directions can be found on the packaging.


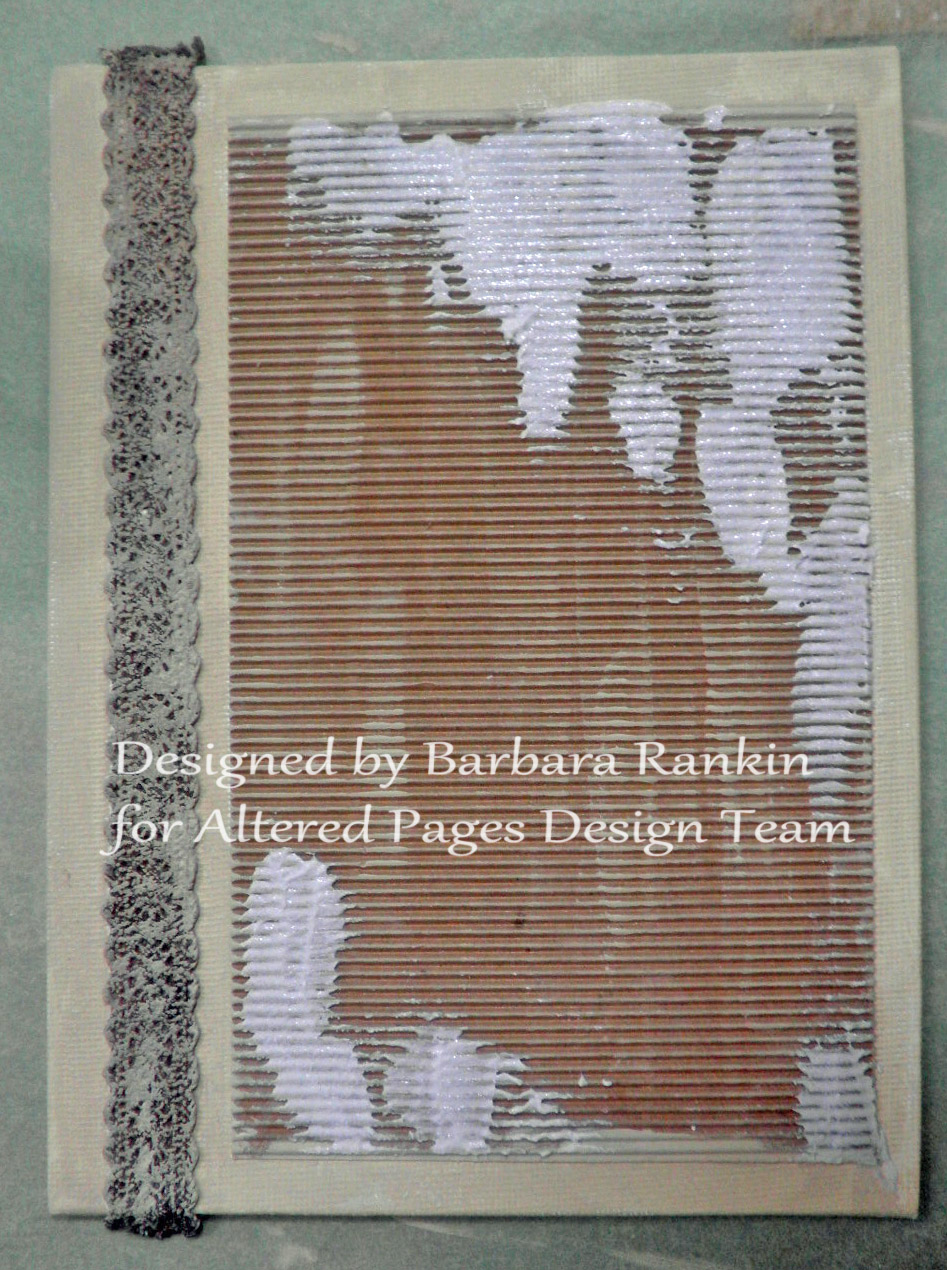
I began with a 6"x8" Canvas Panel, adhering a 4-1/4" x 7-1/4" piece of Kraft colored Adhesive Corrugate paper  to the front. I offset the corrugate paper, as shown, so I could add a strip of the brown Vintage Lace Tape along the left side.  I used Aleene's Tacky Glue to ensure I got good adherance to the canvas.


Paint canvas and lace with Timeless DecoArt Chalk Paints, but dry brush the color over the corrugate paper.  

Randomly spread sand paste over corrugated board.


Mix a small amount of the PermaStone Casting Compound and pour into the ornament mold.  As you can see in the picture, I was having a good time making different pieces for more projects.  You will want to do that while you have it out, plus it's fun and quite addictive.  Tomorrow, I will show you what I did with the frame you see in the lower part of the photo.  The compound dries pretty quickly, but I like to let it cure overnight for added strength.


 I also made many roses using both the Permastone and the Lumina clay.  Below is a picture of the clay in the mold.


Silicone molds are the easiest molds to use because nothing seems to stick to them, and they are flexible, making it easy to remove your molded pieces.  

In the photo below, you can see the difference in the two products.  The clay is more ivory colored and very smooth.  The Permastone is white and, while I think the detail is awesome, there is a slight difference in the smoothness of the finished roses. But that can be a good thing for some  of our more shabby chic projects. 
If you are short on time, the PermaStone is the way to go, because it dries so quickly, while the Lumina clay requires 24 hours.

I coated my ornaments with glaze medium because the PermaStone is quite porous and I want to be able to blend and mix colors as I paint them. 

I painted the ornanments first with a coat of white fluid acrylic. The fluid acrylics are very thin, so I used them instead of regular acrylic so the paint would not fill in my details.


I next brushed on a coat of interference gold fluid acrylic.  


Activate the Mica Paint Palette with water and color the ornaments with the blue and green colors, blending as you paint until you like the effect, let dry.


Next, I added a wash of the gold metallic, mostly hitting the high spots on the ornament.  


I used the Lumina Clay to mold this little beauty.  I made a thick, creamy paste with the gold and hit just the tops of the flowers.


Now, back to the canvas.  Paint the canvas panel with purple, red, violet, and gold from the Mica Paint Palette , mixing and blending on the panel until you like the effect.    Set aside to dry.


Adding Purple and Red


Adding Red and Gold


Adding White Pearlescent

Finally, randomly brush on some of the white pearlescent over the background, and spread a bit of the African Bronze Gilder's Paste in some areas.  Set aside to dry.


Adding African Bronze Gilder's Paste
I die cut some leafy foilage from green double sided paper and adhered to the canvas, as shown in the finished photo.  Some of the smaller foliage was painted with the green and gold mica from the Mica Paint Palette .


I used the Aleene's Tacky Glue to adhere all of the embellishments to the canvas, including the molded pieces.   Visit the Altered Pages shop for a nice variety of embellishments you could use on any of your art projects.


I "hung" the ornaments from a piece of twisted wire and decorated the tops with tiny pine cones, punched leaves, and twine bow.  Finally, I added some faux snow on the leaves and along the top of the canvas.

Here are a few close-ups of the canvas sections.


Altered Pages Supplies:

Canvas Panel (6x8)
Adhesive Corrugate paper (Kraft)
Vintage Lace Tape (chocolate brown)
Aleene's Tacky Glue
DecoArt Chalk Paints (Timeless)
Mediums Textural Accents Sampler
Mica Paint Palette  (Pearlescent & Metallic)
Gilder's Paste (African Bronze)
Molds

Other supplies:

Lumina Air Dry Polymer Clay
PermaStone Casting Compound
DecoArt Media Texture Sand Paste Neutral
DecoArt Media Fluid Acrylics Titanium White
DecoArt Media Fluid Acrylics Interference Gold
Finnabair Snowflake Paste
Foilage dies and punches (Sizzix 658759-Holiday Greens)
Twisted wire
Mini pinecones and berries
Brown twine


I hope you enjoyed my canvas and that I have inspired you to try making one for yourself or a special person in your life.  Remember, the Altered Pages design team shares even more inspiration daily on the Altered Pages blog.  Stop by and see what they are up to.

Many thanks to Activa® , our sponsor this month.  Check out their website for a complete look at all of the products they carry.

Thanks for stopping by, and have a very Happy New Year!!!

Barbara

Monday, December 14, 2015

Mixed Media Christmas Angel with Altered Pages and Activa®

Happy Monday, friends!  I suppose you know by now that the Altered Pages team are working with some really cool products from Activa® this month.  I get to play with two products, Lumina Air Dry Polymer Clay and PermaStone Casting Compound.  Check back in two weeks to see what I make with the PermaStone Casting Compound.

But today, I want to share this sweet little angel I made using a lowly paper mache cone and Lumina air dry clay.
Tear strips of paper from the 6x6 Glitz Happy Travels Paper Pad and adhere to cone with Gel Medium.  Leave areas open to adhere strips of  Music Sheets, but do not cover cone completely.
Use a spatula to spread an uneven coat of crackle paste in those blank areas left between the sheets of paper.
Use waterbrush to color cone with the Mica Paint Palette colors.
I added color after color until I liked the result.
After my layers of colors dried, I decided to go for a lighter effect, so I used a baby wipe to remove some of the paint layers.  As you can see, the watercolors remove easily, so I was able to go back to revealing my music sheet prints.  However, lots of the watercolors were left in the nooks and crannies.
I wanted to add more translucent color, so I brought out my Splash Inks and began adding Blue with a baby wipe.  I could control the amount and transparency of the color easily.
Next, I began adding the Magenta ink in the same manner.  Set cone aside to dry.

I have quite a few molds in my stash, and these products from Activa® are the perfect complement.  Check out the molds available from Altered Pages.
I used the Lumina Air Dry Polymer Clay in an old wings and face mold I have had for years.  It is a hard mold, so I used brushed a light coat of baby powder over it before adding the clay.  The really cool thing about this clay is that it is polymer clay, but it air dries.  It is super easy to use, and very soft and malleable.
When the clay air-dried, I removed it from the mold and began painting the face with various acrylic paints and the wings with ivory paint.
Altered Pages has a nice selection of paints and brushes, too. I even used my Waterbrush with the acrylic paint.  They are not just for water colors, and quite handy, too!  If you don't squeeze it, the water stays put inside the reservoir, but if you need to thin the paint a bit, just squeeze for a watered-down paint, or for cleaning the brush when finished using the paint.

If you don't have a face or wings mold, then check out these great Altered Pages collage images in the Angels/Fairies section.  Any of these would look awesome for your angel or fairy projects.

I next painted the front and back of the wings with gold from the Mica Paint Palette.
I rubbed some of the gold off to bring back the ivory color for a shabby chic look.
Next, I added a very watered down bit of the black from the Mica Paint Palette.  This brought out the details in the wings while giving it a more vintage look.  Do this on both sides, front and back, of each wing.
I found a metal embellishment to put behind my angel face.  Here are the parts so far.
I glued the clay angel face to the metal embellishment, then to the top of the cone, as shown.  I used Aleene's Tacky Glue for this.
While that was drying, I painted one of the chipboard Snowflakes on both sides with White Gesso and allowed it to dry.  Then I coated both sides with Stickles Stardust glitter glue for extra sparkle.
I cut a 5" piece of twisted wire (any heavier gauge wire will work) and bent it into the shape of arms.
I made holes in the cone and inserted the wire through the holes.  Use pliers to straighten and flatten the ends for the next step.
Glue the snowflake to the wire ends to appear as though your little angel is offering you a snowflake for a white Christmas.  How sweet is she?

And finally, our little angel needs her wings.  So I used the Aleene's Tacky Glue again to glue them to each side of the cone, as shown.
For an added  bit of sparkly glitz, I added the Ocean Blue Glass Glitter, making random "patches" of glue and sprinkling the glitter over it.

close-up of glitter patches
And here she is, one more time, looking up to the Heavens like the sweet angel she is.

Altered Pages Supplies:

Paper Mache Cones
White Gesso
Gel Medium
Assorted Flowers
Music Sheets
Waterbrushes
Mica Paint Palette 
Splash Inks
Aleene's Tacky Glue
Snowflakes 6 pieces
Stickles (Stardust)
Glass Glitter (Ocean Blue)

Other supplies used:

Lumina Air Dry Polymer Clay
Gold crackle paste
White crackle paste


Heavy gauge wire

Be sure to check back daily to see more from our design team as they work with ACTIVA® products!!!

And remember our giveaway... comment each day for more chances to win this Celluclay book!

As always, thanks for visiting, and I hope you were inspired to try one of these cute angels for yourself, or maybe for someone special.  I think they would make the most fabulous gift this holiday season.

Until next time, thanks again, and keep on crafting!

Barbara