Showing posts with label Dylusions ink sprays. Show all posts

Monday, May 26, 2014

Venetian Carnivale Mixed Media Card

Hello everyone, and welcome back to my blog.  It's the beginning of a new week over at Altered Pages, and I have another fun, mixed media project to share.  First off, I want to let you in on a little tidbit of good news.   Altered Pages is offering more specials this month.  
When you purchase any three Rubber or Clear stamps or stamp sets, you will get a FREE Memento ink pad! 

OR
BUY SPLASH INK GET A FREE 6x6 STENCIL

Isn't that an amazing deal?  So, to get your juices flowing, I thought I would use some of these products to hopefully inspire you, and perhaps tempt you to take advantage of this special deal.

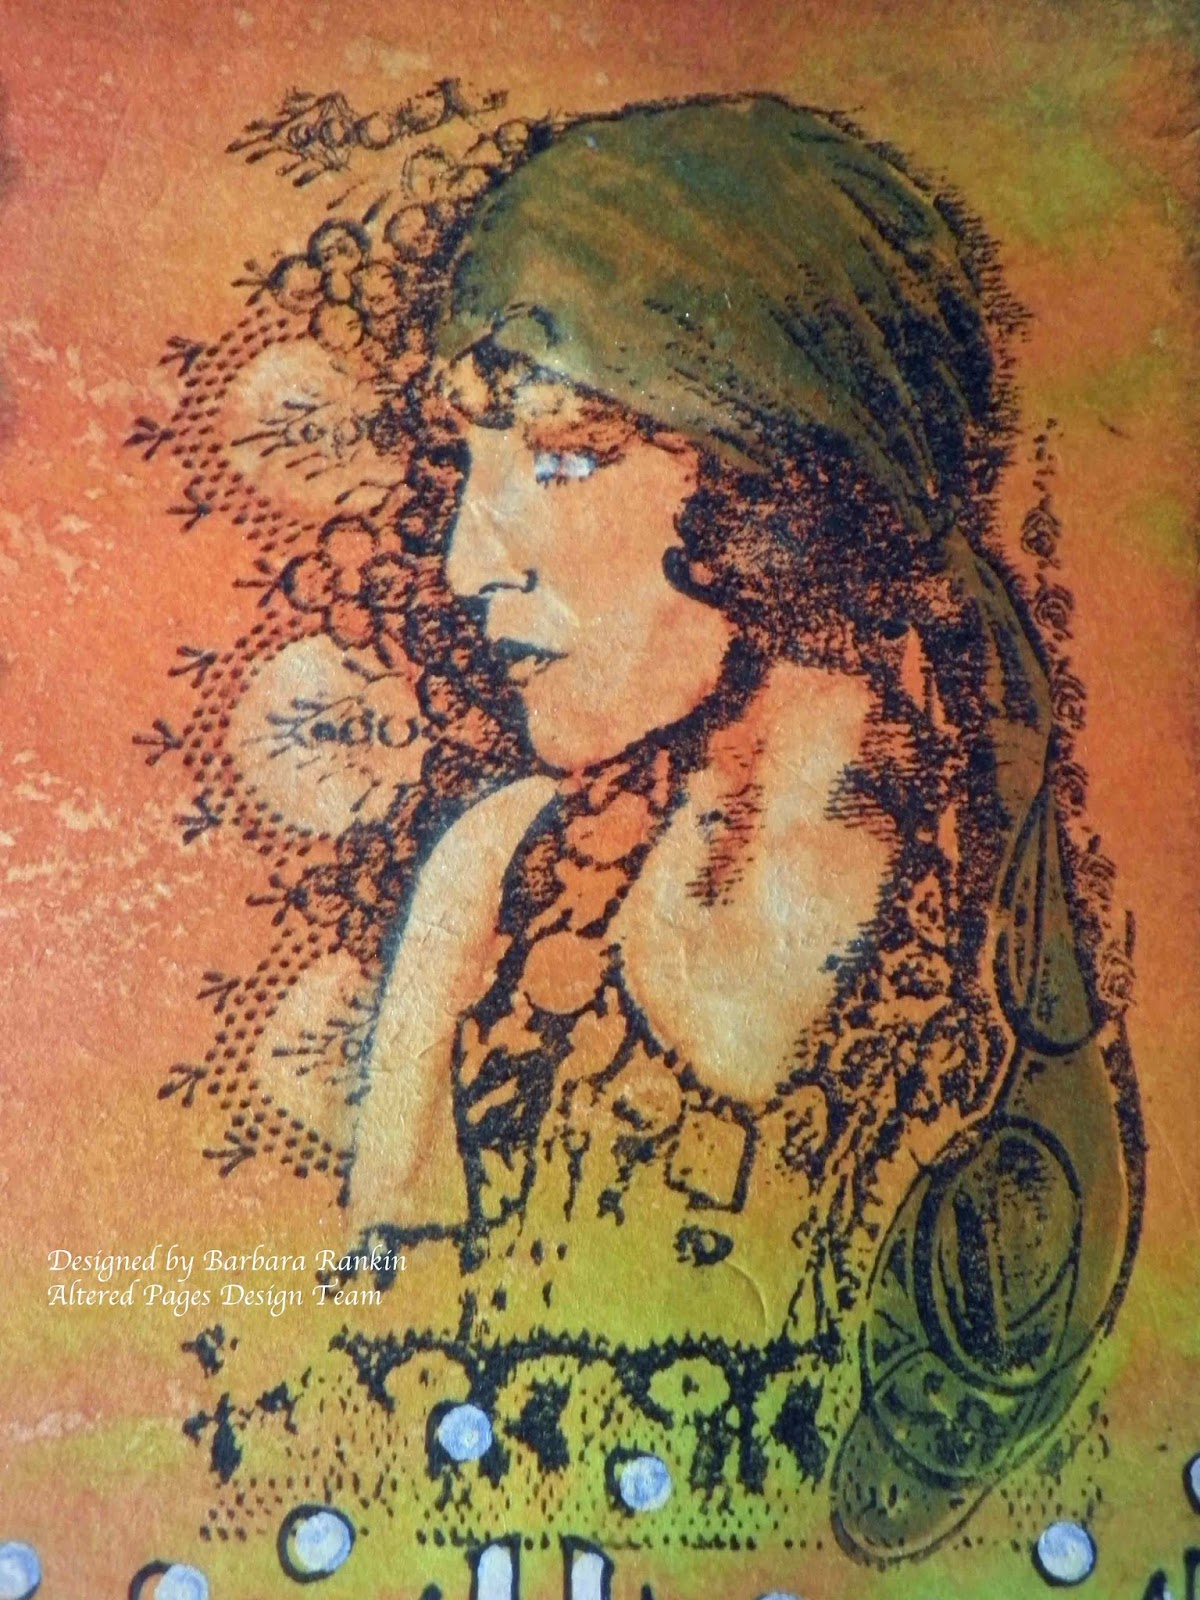
First off, stamp large Venice lady from  Carnevale di Venezia stamp set with StazOn midi Claret ink (Tsukineko) onto an adhesive cork sheet.  I was super amazed at how well this stamped onto the uneven cork surface with the StazOn ink.  
Spray cork sheet with Dylusions ink sprays in Lemon Zest, Squeezed Orange, and Cut Grass.  
Use a water brush and dab with a paper towel to remove some of the color in the stamped image.  I know these images are looking real similar, but if you look closely, you can see areas where I removed some of the color, such as in her face, the mask, and around her headdress.
Using my water brush and multiple colors of my Splash Inks, I colored the image, then I highlighted her face with some Dylusions ink sprays in White Linen and my water brush.  When all was colored, I then sponged Golden Glitz Delicata ink (Tsukineko) around the image to give it a metallic, bright essence.  
I wanted to bring out some of the parts of my image a bit more, so I used a black Micron pen to outline what I wanted to highlight.  Again, it is subtle, but very effective.  I outlined her face and eyes, the mask, parts of her headdress, and the word "Venice".  Can you see the difference?
Now to decide how to use my lovely focal piece.  I chose to make a card, but this would also be lovely on a large tag, canvas, or wall hanging.  First, I die cut the cork with a rounded tag die, adhered it to a piece of dark green card stock, and trimmed around the cork, leaving a 1/8" border.  I sponged more Golden Glitz Delicata ink around the edge and adhered it to my card with pop dots.  Then I die cut a Venetian border strip and covered it with Golden Glitz Delicata ink.  I wanted a more copper color to match the copper stripe in the die cut Venetian mask, so I pulled out my Metallic rub-ons Rich Primary colors and added copper over the entire border.  The shimmery copper stripes in the die cut mask do not show up well in the photo.  It looks so much better in person.  I thought it needed a little something more, so I added a few metal square stickers to the bottom area for interest.
You may notice in the finished photo above that there is no longer any white specks peeking through the cork background.  That is because there were open spaces in the cork, allowing the white release paper to show through.  When I removed the release paper to adhere my cork to my green card stock background, the green now appears in those spaces.  Looks awesome, doesn't it?

During the month of May, join the Altered Pages Design Team as we cross promote Eileen Hull Designs Artist Trading Blocks with the The Artists on the Block Design Team.  They will be posting new ATB projects every Tuesday, while we, here at Altered Pages, will be posting new ATBs every Tuesday and Thursday.  Be sure to stop by often for a month of inspiration.   In the final week, I hope you will check back on Thursday  when I share my rendition of an Altered Trading Block.  But be sure to check out both teams for the most amazing inspiration.  
I hope you enjoyed my project today, and be sure to visit the Altered Pages online store for all of your artsy supplies and to take advantage of this month's specials.

Have a wonderful and creative week!

Barbara

Monday, May 12, 2014

A Gypsy Card with Dylusions Ink Sprays

Hello everyone!  So glad to see you today.  I just spent last week at Art-Is-You Dixie, and I learned so many new and exciting techniques and product usage.  One of the things I learned was how to paint and shade faces.  When I got this stamp set from Altered Pages, I knew I had to try my hand at coloring this lovely lady's face.
I could not decide whether to make an art journal page or a card.  I decided to make a card, with a twist.  I used an entire sheet of inexpensive 9"x12" 90lb watercolor paper, folded it in half one way, then the other. 

I pulled out my Dylusions spray inks and, after first misting my w/c paper with water, I misted with Fresh Lime, Squeezed Orange, and Cherry Pie, allowing them to run together.  


  • FREE SPRAY INK with each OPTION you get a FREE bottle of Dylusions Spray Ink (value $4.95)

    OPTION 1 Buy a Large Dylusions Journal 

    OPTION 2 Buy a Small Dylusions Journal

    OPTION 3 Buy any Dylusions Stamp set


For some background design, I used this Dylusions 8 x 5 Diamond Border stencil that I had used prior to this project, and it still had black ink on it.  So I cleaned my stencil with a baby wipe, rubbing the excess ink through the stencil over my paper, giving me this wonderful background. 
Next, I stamped this lovely lady from the Gypsy Journal stamp set in Jet Black StazOn ink, so my image would not bleed with all the watercoloring.
Next, I stamped "Journey" in Jet Black StazOn, and "moved" the Dylusions color away from the image with my water brush, allowing it to stand out better.
The same technique was used to move the orange color from her face, leaving some for shading.  I still need to practice face painting, but all in all, I am very pleased with her.  I also added a bit of white to her eye with a white Faber-Castell Big Brush Pen, another technique I learned from Art-is-You Dixie.  You may notice I removed some of the color from the lace near her face.  I used a Memento Pistachio pen to color her scarf.  I was amazed at how easy these pens are to use, and how well it blended with my color scheme.
I am a huge fan of shading around the edges of my work, thanks to Mr. Tim Holtz.  But there are no distress inks here.  I ran my black Gelato around the edge, then smeared it with that same baby wipe I used previously.  Look how it frames everything so beautifully.   Ultimately, I glued it together, which gave it nice stability and this fabulous color inside and out.  Now, it is a card.
Card front and back
Card front and back on the inside
I almost forgot to mention that I used the border from the Dylusions 8 x 5 Diamond Border stencil and a Black Micron Pen to trace portions of the border, then colored inside with the white Faber-Castell Big Brush Pen.  You can see it in the photo below.

Supplies used:
Dylusions Ink Sprays:  Fresh Lime, Funky Fuchsia, Squeezed Orange
Tsukineko Black StazOn ink pad
Memento Pistachio pen
Reeves 9"x12" 90lb watercolor paper pad


During the month of May, join the Altered Pages Design Team as we cross promote Eileen Hull Designs Artist Trading Blocks with the The Artists on the Block Design Team.  They will be posting new ATB projects every Tuesday, while we, here at Altered Pages, will be posting new ATBs every Tuesday and Thursday.  Be sure to stop by often for a month of inspiration. 
I hope you enjoyed my project today, and be sure to visit the Altered Pages online store for all of your artsy supplies.

Have a wonderful and creative week!

Barbara