Showing posts with label Halloween home decor. Show all posts

Friday, October 30, 2015

Mixed Media Canvas: Halloween Haunted Graveyard

Hello everyone, and welcome.  I am so excited to share one more Halloween project using ColourArte before my final Halloween post tomorrow.  My inspiration for this piece was this haunted house scrapbook paper.  It set the scene perfectly.


Spread heavy white gesso over 10"x10" wood board with spatula.
Try to spread unevenly for a cool texture like this.  It will pay off when you start adding your paints.
Fussy cut haunted house and adhere to board with a  piece of torn corrugated card board, as shown.
Spread uneven coat of white crackle paste over corrugated card board and let dry.
Using a paint brush, spread a light coat of water over the background and pick up Blue Flame Silks, blending with Periwinkle Silks.
Continue using water to spread a coat of Orange Peel Silks around the house for an eerie glow.  Continue adding Orange Peel with a dabbing motion until you like the look.  Allow to dry.
Put canvas in a "spray" box , cover top portion of canvas, and spray the corrugated, crackled section with Radiant Rains Butternut and Autumn Leaf.  Let dry.
Dab Radiant Rains Wine & Roses dauber around perimeter of Orange Peel painted section.
Then spritz with lots of water and allow the colors to run.
Dab Radiant Rains Rich Cobalt and a tiny bit of Nutmeg dauber around the outer areas, spritz with water and allow those colors to run.  Let dry.
Spritz background with water droplets and let those dry for a mottled effect.  Here are a few closeups of those areas.

Use a damp paintbrush to pick up Chestnut Brown Primary Elements (PE) and brush over corrugated card board.  Add water to spread it, continuing to add the Chestnut Brown until you achieve the darkness and coverage you desire.
Die cut fence pieces from black chipboard.  Mix white gesso with PE China Black to make shades of grey and dry brush over fence pieces to age them, adding lighter grey to areas where the moonlight might be hitting the posts.  (TIP: Add more gesso and less PE to obtain lighter shade of grey).
Die cut graveyard from black chipboard.  Mix white gesso with PE China Black to make shades of grey and dry brush over tombstones to age them, adding lighter grey to areas where the moonlight might be hitting them.
Adhere graveyard chipboard to lower right hand side of canvas, as shown.
Pick up what's left of the gesso/China Black PE and base coat Haunted chipboard.
Add Ancient Coin PE to the mixture and coat the word again.
Mix Ancient Coin PE with Clear Glaze Medium and paint Haunted chipboard, let dry.

Mix Chestnut Brown and Nutty Oak PE with white gesso and coat branches with color mixture.

Mix some of the China Black PE in and add shading to the lower parts of the branches to give depth and form shadows.
Adhere branch above Haunted chipboard word.  While that is drying, spread Clear Distress Crackle Paint through Shattered layering stencil and let dry.
After crackle paint dries, it will look like this.  As you can see, it dries clear, allowing the colors beneath it to show through.
To bring out the cracks, mix PE China Black with water and go over the area with this "wash" of black.  As you can see, it seeps down into the cracks and brings them to the surface.
Adhere second branch along lower left side of canvas, forming a tree.  Adhere fence pieces along bottom of canvas, bending them outward and clamp down while glue dries.
Stamp distressed crows and spider with black archival ink.
Stamp owl onto scrap of Haunted paper with black archival ink and fussy cut.
Add owl eyes and glue to top tree branch.  Glue a metal skull and crossbones embellishment, as shown.
Stamp Undertaker sign with black archival ink.  Center tag die over stamp and cut out.
Add a piece of chipboard behind the tag for stability.
Adhere to canvas with foam tape.  Adhere spider over crackled spider web portion.
Mix PE China Black with Clear Glaze Medium and paint the scaredy cat.  
Add some animal eyes and adhere scaredy cat to center of fence.  Add berry garland along fence.
And here it is, all finished and ready to decorate your home, hang on the wall or place in an easel.
And a few more close-ups to show the dimension achieved by shaping the chipboard pieces.


ColourArte Supplies Used:

Silks Acrylic Glaze:  Periwinkle, Blue Flame, Orange Peel
Radiant Rains Shimmering Mist:  Butternut, Autumn Leaf
Radiant Rains Color Daubers: Nutmeg, Wine & Roses, Rich Cobalt
Primary Elements:  Chestnut Brown, Ancient Coin, China Black

Other Supplies Used:

My Mind's Eye Haunted 12x12 paper pad
Black chipboard
White Gesso (Liquitex)
Heavy Gesso (Liquitex)
Tim Holtz Rubber Stamps: CMS 139 Halloween Cutouts (owl), CMS240 Undertaker (spider)
Tim Holtz Shatter layering stencil
Tim Holtz dies: On the Fence, Graveyard, Bird Branch
Fancy Tags 2 (Spellbinders)
Distress Clear Crackle Paint (Ranger)
Memory Box F1394 Distressed Crows
Black Archival ink pad

October is Breast Cancer Awareness Month.  In honor of those we know who have battled with this disease, please be sure to make a generous donation to the National Breast Cancer Foundation.


Thanks so much for joining me today, and I hope you have a very safe and Happy Halloween!

Barbara

Thursday, October 22, 2015

Halloween Home Decor - Witchful Thinking

Howl-o everyone, and welcome to my bewitching blog-o-ween post!  I love Halloween, and so I made this fun and funky wall hanging to celebrate the occasion.


I found this MDF sign in my local dollar store.  I did not care what was on it because I am going to alter and transform it to my own taste.  And I cannot think of a better way to do this than with Gina's Designs Lasercuts chipboard shapes.


Prepare the base by first sanding off the glittered areas, then base coat twice, if necessary, with black gesso.  Adhere strip of spiderweb paper to bottom section of base, as shown.
Spread graphite paste through shatter stencil on left and right side of base, as shown.  The graphite in the paste dries sparkly, which is a really cool effect for my spider webbing.
Mask boots with a piece of removable tape and paint socks with orange paint mixed with some white gesso.  This was not shiny enough for me, so I went over it with Orange Peel Silks.
Spread black modeling paste through bat stencil over socks only.
Spread clear crackle glaze over boots and allow to dry naturally.  To bring out the cracks, rub Titanium White Antiquing Cream over boots and wipe away excess with damp paper towel.

Add Rich Cobalt dauber to base and spritz with water to allow the color to run and blend over the background.  Set aside.
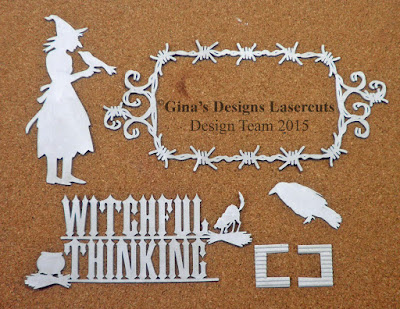
Paint chipboard pieces with white gesso to seal it.  Any pieces that may stick past the base will need to be gessoed on the back side as well.  I also cut two pieces from a scrap of corrugated cardboard to resemble shoe buckles (shown lower right below).
Paint chipboard pieces as follows:

Barbed Wire Deco Frame - Paynes Grey, dry brush with Metallic Silver

Witchful Thinking - Quinacridone Violet, Paynes Grey, Carbon Black, Burnt Sienna, Raw Sienna,  Titanium White

Witch - Carbon Black Paynes Grey, Green Gold, Burnt Sienna, Raw Sienna, Translucent White

Raven - Paynes Grey, Translucent White

Buckles - Diarylide Yellow, Metallic Gold, Burnt Umber Antiquing Cream


Begin adhering the pieces to the base.  Adhere the barbed wire deco frame first, then adhere the words in the center of the frame.  I glued slivers of chipboard behind the letters to raise them off of the base before adhering it.
Pop dots were used to raise the witch up for some added dimension.
The raven was adhered to the toe of the right boot.
And a close up of those batty socks!

Ginas Designs Supplies Used:
Barbed Wire Deco Frame Rectangle
Title Witchful Thinking
Witches
String Alongs - Gothic (Raven) 

Other Supplies used:
Dollar store Halloween sign
Spiderweb paper (Authentique Spellbound)
sandpaper
Corrugated cardboard scrap
Layering Stencils: THS014 Shattered, THS046 Batground
Graphite paste (Finnabair)
DecoArt Media Black Gesso
DecoArt Media White Gesso
DecoArt Media Cadmium Orange Hue
DecoArt Media Paynes Grey
DecoArt Media Metallic Silver
DecoArt Media Green Gold
DecoArt Media Burnt Sienna
DecoArt Media Raw Sienna
DecoArt Media Titanium White
DecoArt Media Translucent White
DecoArt Media Carbon Black
DecoArt Media DecoArt Media Quinacridone Violet
Diarylide Yellow
DecoArt Media Metallic Silver
DecoArt Media Metallic Gold
DecoArt Media Titanium White Antiquing Cream
DecoArt Media Burnt Umber Antiquing Cream
DecoArt Media Black Modeling Paste
DecoArt Media Clear Crackle Glaze
ColourArte Orange Peel Silks Acrylic Glaze
ColourArte Rich Cobalt Radiant Rains dauber
ColourArte Orange Peel Silks Acrylic Glaze

Thanks so much for stopping by, and be sure to check out all the great holiday shapes at Gina's online store.  

Have a wonderful and creative week, and a very Happy Halloween.  

Barbara