Showing posts with label Unruly Paper Arts. Show all posts

Friday, December 12, 2014

Day 12: Unruly Paper Arts 12 Days of Christmas Link Up Party

Hello everyone.  Well, today is the last day of the Unruly Paper Arts 12 Days of Christmas Link Up Party.  So I have one last Christmas card to share with you.


Add print papers to card base, as shown.  Stamp Santa onto white card stock, color with markers, and distress edges.  Stamp Santa's pouch and color with markers.  Shape pouch and adhere to image with pop dots.
Cut out center of cupcake liner and cut open, accordion fold and layer onto card, as shown.  Adhere Santa image over the top.  Add "Nice" chipboard sentiment and you are done!

Supplies:

Green card stock
DCWV Homemade Christmas paper stack
Santa rubber stamp
Cupcake liner (Recollections)
Chipboard sentiment (K&Company)

I hope you have enjoyed playing along or simply visiting the link up party bloggers.  Thanks for stopping by and for all the nice comments you have left me.
Have a wonderful weekend and stay CRAFTY, my friends.  

Barbara

Wednesday, December 10, 2014

Poinsettia Christmas Card - Day 10: Unruly Paper Arts 12 Days of Christmas Link Up Party

Hello everyone.  So glad you stopped by today, because I want to share another Christmas card with you for Day 10 of the Unruly Paper Arts 12 Days of Christmas Link Up Party.  I am having so much fun using Pam Bray's Christmas stamp sets from Sin City Stamps.  I really love how this turned out!

One of my favorite Christmas images, right after Santa and Snowmen, is the Poinsettia.  Pam did a wonderful job recreating this wonderful flower.  So, here is another example of what you can make with her wonderful sets.


All I did was stamp and heat emboss the poinsettia image twice with gold embossing powder, once in whole, once part. Then I colored with my Copic markers and fussy cut each one.  You may notice that the flower only is not the whole flower, but just a portion of it.
Next, I added some gold Flower Soft to the center of the small flower only.  Then I die cut two size frames from the pink pearl and olive pearl card stocks.  I pop-dotted the olive frame and added strips of the wavy gold lines stickers around the edge.  Then I adhered my poinsettia, with the smaller flower pop-dotted on top of that.  You may notice that I did not align the flower, but instead, I offset it so it would have the appearance of more petals.  You can play with this image and arrange it just about any way you want and have so much fun making all your flowers different.

I also added the red Wink of Stella glitter brush to the petals for extra shimmer.
I stamped the sentiment onto a scrap of the beige card stock, die cut with the smallest nesting frame, edged with brown ink, and pop-dotted it, also.
One last thing, I added straight gold lines stickers around the edge of the print paper layer for that extra bling. It makes it look embossed without the trouble.
Supplies:

Card stock:  white, beige, pink pearl, olive pearl
Holiday Traditions print paper (Recollections)
Starform Stickers (gold lines and ripples) (Ecstasy Crafts)
Copic markers:  R37, R39, YG 23, YG25, Y17
Gold ink and embossing powder
Black StazOn
Gold Flower Soft

Stop by the UPA link up party and see what everyone is making!  There are some awesome projects and lots of talent.  
Have a wonderful day!

Barbara

Tuesday, December 9, 2014

Joy to the World - Day 9: Unruly Paper Arts 12 Days of Christmas

Hello everyone.  Day 9 already!  Whew, it is sure going by fast.  I am having a blast making my Christmas cards to share with you as part of the Unruly Paper Arts 12 Days of Christmas Link Up Party.  I hope you are playing along, but if not, then I hope you are enjoying all of the wonderful talent that is sharing their creativity with us.

Today, I have a simple, traditional red and green Christmas card.
It was so simple to make.  Just stamp the sentiment and trumpet onto white card stock.  Then use any die that will fit around the image to cut out.  Color in with markers, add some gold glitter glue to the trumpet and let dry.
Next, trim green card stock to slightly smaller than card front and run through any embossing folder. I chose these snowflakes, so I hit the high spots with white ink.

Edge the pieces with a gold Krylon pen, adhere to red card, pop dotting the trumpet image.

Next, I added these pretty little red roses and holly leaves, with some snippets of silver beading.

Simple!

Supplies:
Red, Green, White card stock
Snowflakes embossing folder (Paper Studio)
Inkadinkado Herald Trumpet rubber stamp
Joy to the World rubber stamp (unknown)

Be sure to stop by the Link Up Party over at Unruly Paper Arts and visit the bloggers who are linked up. They are sharing some fabulous things.
Thanks for stopping by, and have a wonderful, creative week!

Barbara

Saturday, December 6, 2014

Snowman Crossing - Day 6: Unruly Paper Arts Christmas Link Up Party

Hello everyone.  So glad you stopped by today, because I want to share another fast Christmas card with you for Day 6 of the Unruly Paper Arts 12 Days of Christmas Link Up Party.

This is a simple A2 size card from blue card stock, then adhered a snowflake print paper slightly smaller than card base.

I used my Silhouette machine to cut the pine tress with snow banks, (green and white card stocks), and the lamp post from a glossy black card stock.

I added a tiny bit of Flower Soft at the top of the lamp post to simulate a Christmas wreath.  This was pop dotted for dimension.

The snowman was fussy cut from a piece of print paper that had snowmen all over it.  I cannot remember who makes it, though.  It was in my stash for quite a while.  This was also pop dotted with double dots for even more dimension.

"Snowman Crossing" was computer generated onto light blue card stock, punched out with an oval punch, and I embossed the bottom of the oval with white embossing powder to look like snow.

I hope you enjoyed my cute card today.  Be sure to stop by the party participants to see more inspiration, and join in, if you like.  We'd love to see what you've made.

Thanks for stopping by, and have a wonderful weekend.

Barbara

Wednesday, December 3, 2014

Every Time a Bell Rings... Day 3: Unruly Paper Arts 12 Days of Christmas Link Up Party

Hello everyone.  So glad you stopped by today, because I want to share another fast but elegant Christmas card with you for Day 3 of the Unruly Paper Arts 12 Days of Christmas Link Up Party.

Can you guess which movie I was thinking of when I made this card?  (Answer below)
This is an A2 size card from dark bronze metallic card stock.  The next layer is a piece of light pink metallic card stock that I embossed with a woodgrain embossing folder, die cutting the edge of it to match a second piece of die cut white metallic card stock.
After first die cutting the Florentine Bells from the white metallic card stock, I cut a second piece from gold metallic, cutting only the bells.  This was layered on top of the white, and adhered to the front.
I punched a snowflake from a scrap of the white metallic card and adhered.
I computer-generated the first part of the sentiment onto another scrap of the white card, which I punched into an oval shape to layer on top of the larger dark bronze metallic label.
I computer-generated the sentiment for the inside of the card.
A few extra embellishments were added to finish it off.

Supplies:  Pearlized Cardstock (Paper Studio); Snowflake Punch (Emagination Crafts);  Florentine Bells die (Tattered Lace); Scalloped Borders Two die (Spellbinders); Resin Flowers (Prima Vintage Trinkets); Fiskars corner edge punch; Vintage Label punch (McGill)

Thanks for stopping by, and be sure to visit the Unruly Paper Arts Link Up Party, or link up your own project.

Answer:  It's a Wonderful Life (as if you didn't know)  (LOL)

Have a terrific day!

Barbara

Tuesday, April 22, 2014

Trending Tuesday - Moo Cards

Hello everyone, and welcome back to this month's edition of Trending Tuesday with Altered Pages, wherein we will feature the amazing, and somewhat mysterious, Moo Card.  Why mysterious?  Because it is a mystery to most of us what in the world Moo cards are.  I found this one definition online:  
A 1 1/8 x 2 3/4 inch card, originally named for the company that started printing cards in this format.
Well, there you have it.  It is a simple as that.   While we continue to cross-promote with Unruly Paper Arts and  Leaky Shed, the entire design team at Altered Pages is going to feature art work using this format, along with the Unruly Paper Arts' theme of Teacups and Tiaras, and Leaky Shed's  chipboard tiaras and teacups.


So, in keeping with the theme, here are my Moo cards.  Tea anyone?


Supplies used:
Altered Pages collage sheets:  AP-3033 More Moo Backgrounds;  AP-701 Victorian TeaAP-3032 Tea Party Flowers
Leaky Shed Crown Set
Black chipboard
Rhinestone gem stickers
Gold Encore, Brilliance Platinum Planet ink pads
Gold gilder's paste
Charcoal pencil


Here a a few individual close-ups of each card.


You will see a lot of beautiful artwork by the Altered Pages design team this month using this theme.  I hope you will take a moment to visit their blogs and be prepared to be inspired.  There is a direct link to each designer at the  Altered Pages Blog.  And if you are inspired to try your creative hand at these tiny bits of art, Altered Pages has all the supplies you need to make them.  

Thanks for stopping by, and have a wonderful, creative week!

Barbara

Monday, April 14, 2014

Victorian Tea Room Mail Art

Hello everyone, thanks for stopping by.  This month, Altered Pages is cross-promoting with Unruly Paper Arts, an inspirational and informative blogozine.  This month's theme is mail art, using their creative prompt with the theme 
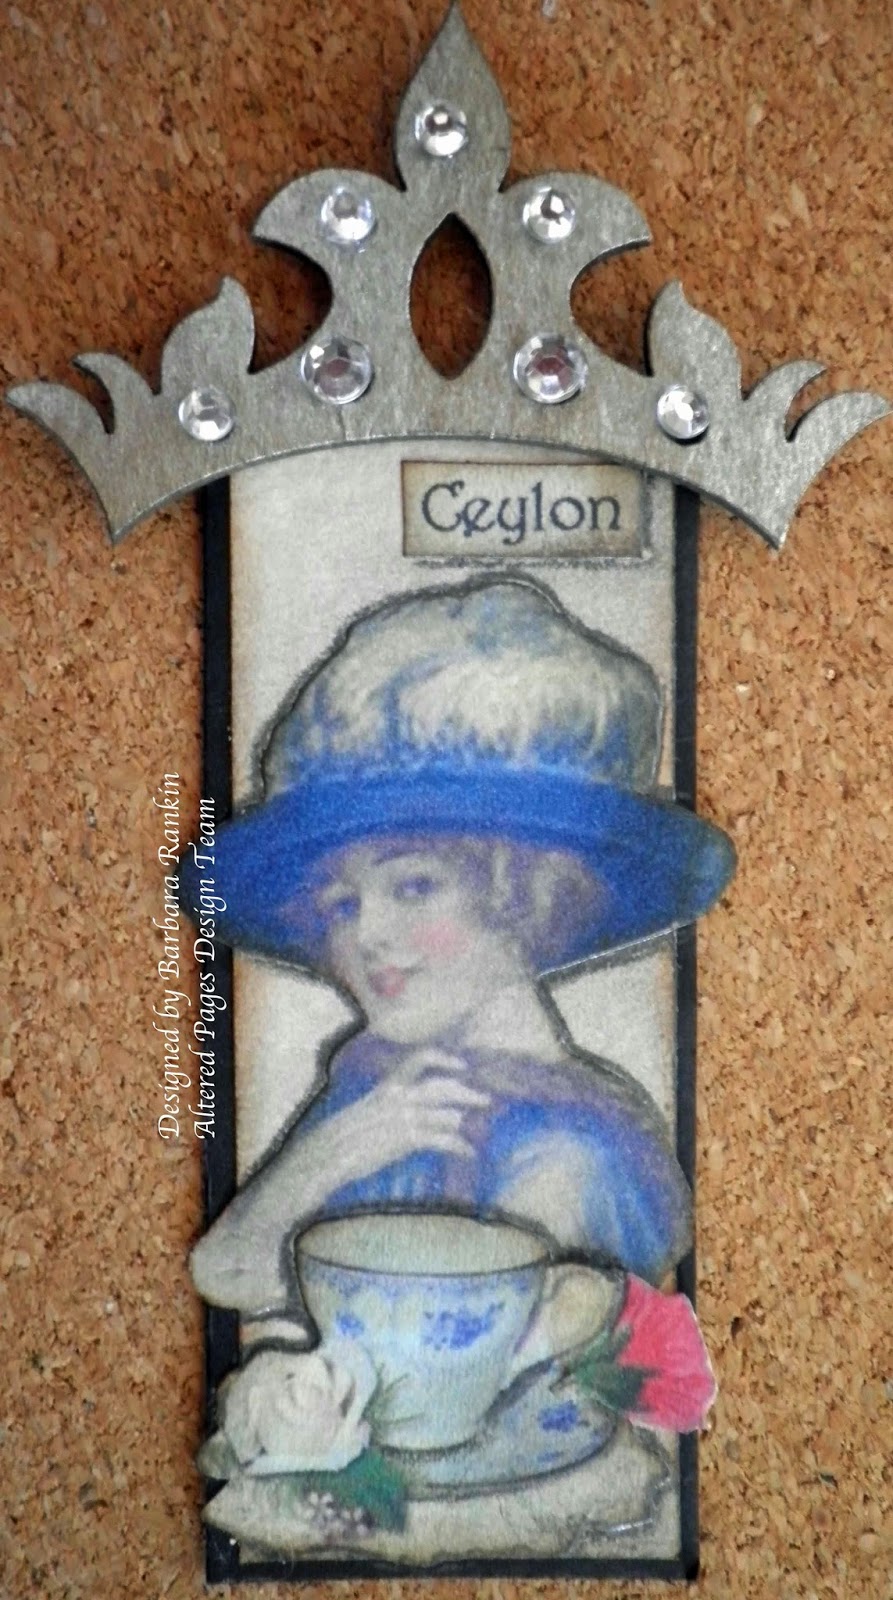
Teacups and Tiaras.  We are also cross-promoting with Leaky Shed, a company that makes the most fabulous laser cut chipboard pieces, to show off our mail art using their chipboard tiaras and teacups.   

You will see a lot of beautiful artwork by the Altered Pages design team this month using this theme.  Here is the creative prompt for April.  
So, in keeping with this theme, here is my mail art project, which can also be viewed on their blog e-zine by clicking here:
Postcard Tag Side 1
Postcard Tag Side 2
Supplies used:

Leaky Shed chipboard:  Crown set
Electric Blue, Winter Pine spray mists (Tattered Angels)
Distress Inks:  Pumice Stone; Picked Raspberry, Worn Lipstick (marker)
Eyelet edge punch (Martha Stewart)
Brilliance Pigment ink:  Platinum Planet, Galaxy Gold
Silhouette cutting machine and file:  Tile Border

Directions:

Spritz reverse (unprinted) side of post card tag with Electric Blue and lightly with Winter Pine spray.  Dab excess ink with paper towel and heat to dry.  This will get rid of the curl in the paper.  Edge with Picked Raspberry.
Cut out Victorian Tea Room menu collage image, distress with Pumice Stone.  Color flowers by picking up some color from the Picked Raspberry ink pad with a Worn Lipstick marker.  Adhere image to tag.
Punch a strip of Ivory Astroparche paper with eyelet edge punch, trim strip to 1/2" wide.  Ink strip with Picked Raspberry ink.  
Slightly overlap and adhere two strips to top of tag.
Cut out Victorian lady and flowers and adhere to tag, as shown.
Turn tag over, spritz with Electric Blue and lightly with Winter Pine spray.  Dab excess ink with paper towel and heat to dry.  This will get rid of the curl in the paper.   

I made a stencil by cutting a Tile Border with my Silhouette machine, or you can die cut or punch a design using something you have.  Lay it over the tag, as shown, and sponge Picked Raspberry through the stencil.
I let the stencil fade out to the left.  I like this effect.  
Fussy cut the tea cup, color the flower with Picked Raspberry, and edge tag with Pumice Stone. 
I needed to address my postcard tag, so I cut out "Your Royal Highness" and adhered it beneath the address portion of the postcard.  I edged the image with a strip of gold German scrap, and added a tiara from Leaky Shed.  
Here is a closer look at that tiara.  I inked it with Brilliance Galaxy Gold and Platinum Planet for a more vintage look.  These lasercut chipboard pieces are intricately designed, as you can see in this photo.
I hope you enjoyed my little piece of mail art, and I hope you will visit Unruly Paper Arts and the Altered Pages blog for more RAQ submissions throughout the month.  Our design team will be playing along all month.   
As always, you can get all of your art supplies at Altered Pages.com.  

Thanks for stopping by, and have a wonderful, creative week!!!

Barbara