Showing posts with label Mod Podge Crackle Medium. Show all posts

Monday, February 18, 2013

Two Cards, Two Looks


Hello everyone.  Welcome back to my blog, and my second monthly post for The Robin's Nest.  Before I get to the project, though, I want to tell you about a fabulous sale going on this month.  All tear shaped dew drops are 20% off this month.  There are not only new shapes, but new sizes and colors, too!  So head on over to the the store and stock up now.  We are also teaming up with Mod Podge this month, so I will be using their Mod Podge One-Step Crackle Medium in one of my projects today.  This product is awesome and I hope you will also visit their website to check out their line of products as well.

Today, we are going to play with die cuts and fabulous papers from The Robin's Nest.  There is just no better combination, in my humble opinion.  So, let's take a look at my first card.


1.  Die cut both butterfly shapes from Mango and Birthday Glitter Stars card stock.
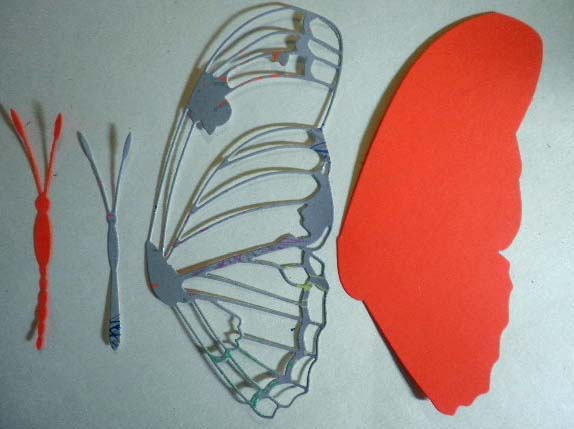
Photo 1

2.  Ink solid butterfly wing using white pigment ink, direct to paper.  Remove excess ink with clean paper towel.

Photo 2
3.  Apply Twinkling H20's to solid butterfly wing.  I discovered that the white pigment ink mixed with the H20's to give a bit of an opaque, pastel color.  As it turns out, I liked this effect a lot.  Allow the H20's to air dry for a more sparkly shine.


4.  Stamp News Print stamp onto solid butterfly with black ink.


5.  Use your finger to apply glitter glue to open butterfly, then adhere to solid butterfly.  Layer both  butterfly bodies and adhere to wings.


6.  Adhere open wings to solid wings.  Cover body with Walnut Stain glitter glue.


Close-up of glitter glue on body of butterfly

7.  Die cut two leaf shapes from Kiwi Glitter Sorbet Card Stock.  Color with Moss Green H20s.


8.  Trim gray card stock to 6-1/2" x 9".  Fold in half to make 6-1/2" X 4-1/2" card.
9.  Trim Awning Glitter Card Stock to 6-1/4" x 4-1/4".  Adhere to gray card.
10. Adhere leaf stems to card front, as shown.  Attach butterfly with foam dots.

Close-up of wings popped with pop dots
My second card is basically using the same supplies, but achieving a very different look.


1.  Die cut both butterfly shapes from Mango and Birthday Glitter Stars card stock.  (See photo 1).
2.  Ink solid butterfly wing using white pigment ink, direct to paper.  Remove excess ink with clean paper towel.  (See photo 2).
3.  Apply a coat of white pigment ink to inside of embossing folder.


4.  Run Mango butterfly wing through your die cut machine to emboss.  The white pigment ink lightens the card stock in the debossed areas.


5.  Continue to add various colors of pigment ink to the high spots on the wings.  (NOTE:  Remember these duo daubers from years ago?  These work really well for adding spots of color to your work).


6.  Adhere open wings to solid wings.  Cover body and wings with mini dew drops.  Adhere tear shaped dew drops to outer edge of wing.


7.  Die cut two sets of poppies from green card stock and scraps of Mango Card Stock for the poppy flowers.  Attach the Mango flowers to the green flowers and coat just the flowers with a coat of Mod Podge One-Step Crackle Medium.  
8.  Allow the medium to dry.  Heat the crackle medium with a heat gun until it begins to burn.  It will leave this beautiful shadowy look to your flowers.  Of course, be careful whenever heating your paper and mediums.  

Top flower unburned, bottom flower burned
9.  Die cut Blue Raspberry Glitter Sorbet Card Stock with Catillion Frame die and adhere to light gray 5"x7" card. 
10.  Glue poppies and butterfly to card, as shown in finished card photo above.  Add foam dots to the butterfly for dimension.


Supplies Used:

The Robin's Nest Mango Card Stock
The Robin's Nest Birthday Glitter Stars Card Stock
The Robin's Nest Awning Glitter Card Stock
The Robin's Nest Blue Raspberry Glitter Sorbet Card Stock
The Robin's Nest Kiwi Glitter Sorbet Card Stock
The Robin's Nest tear shaped dew drops
Mod Podge One-Step Crackle Medium
Memory Box dies (Maribelle Butterfly) (Selena Butterfly) (Cottage Leaf) (Catillion Frame) (Prim Poppy)
Cuttlebug embossing folder (Paper Lace)
White pigment ink pad
Black archival ink pad
Twinkling H20's (Pink Azalea)(Sky Blue)(Sunflower)(Moss Green)
Inkadinkadoo News Print rubber stamp
Stickles glitter glue (Tropical Tangerine)(Walnut Stain)
Foam dots


I sure hope you enjoyed my cards and will be so inspired by The Robin's Nest beautiful papers and embellishments that you will stop on over to The Robin's Nest online store to stock up on those fabulous tear shaped dew drops and gorgeous, high quality papers and embellishments.  I also want to encourage you to visit The Chattering Robin's blog for more inspiration from the wonderfully talented design team.  Oh, and just a quick reminder to enter their monthly design challenge for a chance to win a $20 gift certificate in their online store.  How fun is that?

Until next time, I hope everyone has a wonderful, crafty week, and thanks so much for stopping by!

Barbara

Monday, February 4, 2013

Heartfelt and Love Cards


Hello everyone.  Welcome back to my blog, and my first monthly post for The Robin's Nest.  Before I get to the project, though, I want to tell you about a fabulous sale going on this month.  All tear shaped dew drops are 20% off this month.  There are not only new shapes, but new sizes and colors, too!  So head on over to the the store and stock up now.  We are also teaming up with Mod Podge this month, so I will be using their Mod Podge One-Step Crackle Medium in my project today.  This product is awesome and I hope you will also visit their website to check out their line of products as well.

Since Valentine's Day is just around the corner, I thought it would be appropriate to make a couple of Valentine's cards.


1.  Cut a piece of 10" x 6-1/2" Ivory card stock.  Fold in half to make 5" x 6-1/2" card.
2.  Cut Viva La France card stock 5" x 6-1/2".  Add distress ink colors to glittered portions of paper.  Punch decorative corners and adhere to front of ivory card.
3.  Adhere Princess Glittered card stock to thin chipboard.  Die cut heart shape, as shown.


4.  Following directions on bottle, apply thin layer of Mod Podge One-Step Crackle Medium to heart shape.  Let dry.


5.  Die cut scalloped heart shape from reverse side of Viva La France card stock  Dab scalloped edges with picket fence distress stain.

Distress stain dabbed around edge
6.  Distress white edges with brushed corduroy distress stain.

Brown distress ink sponged to edges

I think this technique makes the edges look a bit like tortoise shell.  What do you think?

Close-up of inked edges

7.  Add same distress ink colors used on the glittered portions of the Viva La France card stock to the crackled heart shape to bring out the crackle, adhere to scalloped heart.


8.  Die cut/emboss scroll tag using reverse of Viva La France card stock.
9.  Stamp "Heartfelt" in center of tag using pink pigment ink and pastel pink embossing powder.


10.  Add pink and orange pigment ink to embossed areas of tag.


11.  Attach scroll tag to heart with foam dots.
12.  Add three sets of three tear drops to heart shape, as shown, simulating tiny heart shapes.


Below is a close-up of the card front.  I think it shows off the beautiful tear shaped dew drops a bit better.


My second card is a bit simpler, but just as pretty, I think.


1.  1.  Cut a piece of 10" x 6-1/2" Ivory card stock.  Fold in half to make 5" x 6-1/2" card.  Ink edges with distress ink.
2.  Cut background shape from Valentine card stock using Silhouette Valentine frame image.  Adhere to ivory card.
3.  Die cut scalloped heart shape from reverse side of Princess Glittered card stock.  Distress edges with distress ink.
4.  Die cut classic heart shape from Valentine card stock and emboss with Quickutz embossing folder.  Adhere to scalloped heart shape.

Close-up of embossed heart and dew drops
5.  Die cut Spellinders fantastic flourish die on reverse side of Princess Glittered card stock.  Distress edges with distress ink.  Adhere to bottom of heart shape, leaving top portion unattached.
6.  Die cut image of vintage couple dancing from black card stock using Silhouette machine.  Adhere image, as shown, slightly beneath flourish.

Close-up of vintage image beneath flourish


7.  Add Pink letter glitter stickers to form word "LOVE" near bottom of card, as shown.  Attach three sets of pale pink tear-shaped dew drops to each corner of card, as shown.


Below is a close-up of the card front.  Again, I think this picture shows off the tear-shaped dew drops a bit better, as well as the embossing on the heart shape.  


Supplies Used:

The Robin's Nest Princess Glittered card stock
The Robin's Nest Viva La France card stock
The Robin's Nest Valentine card stock
The Robin's Nest red tear shaped dew drops
The Robin's Nest Pink glitter stickers
Mod Podge One-Step Crackle Medium
10" x 6-1/2" Ivory card stock (folded to make 5" x 6-1/2" card)
Spellbinders Classic Heart Nestabilities die
Spellbinders Classic Scallop Heart Nestabilities die
Spellbinders Fantastic Flourish Two D-Lites die
Cuttlebug Plus Fanciful Labels embossing folder
Silhouette image-vintage couple dancing
Quickutz embossing folder - Diamonds & Dots
Fiskars decorative corner punch
Distress Ink (Brushed Corduroy, Spiced Marmalade, Picked Raspberry, Old Paper)
Distress Stain (Picket Fence)
Pigment ink (orange, pink)
Pink Pastel embossing powder

I sure hope you enjoyed my cards and will be so inspired by The Robin's Nest beautiful papers and embellishments that you will stop on over to The Robin's Nest online store to stock up on those fabulous tear shaped dew drops and gorgeous, high quality papers and embellishments.  I also want to encourage you to visit The Chattering Robin's blog for more inspiration from the wonderfully talented design team.  Oh, and just a quick reminder to enter their monthly design challenge for a chance to win a $20 gift certificate in their online store.  How fun is that?

Until next time, I hope everyone has a wonderful, crafty week, and thanks so much for stopping by!

Barbara