Showing posts with label monthly challenges. Show all posts

Saturday, January 11, 2014

Altered Pages Monthly Challenge


Hello everyone, and Happy New Year!  And speaking of the new year, our theme for this month's challenge is Chinese New Year.  2014 is the Year of the Horse, and this year, Chinese New Year's Day will actually arrive on January 31st.  So, to celebrate this day, I decided to make a Chinese Lantern, but instead of using a candle, I prefer to use the battery-operated tea lights.

Side 1
Side 2
Side 1-Night View

Side 2 - Night View
Close-up - Night View
I used two pieces of 6" x 12" black card stock that I scored vertically along the long edge  at 3", 6", and 9".  This gave me four panels to work with.

Next, I resized my four central images from AP 2251 Year of the Horse collage sheet and printed them onto vellum.   After cutting four lattice frames in the center of each of the two center panels using my Silhouette die cut machine, I placed strips of Scor-tape along the lattice edges, applying gold leafing through the openings.  When I removed the release paper on the opposite side of the Scor-tape  I centered the frames over my vellum images.

Graphic 45's Birdsong paper lent itself beautifully to decorating my lantern, using a decorative corner punch on each corner before adhering to each outer panel.  On two outer panels, I die cut two horses using my Silhouette machine, and two more horse images from the AP 2251 Year of the Horse collage sheet.  I used images from AP 1842 Chinese Health Posters to place behind each horse image, and a few calligraphy symbols for the center panels.

Supplies used:

Altered Pages Collage Sheets:  AP 2251 Year of the Horse
Black card stock
decorative corner punch
Chinese embellishments
Mini tassels (4) 
Maple leaf brads

Below are some close-ups of each panel.  
           Side 1 - Panel 1
Side 1 - Panel 2

           Side 1 - Panel 3
Side 1 - Panel 4
Side 2 - Panel 1
Side 2 - Panel 2

Side 2 - Panel 3
Side 2 - Panel 4
Now that you have a bit of inspiration from the design team for this month's challenge, I hope you will join us for this fun, festive holiday by making your very own Chinese New Year project, posting it to your own blog and linking it up to the Altered Pages Challenge page.  There is always a wonderful prize to be won, and we love to see your work!

Thanks for stopping by, and hope to see your creation this month.  

Hugs,
Barbara

Monday, December 9, 2013

Altered Pages December Challenge

Hi everyone!  Guess what time it is?  It's challenge time again at Altered Pages.  December's challenge theme is "Colors of the Season", and you can interpret that any way you choose.  Whether you like the traditional reds and greens, the blues of winter, or something else altogether, it is up to you.  We want to see your art work, so take a moment to visit the Altered Pages challenge page to read all about it.  

So, today, I hope to give you a bit of inspiration with a fun Christmas card that I made using the Hello December collection by Glitz Design.  This paper is a bit too primary for me, but I am going to tell you how I "vintaged" it up a bit.  


First, I covered the numbers background from the WhatNots die cuts with Old Paper distress stain.  Then I distressed and inked the edges with more Old Paper distress stain.  This color has a greenish undertone, which is perfect for the "Colors of the Season" I am going for.  However, I added some Gathered Twigs distress ink to the edges to darken them a bit more.

Next, I inked the wreath die cut with Gathered Twigs distress ink and lightly dabbed some embossing ink all over.  I sprinkled on a bit of Winter Wonderland embossing powder and heat set it.  I've had this EP for at least a decade, but any glittery white EP will work to make snow.  
Layer the wreath onto a circle of brown paper and adhere both to card front.
Fussy cut ivy bells garland collage image (AP-1050-Christmas Ivy and adhere to center top of wreath with pop dots.  Add green paper rosette and bottle cap with giant rhinestones, a couple of white paper flowers inked with Old Paper distress stain, and bead garland around wreath, as shown.


Remove cut out "happy holidays"portion from the red tag die cut, ink edges with Gathered Twigs distress ink, and adhere a small piece of the yellow striped paper that you inked with the Old Paper distress stain behind the words in the tag.  Adhere tag to bottom of wreath.
 

For the inside:  Fold Merry Christmas banner die cut in half and adhere to card inside, as shown.  You now have an easy pop-up element.  
Trim yellow stripe paper to 4" x 6", fold in half with right sides together.  Adhere inside card, matching center folds.  This will allow you a place to write a note to the recipient.  It also finishes off the inside.  

I wanted to add a touch of glitter here and there, so I went to my new go-to tool, Wink of Stella pens, adding red, green and clear to the ivy bells collage image, and clear to the rosette and tag.  I hope you can see it in the photos. It adds so much to the piece.  


Supplies used:

Hello December collection (Glitz Design) (6x6 paper pad, WhatNots, Giant Rhinestones)
AP-1050-Christmas Ivy collage sheet
Wink of Stella pens (Red, Green, Clear)
5"x7" kraft pre-folded card
Gathered Twig distress ink
Old Paper distress stain
Clear embossing ink
Winter Wonderland embossing powder  
Christmas Bead garland
Mini rosette die

So, what are your colors of the season?  Come on and play along with us.  Make some art and share it with us.  Altered Pages always has a wonderful prize giveaway to the winner, and everyone wins with a free collage sheet, just for entering.    

Thanks for stopping by, and be sure to check out the rest of the design team's interpretation of the Colors of the Season by clicking here.  

Have a wonderful week!

Barbara

Saturday, January 26, 2013

Altered Pages January Challenge

Hello everyone, and welcome back to my blog.  Are you familiar with the monthly challenges over at Altered Pages?  If not, I hope you get a chance to check out their Altered Pages Artsociates blog and online store.  The challenge theme for January is "Snow Dancing".  I took a bit of "artistic license" to make my tag.  I put the dancers beneath snowflakes; hence, snow dancing.


From the Glitz Design Vintage Blue 6x6 paper pad, fold the yellow polka dot paper in half and glue it together.   Cut the top tag edges using the Art Deco corner scissors.  If you do not have any of these scissors, you can use a punch instead.  I inked the edges with Frayed Burlap distress ink.


Cut out the dancers image from the Color ATC Yellow collage sheet, distress and ink the edges.  Die cut several different snowflakes using a Spellbinders die in two different blue print papers from the Glitz Design Vintage Blue 6x6 paper pad.


I painted the edges of each snowflake using Terri Sproul's Mixers (Smokey Quartz) and a water brush.  Layer the snowflakes and glue to the tag.  Attach a silver filigree jewelry piece to the center.  I added more of the Smokey Quartz mixer with water to the filigree pieces to tone down the bright silver.


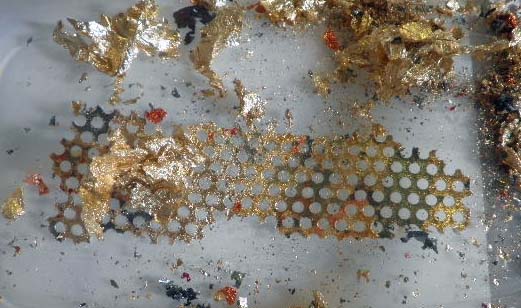
Now, for the fun part.  If you have never tried this, you are in for a real treat.  Go to the hardware store and buy yourself a roll of self-adhesive paper drywall tape.  You will have enough to either remodel your home or share with a few friends.


The drywall tape tears easily and makes a really cool looking background piece when inked.  After removing the backing paper, you can adhere it to your project.


However, for this project, I did something a bit different.  I first removed the backing paper to reveal the adhesive and applied gold multi-color leafing flakes to the adhesive side.  Isn't that beautiful?


I simply put a dab of glue beneath the collage image to adhere it.  I love the look of drywall tape when torn because it looks like honeycomb to me.  It is so much fun to play with.  I hope you will give it a try.


Another neat find I want to share is this beaded Christmas garland I found at Michaels for half price.  I have been removing pieces of it to use in my art work, and I am getting a lot of mileage from it.


Here, I added pieces of the garland through the eyelet that I attached to run the ribbon through.  The ribbon was ivory, but I found that Tim Holtz's Weathered Wood Distress Stain matched the blue in this paper perfectly.  Scrunch the ribbon up while wet and dry it carefully with your heat gun to achieve that vintage crinkly look.  So pretty.


For added interest, I added tiny dabs of Duo Adhesive and more gold multi-color leafing flakes to the background paper.

I hope you enjoyed my project today, and thanks so much for stopping by.

Happy crafting!

Barbara