Showing posts with label Glitz Design Papers. Show all posts

Thursday, April 21, 2016

Altered Art: Hidden Drawer Book Box

Hi everyone!  It's Thursday again, and it is my turn to share another fun project with you using the fab laser cut chipboard from Gypsy Soul Laser Cuts.  I am a huge fan of books and boxes, and what better way to satisfy that need than with a Hidden Drawer Book Box.  Just think of the things you could stash inside this beauty... paper, pencils, love notes, ephemera, or how about a mini album made to fit?  What other ideas do you have?  I would love to hear them.


Lay out the pieces for the box that holds the drawer.


Lay out the pieces that form the drawer.


Cover the inside of the drawer pieces with the script paper.  Use a craft knife to cut out the openings for the connector pieces.  Be sure they are free from any excess paper or glue to ensure a good fit when putting the pieces together.  I used tiny metal files to remove any residue that was left in them.


Adhere script paper to the inside pieces of the box and the inside of the drawer front. I then glued the box together, but you could glue the box together first and then cover the inside.


(TIP:  Use a sanding block or emery boards to sand excess paper off of any edges where it may still show).

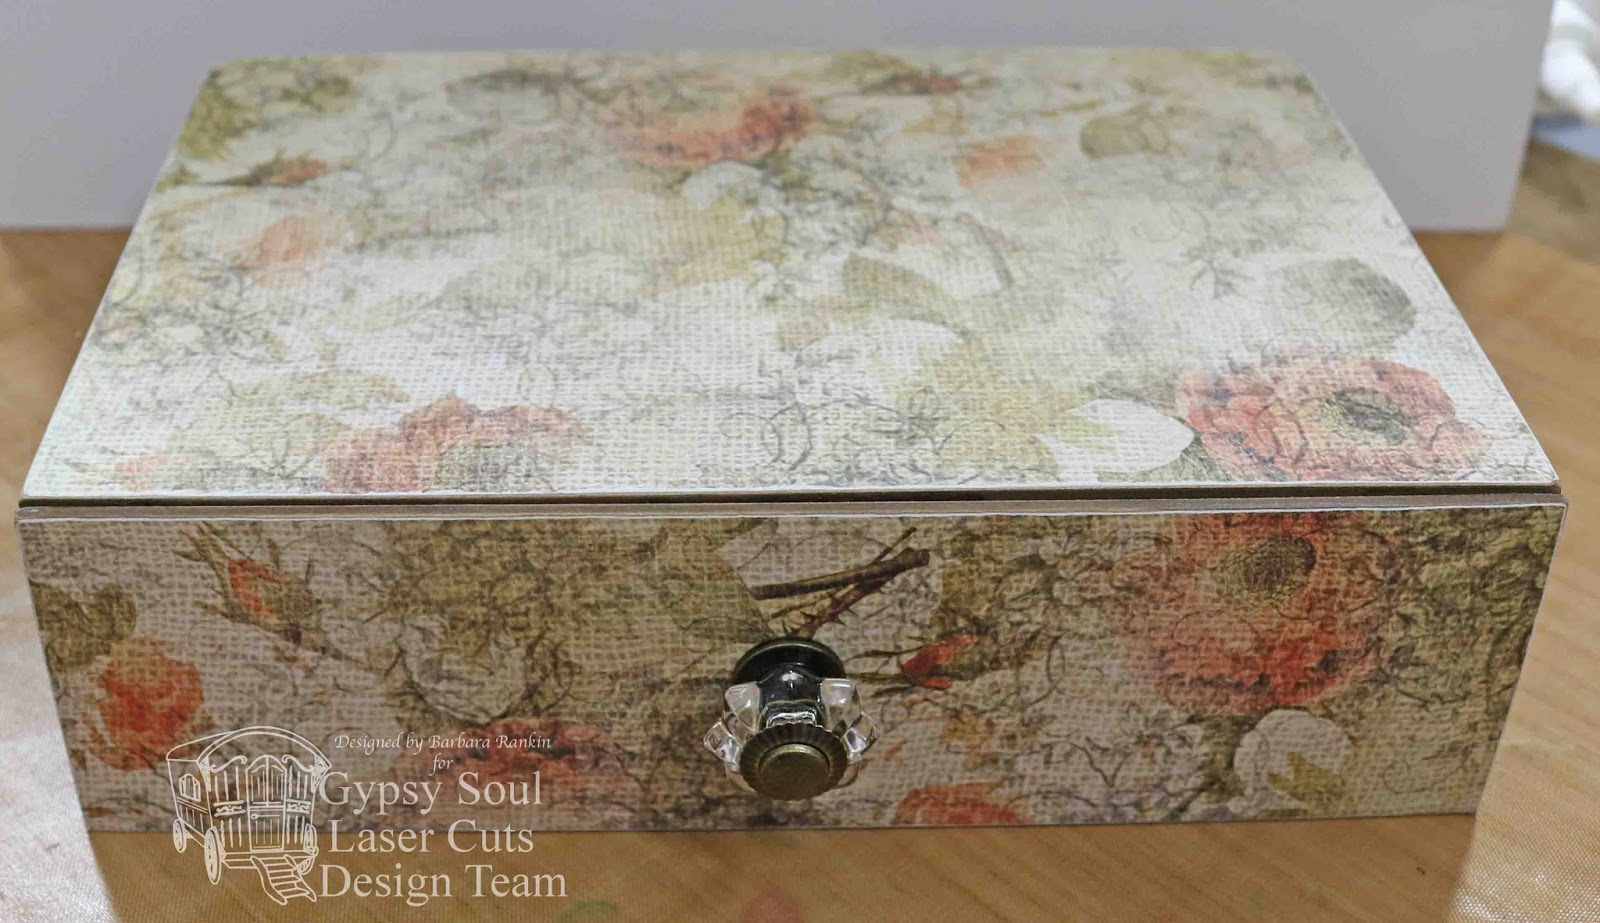
Adhere the box together and cover the outside with the flower paper.  Again, trim any excess paper and sand the edges for a more finished look.


Center a hole in both the front of the drawer, and the drawer front piece.


Add the drawer knob though the holes in both pieces.  The drawer is now ready to use.  Add Gold Krylon pen around all edges.


Color two hinges with the Gold Krylon pen.


Fold and adhere each hinge to back side of box.


Slide drawer into box.  Now start the embellishing.


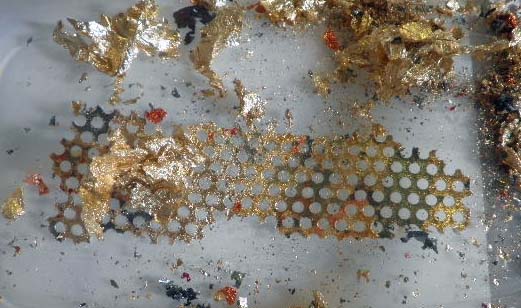
Paint the Deco Lattice Panel 2 with chalk ink that matches colors in the paper.  Center and adhere to top of box.


Paint Fashionista with chalk ink to match the green in the paper.  Adhere to the left side of the panel.


Paint fern fronds in a similar but darker green chalk paint to match the papers, and arrange in the lower bottom right corner of the box top.  Add flowers, cut up pieces of intricate doilies, snippets of lace, and glass glitter.


Lastly, I decided to add a decorative escutcheon under the drawer pull using a stackable label that I colored with the gold Krylon pen.   Center and punch a hole in it, and add it beneath the drawer pull, as shown.


Here are a few views from different angles.


Supplies Used:

Hidden Drawer Book Box
Deco Lattice Panel 2
Fashionistas: 1930s
Fern Fronds
Cardstock Doilies - Intricate (coming soon)
Hinges Shape Set
Stackable Labels Shape Set
Drawer knob
Print scrapbook paper
Chalk paints
Glass glitter
Flower embellishments
Lace

So, have you thought about how you would use this pretty little box?  There certainly are a lot of choices, and it is only limited by your imagination.

Thanks for stopping by, and have a wonderful, creative weekend!!

Barbara

Monday, December 23, 2013

New Year's Card

Hello everyone!  There are only two days until Christmas.  Can you believe it?  And I know everyone is so rushed this time of year, so I have a really simple little project to share with you today.  It is a card again.  I know, I do a lot of cards, but if you celebrate the New Year, this might come in handy as a New Year's Party invitation, or just simply well wishes to friends and family for a wonderful and prosperous New Year.
I re-sized my Silhouette arched lattice image to fit the New Year's couple image from AP-2058, and adhered both to a piece of print paper from the Glitz Design paper pad that I edged with black distress ink.  This sheet determined my card size for me because I did not want to cut off the lower left portion that says, "Something Good Will Happen Today", which is what everyone hopes for the New Year.  So my card measures 6" x 6".  

I stamped the pocket watch image, which is one of Altered Pages new, original stamps, that I thought is also very appropriate for the New Year, because it is, after all, associated with time, such as, the countdown to midnight.  I silver embossed the image onto another piece of print paper from the Glitz Design pad, cut it out, and colored the pocket watch with a silver Wink of Stella pen, my new favorite tool!  

I could not leave well enough alone, so I added some botanicals to the lower right corner to balance the image and give it some added dimension.  If you are going to mail your card or invitation, you can always leave these off.  I have included a picture of the card front without the botanicals.  It does not look so bad, but I really do prefer adding the botanicals.  
I used another image from AP-1133, "A Joyful New Year", for the inside of my card.  I simply cut it out and inked the edges with some black distress ink.  
Supplies used:
Altered Pages Collage Sheets:  A Very Vintage New Year (AP 2058); Happy New Year! (AP-1133)
Pocket Watch stamp (Time on Your Side set)
Glitz Design Pretty in Pink 6x6 paper pad
Wink of Stella pen (Silver)
Kraft card stock
Silver ink, silver embossing powder
Brown and black distress inks
Botanicals
Silhouette die cutting machine and lattice frame image

This card was so easy to make.  You still have time to make up a batch to send before the New Year.  So take a minute to go check out all the new products, original stamp designs, and collage sheets over at Altered Pages.

Thanks for stopping by, and have a very Merry Christmas, and a wonderful, prosperous, New Year!

Barbara

Monday, December 9, 2013

Christmas Gift Card Envelopes with Altered Pages

Hello everyone!  Barbara here with my first post for December.  And what cold weather we are having this year. How about you?  Hope everyone is staying toasty warm this winter.  And to help you out with that, I have some fun gift card envelopes for you to make at home for your special friends or relatives that are hard to buy for.  And Altered Pages has all the supplies you need to make these wonderful gift presentations.


Supplies Used:

Gathered Twigs distress ink
Decorative punches (pine branch, chain)

Cover coin envelopes with print papers from the Joyeax Noel paper pad.   To do this easily, I simply opened up the envelope and glued the right side of the envelope to the wrong side of my print paper.  (NOTE:  Ensure that your paper is going in the correct direction, if necessary).  
Cut out around the envelope and score fold lines.
Add a scrap of paper to the top flap on the reverse, then reattach side and bottom flaps with more glue.
Ink edges with gathered twigs distress ink.

Red gift card envelope:  Lay snowflake stencil over envelope, spritz with Dylusions white linen spray.  Remove stencil and let dry.  
Punch scalloped circle doily from print paper.  Fussy cut Santa and adhere Santa with foam dots over doily.  Add a bit of white Wink of Stella to Santa's hat and beard.
Green Angel gift card envelope:  Color ribbon with watered-down Peeled Paint distress ink, tie around envelope.  Make rumpled ribbon rose from another piece of green dyed ribbon and adhere over knot.  Fussy cut Angel, adhere to envelope with foam dots.  Add a few sprigs of green print paper punched with pine branch punch and some clear Wink of Stella to the angel.
 
Brown print gift card envelope:  Punch chain from brown print paper and wrap around envelope.  Flatten a bottle cap and color edges with gold Krylon pen.  Adhere giant rhinestone to center of cap.  Adhere bottle cap and a few sprigs of green print paper punched with pine branch punch.
 I hope you have enjoyed this quick and easy project for your last-minute gift giving.  It makes giving a gift card so much more personal when presented in a handmade gift card envelope.  And if you still need something to give your craft friends, there is still time to check out the fabulous products and new line of Altered Pages original art stamps, too.  So check them out and see what fabulous gift giving ideas you can come up with.

Thanks so much for stopping by, and have a wonderful week.

Barbara


Monday, November 11, 2013

A Veterans' Day Thank You Card

 Hello everyone, and Happy Veteran's Day.  Barbara here with my first post as a member of the Altered Pages design team.  What a wonderful country we live in, and I feel so blessed to be here with such a wonderful group of designers.  I am also participating in LeslieRahye's Thankful for Those Who Have Served Blog Hop today.  You can see more of these designers wonderful art by clicking here to start.  Please be sure to leave a comment on each blog while you are there.

In honor of all those brave men and women who have served our country so proudly and selflessly to protect our freedoms, I made this card to send my wholehearted thanks to each and every one of you.
I covered the front of a 5"x7" kraft card with Glitz Designs Pretty in Pink papers.  This pack has a lot of browns in it, so in spite of its name, it worked very well for my Veterans' Day card.  Plus, it's nice for honoring the service women, as well.

I used die cuts to make the rosette and ornate frame for my AP-989 4th of July Trade Cards images.  I added a bottle cap, US image, and clear epoxy bubble to the center of my rosette.  The central image is from AP-266 Vintage Soldiers collage sheet, covered with a piece of mica and attached with a brad through a metal embellishment.  

Have a simply wonderful week and a very happy Veteran's Day!

Barbara
*************************************


Saturday, January 26, 2013

Altered Pages January Challenge

Hello everyone, and welcome back to my blog.  Are you familiar with the monthly challenges over at Altered Pages?  If not, I hope you get a chance to check out their Altered Pages Artsociates blog and online store.  The challenge theme for January is "Snow Dancing".  I took a bit of "artistic license" to make my tag.  I put the dancers beneath snowflakes; hence, snow dancing.


From the Glitz Design Vintage Blue 6x6 paper pad, fold the yellow polka dot paper in half and glue it together.   Cut the top tag edges using the Art Deco corner scissors.  If you do not have any of these scissors, you can use a punch instead.  I inked the edges with Frayed Burlap distress ink.


Cut out the dancers image from the Color ATC Yellow collage sheet, distress and ink the edges.  Die cut several different snowflakes using a Spellbinders die in two different blue print papers from the Glitz Design Vintage Blue 6x6 paper pad.


I painted the edges of each snowflake using Terri Sproul's Mixers (Smokey Quartz) and a water brush.  Layer the snowflakes and glue to the tag.  Attach a silver filigree jewelry piece to the center.  I added more of the Smokey Quartz mixer with water to the filigree pieces to tone down the bright silver.


Now, for the fun part.  If you have never tried this, you are in for a real treat.  Go to the hardware store and buy yourself a roll of self-adhesive paper drywall tape.  You will have enough to either remodel your home or share with a few friends.


The drywall tape tears easily and makes a really cool looking background piece when inked.  After removing the backing paper, you can adhere it to your project.


However, for this project, I did something a bit different.  I first removed the backing paper to reveal the adhesive and applied gold multi-color leafing flakes to the adhesive side.  Isn't that beautiful?


I simply put a dab of glue beneath the collage image to adhere it.  I love the look of drywall tape when torn because it looks like honeycomb to me.  It is so much fun to play with.  I hope you will give it a try.


Another neat find I want to share is this beaded Christmas garland I found at Michaels for half price.  I have been removing pieces of it to use in my art work, and I am getting a lot of mileage from it.


Here, I added pieces of the garland through the eyelet that I attached to run the ribbon through.  The ribbon was ivory, but I found that Tim Holtz's Weathered Wood Distress Stain matched the blue in this paper perfectly.  Scrunch the ribbon up while wet and dry it carefully with your heat gun to achieve that vintage crinkly look.  So pretty.


For added interest, I added tiny dabs of Duo Adhesive and more gold multi-color leafing flakes to the background paper.

I hope you enjoyed my project today, and thanks so much for stopping by.

Happy crafting!

Barbara