Thursday, July 21, 2016

Skyline Travel Card

Hi everyone! Today I am up on the Craftwell Blog with a card with a travel theme using my eBrush and stamps from our July partner, Clearsnap.  


Ink the skyline rubber stamp with black archival ink and without re-inking, stamp it twice onto scrap paper and cut out with craft knife, leaving the openings in the paper to use as a stencil, as shown.  


Using a die the same width as the stamp image, die cut one of the nesting labels onto glossy white card stock with the Craftwell Cut n' Boss.  The middle die in the photo below will work perfectly.
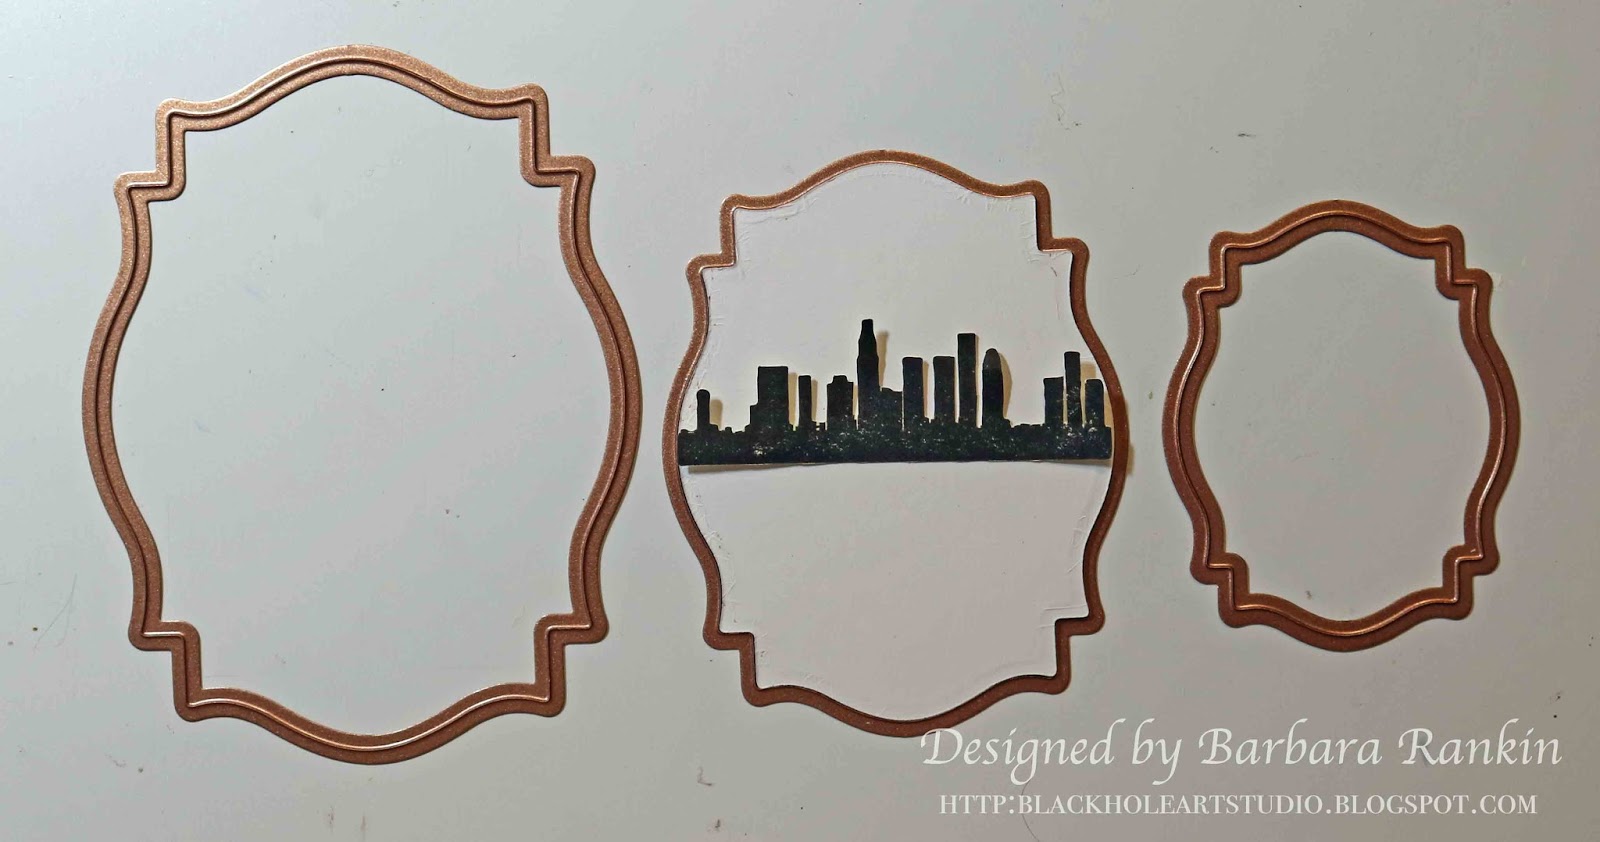


Find and mark the middle of the die lightly with pencil.  I like to use a ruler that has both horizontal and vertical markings to help me keep my lines straight in either direction. 


Place a piece of washi tape below the pencil line and protect the bottom half with a post-it note or scrap paper.


Begin eBrushing a beautiful sunset sky on the top half of the die cut.


YR61 Yellowish Skin Pink

YR68 Orange

B97 Night Blue
So far, so good!

Remove tape and place it above the pencil line, and protect the top half with a post-it note or scrap paper.  Begin eBrushing a beautiful blue river or lake on the bottom half of the die cut. 


Looking good!

Place one of the fussy cut pieces of card used to stamp on and, using it as a stencil, making sure to reverse it to match the stamped image, eBrush a dark or black marker through it.  Lay the stamped skyline on the card to check for accuracy.


eBrush through the "stencil" with the W10 Warm Gray marker.


I decided I need to add a bit of yellow to my sunset, so I placed my post it note along the line again and sprayed over the orange area with Y15 Cadmium Yellow.


Better!

I got to thinking that my stamped image was a bit speckle and not real black, so I thought why not airbrush it with my black marker.  


I don't know why I hadn't thought of that sooner.  Now look at that deep, dark black silhouette.  This was then adhered to the second generation stamping of the skyline to give a nice, light shadow effect.


Use the larger die to die cut a piece of coordinating print paper to use as an under-layer.  Edge both pieces with the Gold Shine ink pad.  It really made a difference.


Die cut a film strip from a piece of black card stock.  I used a scrap that was sitting on my desk from another project.  Use the openings to find small pictures from the Cityscapes paper and trim each piece to fit inside the film strip openings before adhering to the back.


I made a 4-½" x 6-½" black card, cut a print slightly smaller than the front and distressed the edges.  This was then adhered to the card front.  I curled the corners to show off that pretty print on the back of the paper, too.

Trim a few more prints of tags, stamps, etc, from the paper and layer them onto the card front, as shown.  

I used pop dots to adhere the stamped image layer, as well as using a single pop dot under the second film strip picture to give it some curl on the paper.  Here is a closer look at the finished card.


Supplies Used:


Clearsnap Skyline rubber stamp (Teresa Collins)
Clearsnap pigment ink pad (Gold Shine)
Card stock - Glossy white, Black
Spellbinders Die Labels 18
Tim Holtz Film Strip die 
Graphic 45 Cityscapes collection
Archival black ink
Copic Markers: B97 Night Blue, YR61 Yellowish Skin Pink, YR68 Orange, Y15 Cadmium Yellow, W10 Warm Gray

There will be more fun projects featuring the Clearsnap products, so make sure to check out the Craftwell Blog all month long for more inspiration from the team. 

Thanks for stopping by, and have a crafty day!

Friday, July 15, 2016

Find Your Wings Video Tutorial with ColourArte

Hi everyone!  I love my ColourArte products, and I made another video tutorial to share with you.  I hope you enjoy it, and if you like, you can watch it by clicking on the video below.  A complete list of supplies are included there.  


Thanks for stopping by, and I hope you have a super crafty weekend!!

Barbara

Thursday, July 14, 2016

Art Journaling with Gypsy Soul Laser Cuts and Graphic 45

Hi everyone!  Today I have a fun art journaling project using both Gypsy Soul Laser Cuts chipboard and Graphic 45's new City Scapes paper collection.  I love how the chipboard adds just enough dimension without too much bulk, perfect for embellishing your art journals.  

Cut two pieces of paper from the Graphic 45 City Scapes collection and run through Xyron Creative Station.  I also ran the top piece from the chipboard hot air balloon through the Xyron, too.


Adhere papers to left page of the art journal, as shown.


Cut a second sheet (red print) to size and adhere to right page.


Place a piece of washi tape down the middle of the journal.  I added a white glue to the tape to make sure it stays in place.


Leave the top piece of the balloon on the Xyron release sheet and paint it with black gesso.


Cut out prints from the G45 paper collection that will fit inside each section.  Here's where your craft mat will come in handy.  Remove the white release sheet from the back of the balloon and stick it to your craft mat.  Start with the prints that will fill the smaller openings and adhere them.  Just lift the balloon off of the craft mat and sit it down onto the prints.


The two larger openings need some extra background paper behind them, so cut out a background paper and adhere behind the two remaining openings.  Then adhere the prints over that through the open section.  Trim excess background paper.


Paint edges of solid balloon back and basket parts.  Adhere solid balloon back to top section.  Adhere G45 paper inside basket opening.


Paint the mini balloon, jalopy, and word ribbon with brown chalk paint.  Adhere a piece of striped G45 paper to the top of the balloon.


Connect the basket to the balloon with three pieces of twine and glue each to the right side of the journal page.  Add the word ribbon at the top of the page and the mini balloon just below the large balloon.  Add stickers to spell "ADVENTURE AWAITS".


Cut a piece from the wrought iron border to fit the width of the page.


Adhere that to the bottom of the left journal page, along with the jalopy. 


Supplies Used:
Mini Display Tray - Hot Air Balloon
Word Ribbons 4
Miniatures Shape Set - Guy Thing
Wrought Iron Set
Graphic 45 City Scapes collection
Xyron Creative Station
Art Journal
Chalk Paint

I hope you enjoyed the project today, and perhaps inspired to give art journaling with papers and, of course, laser cut chipboard for added dimension.  It really does raise your projects up a notch.  And if you don't do art journaling, consider using this layout for just that, a scrapbook page layout, perhaps to memorialize a summer trip to a beautiful city, or maybe even Europe.

Be sure to stop by the Gypsy Soul Laser Cuts shop for more really amazing laser cut chipboard choices.

Thanks for stopping by, and have a wonderful and creative week!

Barbara

Monday, July 11, 2016

Mixed Media Family Crest Wall Decor

Hello everyone! Today I want to share a really fun project using Dixie Bell Paints, our partner this month.  I am so delighted with this product, and I want to share how easy it is to use.  

I love working with chipboard because it allows me to add wet and heavier objects to my pieces.  So here goes.


I started with this Laser Cut Crests chipboard as my base.  


I painted the chipboard with a coat of Liquitex Gesso.  If I were working on wood or furniture, I probably would not have used the gesso with this paint, but I like to save my expensive paints from soaking into the very porous chipboard, and the gesso does give it a nice base to work on.  Plus, your color will be truer if you have the white base beneath the paint.

I printed my collage images and, using a soft brush, coated them with the Dixie Bell Clear Coat Satin.  Since I only have an inkjet printer, this will keep the ink from running while I am mixing up my wet media.  Tear around the images and set aside.

While those are drying, I cut two 1/4" wide strips of card board and one was cut to 1" wide and cut that strip in half.  To miter the 1" pieces, you need a 45º angle.  To do this easily, you can simply measure 1" down and 1" across the top (the width of the cardboard strip), mark spot with a pencil, draw a line to meet the two points and cut off the triangle.


These pieces will be used to separate portions of my Crest.  Use a ruler to align the vertical chipboard strip straight.


Before I adhere the chevron piece and the horizontal piece on the left, I needed to decide where the collage images would fit best by laying them out to determine placement of everything.  I glued the images down first, as shown.


Now, I know exactly where to place my chipboard "crossbars".  Use a ruler to align the left strip and adhere to the base.  


Measure and mark the center of the right side for placement of the center of the mitered corners.  


Trim off excess ends and adhere all with Aleene's Tacky Glue.  I drew pencil lines to mark where to cut off that excess.


Adhere Paperclay molded pieces to the key and crest with the tacky glue.  The slightly darker Paperclay pieces were molded, allowed to dry partially before removing from the mold, and then glued down to the chipboard pieces.  This allowed me to curve some of those pieces that needed to follow curves on the chipboard.  Allow them to dry completely, then paint Paperclay molded pieces with a coat of white gesso to seal the clay.


Add dimensional accents to the chipboard using Crystal Lacquer.  You can create these by simply following the lines of the chipboard.  Let dry thoroughly.


Paint patches of crackle paint to the Crest background to age the piece.


Paint a wash of Timeless chalk paint over the chipboard background, making sure not to fill in the cracks with the paint.

Add another layer of aging by mixing the Timeless chalk paint with the crackle paint and blending the two directly onto the chipboard pieces as you dab the paints onto the surface.  You will get this mottled effect.  Let paints dry.


Paint both chipboard  pieces with a coat of the Dixie Bell Paints in Soft Pink.  Let dry.  I was pleasantly surprised at the nice coverage of this paint.  It seems to be highly pigmented, and I did not need to use a lot of paint. 


Paint both pieces with a wash of the Timeless chalk paint and let dry.  This is going to give it a very shabby chic, vintage look.


Use a soft brush to paint both pieces with the Dixie Bell Paints Clear Coat Satin.  I had to take a picture of it while still wet because once it dries, you will not be able to see it at all.


Use your finger to pick up the Gold from Kit #1 and Deep Gold from Kit #2 Metallic Rub-on Sets to highlight and give this piece even more vintage shabbiness!


Add pearl and gold  Dew Drops to add more accents to the piece, as shown.


Make a hanger and bow with the Twill Tape, run it through the hanger openings in both pieces of chipboard, and tie it off at the top.   (Tip:  You can color the twill tape with inks or paints to match your project.)  Now you are done!

And a few closeups of that shabby goodness!


ALTERED PAGES SUPPLIES USED:

Laser Cut Crests
Liquitex Gesso
Dixie Bell Paints (Soft Pink, Clear Coat Satin)
Paperclay
Crystal Lacquer
Collage Sheets: Castles of the Ages;  Bookplates
Metallic Rub-on Sets
Dew Drops
Aleene's Tacky Glue
Twill Tape

Thanks so much to our partner, Dixie Bell Paint Company.  I hope I have inspired you to take a look at their website for more color choices, and as always, there will be more inspiration from the team this month.  In addition, Altered Pages is your one-stop shop for your crafting needs.  Be sure to check them out.

Thanks for stopping by, and have a wonderful, crafty week!

Barbara

SaveSaveSaveSaveSaveSave