Showing posts with label Fall home decor. Show all posts

Thursday, November 5, 2015

One Falling Leaf Wall Hanging with Gina's Designs

Hello chippie fans, and welcome back.  Well, I enjoyed my month of October Halloween projects.  Now I am on to Fall, so I decided to do another home decor wall hanging that can be inserted into the frame I've been using for the past several postings.  If you put your project on a sturdy piece of chipboard or mat board that fits snugly in the frame, you can simply remove one and insert another, whatever the season.  How's that for being frugal!  Check out my previous posts and you will see what I mean.


I first adhered the scrapbook paper to a piece of 12"x12" mat board.

Each chipboard piece was painted with acrylic paints in Fall colors.
The bottom layer of the  FALL banner was painted with Rusty paint, while the top layer was first painted with black, then I spread gold crackle paint over that.  To really age the letters and bring out the cracks even more, I added a wash of black paint and dabbed the excess off with a paper towel.  These were adhered along the top right with foam tape, and berry garland added.

The black bird was painted with black, of course, and details were added to the beak and eye.
The oak leaves and acorns were painted with yellow and brown paint mixtures to give each piece shading and depth.  I stamped the sentiment onto a scrap of manila card stock with black archival ink.  I punched the corners with a ticket punch.  I wanted to match the colors in the paper, so I blended yellow and orange distress inks and edged with a brown ink.
The cider jugs were painted similarly, then given a coat of clear crackle paint.  One jug was lifted with foam tape for dimension.
I cheated a bit and googled apple barrel images and found this one, which I printed off and adhered to my apple barrel chipboard shape.  I cut a slit along the top edge so I could insert my apples, which were painted with yellow and red paint mixture.  The leaves were a mix of light and dark greens, and the stems were painted with brown.


Gina's Designs Supplies Used:

Fall Shape Set

Other Supplies Used:
12x12 Memory Box Blackbird paper
12x12 mat board
Viva Decor Rusty Paper Paint
Finnabair Gold Crackle Texture Paste
DecoArt Media Fluid Acrylics Raw Sienna
DecoArt Media Fluid Acrylics Burnt Sienna
DecoArt Media Fluid Acrylics Quinacridone Gold
DecoArt Media Fluid Acrylics Quinacridone Burnt Orange
DecoArt Media Fluid Acrylics Burnt Umber
DecoArt Media Fluid Acrylics Diarylide Yellow
DecoArt Media Fluid Acrylics Sap Green
DecoArt Media Fluid Acrylics Green Gold
Distress ink pads: Dried Marigold, Scattered Straw
Prima Branch Bark ink pad
Serendipity Stamps D384 (One falling leaf ...)
Black archival ink pad
Ticket corner punch (Stampin Up)

I hope you enjoyed my Fall project today.  It was quick and easy, and at this time of year, we really need that.

Gina's Designs Lasercuts has a fabulous selection of Fall-themed chipboard shapes, so be sure to stop by the online shop for all of your chipboard needs!

Have a wonderful week, and Happy Fall ya'll!!!

Barbara

Monday, July 27, 2015

Mixed Media Fall Wall Hanging

Hello everyone.  Barbara here with Altered Pages.  Are you thinking of Fall yet, with its crisper, cooler air and beautiful colors?  Let's face it, when it is freezing cold outside, we long for Spring and Summer.  When it gets unbearably hot, we long for the cold.  We are a funny creatures.  In any case, we have been sharing everything Fall-related here at Altered Pages.


I decided to make a wall hanging to display in anticipation of the coming of Fall.  


Supplies used:

Falling for Fall collage sheet
Adhesive Corrugated
White gesso
Mix'd Media Inx pads: Leather, Adobe, Vintage, Mossy
VersaMark ink pad
Scroll corners 
Serviette Papers
Bottle caps
Adhesive Dimensionals
Glue Stick
Aleene's Tacky Glue
Double Side Tape Mini
1/2 inch Olive Green Flat Jute
Metal corners (Retired Mailbox Muse kit)
Black card stock
DecoArt Media Mister - Carbon Black
Clear embossing powder
Leaf punch
1" Circle punch


To begin, adhere 6" x 6" Adhesive Corrugated to a piece of mat board for support.  Paint high spots of corrugations with white gesso, let dry.
Apply Adobe and Mossy Mix'd Media ink to corrugate.  Spritz with water and heat dry.
Add Leather Mix'd Media ink to corrugate, spritz with water and heat dry.
Mist lightly with DecoArt Media Mister - Carbon Black, mist with water and heat dry.
Ink chipboard scroll with Mix'd Media Ink (MMI) Vintage and emboss with clear embossing powder (EP).  Lightly dab MMI Adobe onto it and  heat emboss with a second coat of clear EP.
Punch a 1" circle from small red leaves image and flatten a bottle cap.
Ink punched circle with Versamark ink and emboss with clear embossing powder.  Adhere a piece of chipboard to inside of bottle cap.
Adhere embossed print image over chipboard on bottle cap.
Punch leaves from Serviette papers.
Use a sponge to ink leaves with the Mix'd Media ink pads in Vintage, Adobe, and Mossy.  Heat set.
Print leaf background image large enough to use as a background and trim to size (approximately 3-1/2" x 5-1/2").  Layer onto slightly larger piece of black card stock.

Adhere Happy Fall image to slightly larger piece of black card stock.  Adhere all pieces to background, as shown in finished photo above.

Adhere a length of 1/2 inch Olive Green Flat Jute to the back to use as a hanger.  Punch a hole through corrugate and insert Light bulb safety pin through each end.  (The glue is actually holding the jute, the pins are merely decorative).
Add metal corners to each corner to finish it off.

I hope you enjoyed this project, and perhaps you want to make one for yourself.  Be sure to stop by Altered Pages to check on all the fun things you can use to put one of your very own together.

Thanks for stopping by, and have a wonderful week!

Barbara

Monday, July 13, 2015

Watch the Leaves Turn Clock Magnet

Hello everyone.  I hope your week is starting off well.  Our theme this month is all about Fall.
So, I want to share a fun little project to either sit on your desk, turn it into a magnet, or place it anywhere you feel like thinking of Fall!  I love this saying because it reminds us to "... take time to sit and watch the leaves turn".


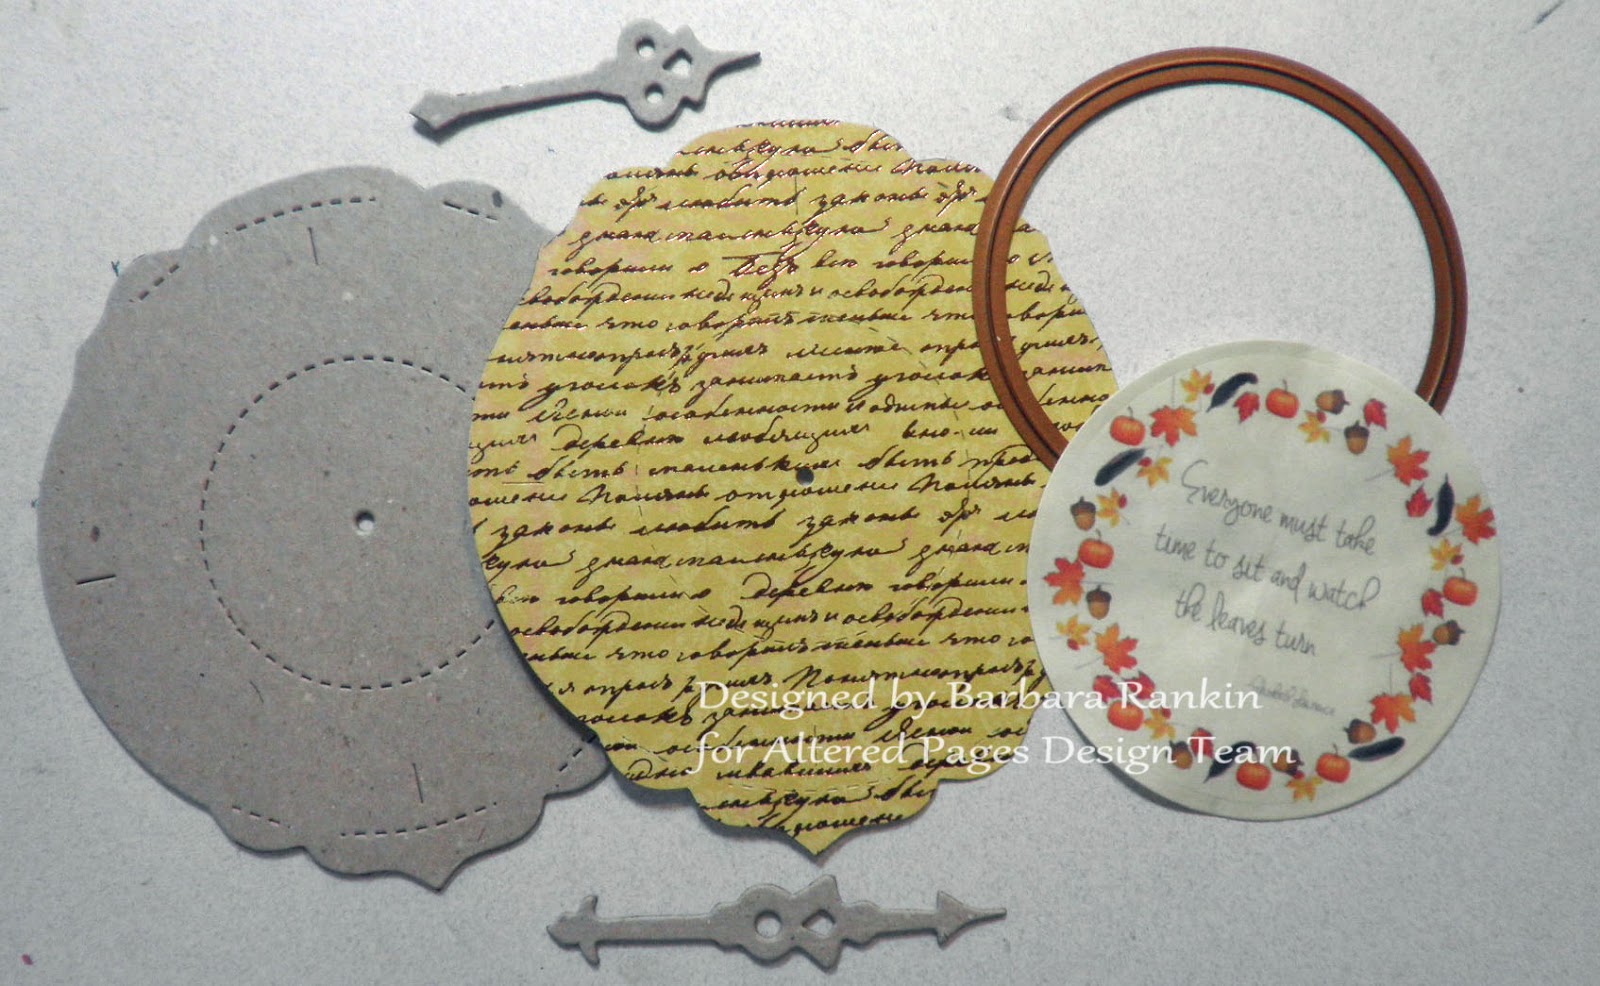
I used a clock die to cut some thick chipboard, as well as a piece of print paper to cover the board.  Then I used a circle die to cut out the  collage image for the center of the clock.
Use a glue stick to adhere the paper to the chipboard and edge with the Leather Inkx and the blending tool.  You can see the difference where I have added the brown shading on the right of the chipboard.
Edge the collage image with the gold ink pad.
Adhere to center of clock and add shading with a thin line from the Wink of Stella pen.  Again, I have shown a portion of where I used the pen to shade along the lower edge, versus the top edge, where there is no shading yet.  It really makes the clock face pop.
As you can see in the photo below, the chipboard clock hands are obscuring the beautiful "saying", so what to do, what to do?  Aha, I know!  I cut the clock hands from a scrap piece of acetate sheet.
I edged them with a black permanent marker, just enough to be seen.  Then I used a tiny brad to attach them to the clock.
I chose a scroll corner that fit the top of the chipboard, and first inked it up with the Delicata Ink Pad Gold and let dry.
Next, add a good, thick coat of the Aleene's Tacky Glue.
Pour the Champagne glass glitter over the scroll corner and let dry.  Remove excess glitter. Use the Aleene's Tacky Glue to adhere the scroll corner to the top of the clock.
And here is a closeup of the clear clock hands.  You can still see that beautiful phrase.  Love it!
Now, one last thing, add some numbers to the front and a piece of the Magnet Sheet to the back.  See photo of finished project above.

Altered Pages supplies used:
Kaisercraft Botanical Odyssey paper padFalling for Fall collage sheetChampagne glass glitter;
Mixed Media Salazar Inkx (Leather)glue stickAleene's Tacky GlueRanger Blending ToolDelicata Ink Pad GoldWink of Stella penMagnet Sheets 4 x12 inchScroll corners

Other supplies used:
thick chipboard
clock die (Sizzix)
2-3/4" circle cutter die
Acrylic sheet
Mini brad
Black permanent marker
Number stickers

Well, that's it for this project.  Pretty easy peasy, wouldn't you say? So for more inspiration, stop by the Altered Pages website to check out all of the fab Fall products to use in your next project.

In the meantime, thanks for stopping by today, and have a wonderful, creative week!

Barbara

Monday, September 22, 2014

Leslie Rahye's Very Fall Steampunk Blog Hop

Hello my very artsy steampunk friends, and welcome to Autumn.  I am so glad you stopped by today.  The fabulous Leslierahye is hosting another one of her fabulous steampunk blog hops, and today's theme is Fall!  

I don't know about you, but Fall is one of my favorite seasons, and I absolutely love the colors associated with Fall.  I found this Sizzix die in my local craft store on clearance, and boy, was I excited.  I grabbed it so fast it would have made your head spin.  

It is one of Tim Holtz' dies called Luminary 3-D.  It is not as large as it appears on screen, but it is awfully cute, and makes beautiful little candle light decorations, or just about any kind of decoration you might choose.  I think it is very versatile and I plan on using it quite a bit.  

I started searching for ideas on Pinterest, and found a gazillion of them.  However, I was particularly taken with a technique called Melt Art Tissue Wrap Jeweled Leaves that I found on Tammy Tutterow's blog using tissue wrap, distress stains, and the melting pot.  


Supplies:
Sizzix/Tim Holtz 3-D Luminary die
Die cutting machine
Altered Pages Steampunk Collage Images
Melting Pot
Clear UTEE (Ultra Thick Embossing Enamel)
Gold metallic cream
Distress stains in Fall colors
Tim Holtz Melange tissue wrap
Tim Holtz Ideaology music box keys
Prima Vinage Trinkets
Burgundy two-tone card stock
24# Clear Vellum paper
Glossy Accents
Red Liner tape

I cut two-toned burgundy card stock with the Sizzix Tim Holtz 3-D Luminary die and followed the directions for putting it together.  But before I actually adhered it together, I first resized the four collage images from Altered Pages to print at 2.1" x 2.8" onto clear vellum paper and trimmed each one down to 2" x 2-3/8" to fit behind the window openings.

Using the techniques learned from Tammy's blog post, I was inspired to make the leaves she shared, but I was further inspired to make some "gear flowers" using the same technique used for the leaves.  I cut out some larger gears with a Spellbinders die and tissue wrap, stained with Fall colors, and dipped in UTEE.  I did, however, shape them somewhat to form a flower shape.  Adding a few metal embellishments from Prima and Tim Holtz Ieadology, and my luminary was complete.

Front close up

Side 2

Side 3

Side 4
The really cool thing about these tissue embossed leaves is that they become quite see-through, which I think is an awesome effect.  Can you see the transparency in these close-ups?
Gear flowers closeup


The metal gear on this flower looks like it is floating, but it is actually adhered to the UTEE that I allowed to remain inside the circle of the gear.  Pretty cool, huh?


Tiny metal gears are added to form flower centers.  


Insert a battery-operated tea light inside for safety while providing a nice candlelight glow.


Now I have a sweet Fall home decor piece for my table.  I think I need more!!!

I hope  you enjoyed my project today, and have a great time visiting the rest of the bloggers today to see their awesome projects.  

Here are the links to their blogs to help you stay on course!


Thanks so much for stopping by, and please have a wonderful, crafty week!

Barbara

Monday, October 7, 2013

Fall Candle Ring

Hello everyone, and welcome back to the blog.  I am so glad you stopped by today.  I think Fall is finally in the air, and today, I wanted to share something with you that was quite easy to make and would make wonderful gifts for the upcoming holidays.

I knew I wanted to make a "wreath" like piece, but not so big as a wreath.  So then I got the idea for a candle ring.  Yes, that is perfect, not too big, not to little, and would be so pretty to display for this time of the year.  I even found a pillar candle in my stash and decided to decorate that to match.


Supplies Used:

Creative Paperclay® modeling material
Corrugated cardboard
Circle cutter
Leaf Molds (Makin Clay)
Leaf Cutters, Sunflower Cutters (Lisa Pavelka)
Acrylic Paint:  Burnt Umber, Sunflower, Light Avocado, Tomato Red, Yellow Ochre
Helmar 450 glue
Burgundy 3" fluted pillar candle

Directions:

Cut a 4" circle from corrugated cardboard.  Cut the center out, leaving about 1/2" along the perimeter.
Paint the chipboard with Burnt Umber.
Mold several leaves and sunflowers and allow to dry partially.
You can also speed up the drying time by hitting the clay gently with your heat gun.  At this point, I did not want it completely dry because I still need to be able to manipulate the flowers, and particularly the leaves.
Make seed pod indentations in flower center with rubber tip tool
Adhere the sunflowers and some leaves to the candle using Helmar 450 glue.  Normally I paint my pieces before putting them together, but I was afraid to paint them while my clay was  still damp.  So I painted them after application.
I painted the sunflowers after applying them to the candle.
I placed the chipboard ring around the candle so I could better see how I wanted to place my leaves around it.  I painted the leaves, front and back, before adhering to the candle ring.  I began by gluing and bending the leaves in a pleasing manner to the chipboard.
side view
side view
I hope you enjoyed my project today.  Wouldn't these make great gifts for your friends and family?  Or make one for yourself for a festive holiday table setting.  So visit the Creative Paperclay® blog and online store for more fun seasonal and inspirational projects from the rest of the team this month.  

Happy Fall to one and all!

Barbara