Showing posts with label pop-up cards. Show all posts

Sunday, November 30, 2014

Pop-Up Christmas Card with Pam Bray's Christmas Collection

Hello everyone!  Can you believe it is December already?  My how time flies when you are having fun.  And speaking of fun, I am having so much fun with Pam Bray's new Christmas stamp sets.   If you know anything about me, you know I love dimension, and I found this fabulous pop-up fireplace card on my Silhouette.  It was just what I needed to hang my stamped Christmas stockings and place my gift box.  Yeah, only one gift so far, but it is early.  LOL 

I am also linking up with the Unruly Paper Arts Christmas Link Up Party.  Check out the rest of the bloggers' projects there.  

Here is the front of the card.  I folded a print card stock in half to make a 5" x 7" card, stamped and colored  Santa onto white card stock and cut around him, adhering to a 3" doily.  Dear Santa ... was stamped onto a note card from the paper collection, and a Santa definition from my Silhouette added.
And here is what you see on the inside.  Isn't this fabulous?  I cut the pop-up out in full once, and two more times in the parts I needed so I could have the base (beige), the red bricks (red), and the wooden mantel (tan).  I ran the tan mantel piece through a woodgrain embossing folder and darkened the grain with a brown ink.  The red piece was embossed with a brick embossing folder and highlighted with a white ink.  Now to hang the stockings with care, and set the first present nearby.  
Here is a view from above.  You can see the stamped sentiment from Pam's Christmas Collection 2, stamped in green StazOn and die cut with a fancy labels die.
Here is a close-up view of those cute stockings and present that I stamped onto white card stock, colored and cut out to hang on the mantel.  I used a red Pico embellisher pen to make the berry dots on the garland, and on the stockings.

Supplies: 
Sin City Stamps:  Pam's Christmas Collection and Pam's Christmas Collection 2 
Spellbinders Fancy Labels die 
Card stock:  white, beige, tan, red
DCWV Handmade Christmas paper collection  
Copic markers in reds, greens, yellows 
Ink Pads:  Green StazOn, Memories Black, brown distress, white chalk  Irresistible Pico Embellisher: Love Letter Red  

Thanks for stopping by today, and please be sure to check back often.  I am going to be sharing some more fun Christmas cards using these two stamp sets, and of course, there is always so much more inspiration from the rest of the team.   Have a wonderful, creative week! 

Barbara

Saturday, November 10, 2012

Autumn Pop-Up Card For The Robin's Nest Design Team Application


Hello everyone, and welcome back to my blog.  Today, I am trying out for The Robin's Nest Design Team.  I absolutely love The Robin's Nest products, and I have enjoyed working with them so very much.  I would be so honored to have the pleasure of working with them for another term.  


I made this great little pop-up card for Autumn.  This is my favorite time of year, and I wanted to express that in my card using these luscious autumn colored papers from The Robin's Nest.  I absolutely love how this card turned out. Aren't those pinecones beautiful?  I keep looking at them and still, I cannot believe they are made from paper and a Sizzix die. 


The base (outer) card is made with this gorgeous Family-Glitter Getaway Stripe Double-Sided Cardstock.  I  used the Brown Glitter card stock for the pinecones and some olive green paper for the pine needles, which I distressed a bit with brown ink.  I also added a bit of copper glitter to the pinecones.  I glued this arrangement over a scrap piece of die cut chipboard covered with the reverse side of Family-Glitter Getaway Stripe Double-Sided Cardstock, edging with gold ink.  For added glitz, I "sprinkled" some of these beautiful Getaway Dew Drops around the front.  Let's face it, nothing is complete without adding some pretty dew drops about.  

Finished Pop-Up Inside Card


I used a Sizzix die to make this card.  Although pop-up cards are not really as difficult as they look, they always surprise and amaze the recipient.  Below, I have made a simple diagram of a pop-up with straight lines for your use.  The sky is the limit, whether or not you use a die or a ruler and a craft knife.  The same goes for rosettes.  A strip of paper, accordion folded, glued into a circle, and you have yourself a rosette, as you will see later in this post.  Dies just make the job a little faster, but not necessary.


Outer Card (left) Inner Card w/pop-up (right)
First, die cut or manually cut the outer card using Family-Glitter Getaway Stripe Double-Sided Cardstock.  The outer card measures 4-1/4" x 11", folded in half to form a  4-1/4" x 5-1/2" card.

Next, you can either use the die to cut the inner card using Brown Glitter card stock, or follow my diagram below for a simple straight line pop-up.  You may need to trim a sliver off of each short edge of the inner card so that it will fit nicely inside the outer card.  


View of inner card from side angle
I cut a second piece from Glitter Copper Butterflies card stock to adhere over the center pop-up.  Alternatively, you can simply punch a 2-1/4" circle instead.  Then I punched a 2" scalloped circle from the reverse side of Family-Glitter Getaway Stripe Double-Sided Cardstock and used the botanical from the Family Rub On.  The Robin's Nest rub-ons go on like butter, and are not only versatile, but very easy to use.  I also inked the edges with gold ink and adhered both pieces to the central pop-up piece.


Central pieces cut out and added to pop-up center

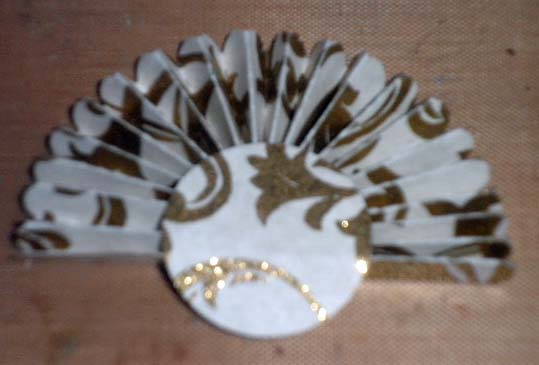
Die cut a Glitter Coffee Creme Swirl Cardstock rosette, but only adhere it as a half circle rather than a full circle behind the central pop-up piece, as shown in the picture below.  You can also make the rosette by cutting a strip of this gorgeous paper into a 1" x 10" piece and accordion folding it every 1/4".  If you want the scalloped edge, you can trim one edge with decorative scissors before accordion folding it.  

Half rosette
Add glue to the front of the circle (on the right side of the paper) to adhere it behind the circular area of the pop-up, as shown.  (NOTE: The circle is not decorative in this case, but necessary to hold the rosette together).


Close-up of half rosette adhered behind pop up
I punched leaves from Distressed Honeycomb cardstock and added distress ink colors to each of the leaves to give them a variety of Fall colors.  After attaching a piece of wire to the reverse side of each leaf with a small piece of washi tape, I was able to insert the wires where I wanted them behind the rosette, enabling easy adjustment of their placement. 


Reverse of leaf showing wire attached with washi tape

Below is a close-up of the pop-up with the leaves attached.


Close-up of finished pop up

Another picture of the card from the side.


Angle view of card
I stamped my Autumn sentiment on the reverse side of the Family-Glitter Getaway Stripe Double-Sided Cardstock, continuing the shape from the front to the inside.  I also edged this with gold ink.  The sentiment is a bit hard to read in the photo, so this is what it says:  


"Every leaf speaks
bliss to me
fluttering from
the autumn tree."
                  -Emily Bronte

Close-up of stamped sentiment
Below, I have made a diagram of a simple pop-up insert for any card.  

The Robin's Nest Products Used:

Family-Glitter Getaway Stripe Double-Sided Cardstock


Glitter Coffee Creme Swirl Cardstock
Glitter Copper Butterflies


Distressed Honeycomb cardstock
Brown Glitter card stock

Getaway Dew Drops


Family Rub On

I hope you have enjoyed my card project this week and that you will be inspired to visit The Robin's Nest online store, as well as their blog, The Chattering Robins, for more inspiration and to check out their new and wonderful product line. 

Until next time, have a wonderful week, and happy crafting!

Barbara