Friday, September 11, 2015

Sin City Stamps ATC Blog Hop

Hi everyone.  So glad you decided to join us today because the Sin City Stamps design team have a fun blog hop for you to enjoy.  Please click here to see a link-up of all of the blog hop participants.  Just click on their thumbnail to be taken directly to their blog.

Our theme is ATCs, or Artist Trading Cards.  If you don't know what an ATC is, let me explain.


  1. Artist trading cards (or ATCs) are miniature works of art about the same size as modern trading cardsbaseball cards, or 2 1⁄2 by 3 1⁄2 inches (64 mm × 89 mm), small enough to fit inside standard card-collector pockets, sleeves or sheets.


Here's what you need to do to win!

Visit each blog and leave a comment.

Return to the Sin City Stamps blog and leave a comment there to enter to win your choice of ATC stamps.

Like both the Sin City Stamps Facebook page and Sin City Stamps YouTube Channel.

A random winner will be chosen on Monday, 14 September, and announced on the Facebook page.

Now, for my project today, I want to share a set of three ATCs, all made using some of my favorite Sin City Stamps.


ATC Fronts

ATC Backs

Directions:


ATC #1

Cut three pieces of white chipboard to 2-1/2" by 3-1/2", paint with Oatmeal chalk paint.

ATC #1:  Stamp dandelions  on the ATC and add dots of Cantaloupe and Platinum Pearl Paints, as shown.
Tear a strip of print paper from the 7Gypsies pad, ink edges and adhere along top edge.  Stamp two butterflies  onto print paper, fussy cut and adhere to ATC.
Stamp Weed or Wish? onto solid color paper from the 7Gypsies pad, cut out, ink edges, adhere to chipboard for dimension, then adhere to ATC.  Add three tiny metal square stickers, as shown.
ATC #2
ATC #2:  Emboss with Tropical Paisley embossing folder and sand the high spots to reveal the white chipboard.
Use a blending tool to color the high spots with Fired Brick distress ink.

Stamp bird twice onto scrap print paper from 7Gypsies pad with black archival ink, cut out one complete bird, and one wing.  Adhere wing to bird, and draw in an eye with a black marker and white gel pen.

Stamp creativity definition  onto solid color paper from 7Gypsies pad with black archival ink, cut around it and ink edges.  Glue to a piece of chipboard and adhere to ATC.

Stamp clock face with black archival ink onto print paper, punch out with 2" paper punch, and cut in half.
Add Fired Brick distress ink and adhere left half of clock face to left side of ATC.  Add Fired Brick distress ink to wood clock hand, stamp Wish with black archival ink.  Adhere to clock face.  Adhere bird with foam dots, so it looks like it is perched on the clock hand.
Add dots of Platinum pearl paint around clock face, and adhere tiny gold metal stickers to top and bottom of ATC, as shown.


ATC #3
ATC #3:  Emboss ATC with Diamonds in the Rough embossing folder and sand the high spots to reveal the white chipboard.
Use a blending tool to color the high spots with Vintage Photo distress ink.
Stamp music notes portion of the birds with nest onto a piece of Authentique print paper with Tree Branch archival ink.  Ink paper with Faded Jeans distress ink, tear bottom edge and adhere to top of ATC.

Ink the other half of the stamped clock face from ATC #2 above with Faded Jeans distress ink and adhere to right side of ATC. Add dots of Pearl Platinum Pearl paint around the edge.

Stamp Make A Wish with black archival ink and punch with a decorative punch.  Adhere to a piece of chipboard for dimension and then to top of ATC.  Add a dot on either side with Cantaloupe pearl paint.

Stamp Dream key onto same paper used to stamp the butterflies above with black archival ink.  Fussy cut and adhere with pop dots.

Add three tiny gold metal square stickers to the top and bottom corners, as shown.


Bonus ATC
Bonus ATC:  The birds with nest image was stamped onto the Authentique brick pattern paper with black archival ink.  I stamped around the image with the crackle stamp, also with black ink.  Using a blending tool, I added the four Distress inks to quickly color the background.
I used a water brush on the birds, nest, flowers, and leaves, to remove some of the distress inks color. This is a technique by Tim Holtz, since distress inks are reactive with water, you can "erase" some of the color.
I used various colored pencils to fill in the image, and added dots of Cantaloupe pearl paint to the flower centers.  

Stamp Wings of Love in black archival ink onto solid print paper, punch with decorative label punch. Adhere to chipboard and then to the ATC.  Add three square metal stickers to the top and bottom corners, as shown,

I used this ATC background stamp to finish off this ATC.  These stamps are perfect for adding just the right touch to the reverse side of all of your ATCs, allowing you to sign and date them, and also number them, as well as give them a theme if you are trading them.  

Bonus ATC Back

Supplies used:
Sin City Stamps:  Terri Sproul's Vintage Set (music background with birds and nest)
Terri Sproul's Wish set (dandelions, butterflies, creativity definition, Make A Wish, Weed or Wish?)
Birds and Clocks (clock face, bird)
Sin City Wings (Wings of Love, crackle background)
Steampunk'd (dream key)
Michelle Frae Cummings Steampunk ATC Card
Vintage Keys ATC Card
Chipboard
Manila card stock
Oatmeal chalk paint (Folk Art)
Papers:  Gypsy Market 6x6 pad (7Gypsies); Accomplished 6x6 pad (Authentique)
Embossing Folders: Diamonds in the Rough (Cuttlebug); Tropical Paisley (Sizzix)
Distress Ink Pads:  Vintage Photo, Fired Brick, Faded Jeans, Spiced Marmalade
Archival Ink Pads:  Jet Black, Tree Branch
Ranger Liquid Pearls: , Platinum, Platinum Pearl, Cantaloupe
Gold Metal Stickers (TPC Studio)
Foam dots


Thanks so much for stopping by today, and don't forget to leave comments on all the blogs, and Like both the Sin City Stamps Facebook page and the Sin City Stamps YouTube Channel for your chance to win!

Good luck, and have a wonderful weekend!

Barbara

Thursday, September 10, 2015

A Birdhouse Mini Display

Hi chippie fans!  I want to share another birdhouse project for you.  If you haven't guessed by now, I love birds, and this Birdhouse Mini Display Tray from Gina's Designs Lasercuts started my creative juices flowing.  


Trim chicken wire to fit over one of the birdhouse frames.  Paint chicken wire with Sterling paint, then dab Rusty paint randomly for a weathered look.   Adhere to one of the black painted birdhouse frames.
Measure and mark chickenwire for size
Paint the two frame (open) pieces with black chalk paint.

Select a print clock face, adhere to the remaining frame (open) and trim excess.  Insert a set of tiny clock hands with a tiny brad.  
Select a portion of the print paper, using the open frame piece as a template to see which portion of the paper you want to show through. 
Cut out the paper just inside the pencil marks and adhere to the base (solid piece) of the birdhouse.  Paint the back and sides with black chalk paint just to finish it off nicely.  Color background paper with Rusty Hinge, Stormy Sky, and Peeled Paint distress inks.  Set aside.
These are the three pieces you should have now, and will be adhered together in this order later.
Use a spatula to spread a thick coat of the white crackle paste over the frame with the clock face.  (TIP:  You might want to do this before adding the clock face and hands).
Dab Gathered Twigs and Vintage Photo distress stains over crackled frame to bring out the cracks and to give depth with the different brown colors.  Then dry brush some of the Turquoise paint over the crackles.
Here is a closeup of the color variations from this technique.
 Adhere first frame piece with the chickenwire attached to the solid print covered background piece.
Adhere second frame piece with the clock face over the piece with the chicken wire, sandwiching the chickenwire between the two frames.
Color both the lace border sticks and one corner from the Art Deco Border & Corners Set with Prima Color Bloom spray mists in Soft Teal, Gilded, Cobalt, and Emerald.  Rub Rose Quartz Treasure Gold over the top.  Deepen the color for a better color match by sponging on Peeled Paint distress ink.
Adhere these three pieces to the top of the birdhouse, as shown.
Paint Birds of a Feather with Rusty paint (words), and Turquoise paint on birds and feather.  Add Rose Quartz Treasure Gold, more Turquoise to each section.  Adhere to the bottom section of the birdhouse, as shown.
I thought something was missing, so I used this tiny butterfly from the butterflies and dragonflies shape set, covered with the Rose Quartz Treasure Gold on both sides.  On the front side, I added a bit of blue color with the Prima Cobalt mist, but I used a paintbrush to add it to the wings.  I gently lifted the wings and adhered to the clock, as shown.  

Gina's Designs Supplies Used:
Mini Display Tray - Birdhouse
Butterflies and Dragonflies
Border Sticks Lace
Chicken Wire Large
Birdwatching Shape Set
Art Deco Border & Corners

Other Supplies Used:
Tim Holtz 8x8 Paper Stash - Collage
Dina Wakley Sterling  and Turquoise acrylic paint
Black chalk paint (FolkArt)
Viva Decor Rusty paper paint
Tiny clock hands (Blank Slate-Hobby Lobby)
Prima White Crackle texture paste
Tim Holtz Idealogy:  Mini brads
Tim Holtz Gathered Twigs and Vintage Photo distress stain
Tim Holtz Wild Honey and Peeled Paint distress inks
Prima Color Bloom sprays: Cobalt, Soft Teal, Gilded, Emerald
Treasure Gold Rose Quartz metallic wax


Thanks for stopping by, and I hope you are inspired by my project today and will take a moment to hop on over to Gina's Designs Lasercuts to see the wonderful selection of chipboard to help get your creative juices flowing.  And be sure to visit the blog for more fabulous projects from the design team.  

Barbara

Saturday, September 5, 2015

Craft Hoarders Anonymous Monthly Blog Hop: September 2015


Welcome to the September Craft Hoarders Anonymous Blog Hop! You should be coming to my blog from Jan's blog. After visiting me, hop over to Karen's blog next! To start at the beginning of the hop, and for the full list of Bloggers, go to Gloria's Blog.

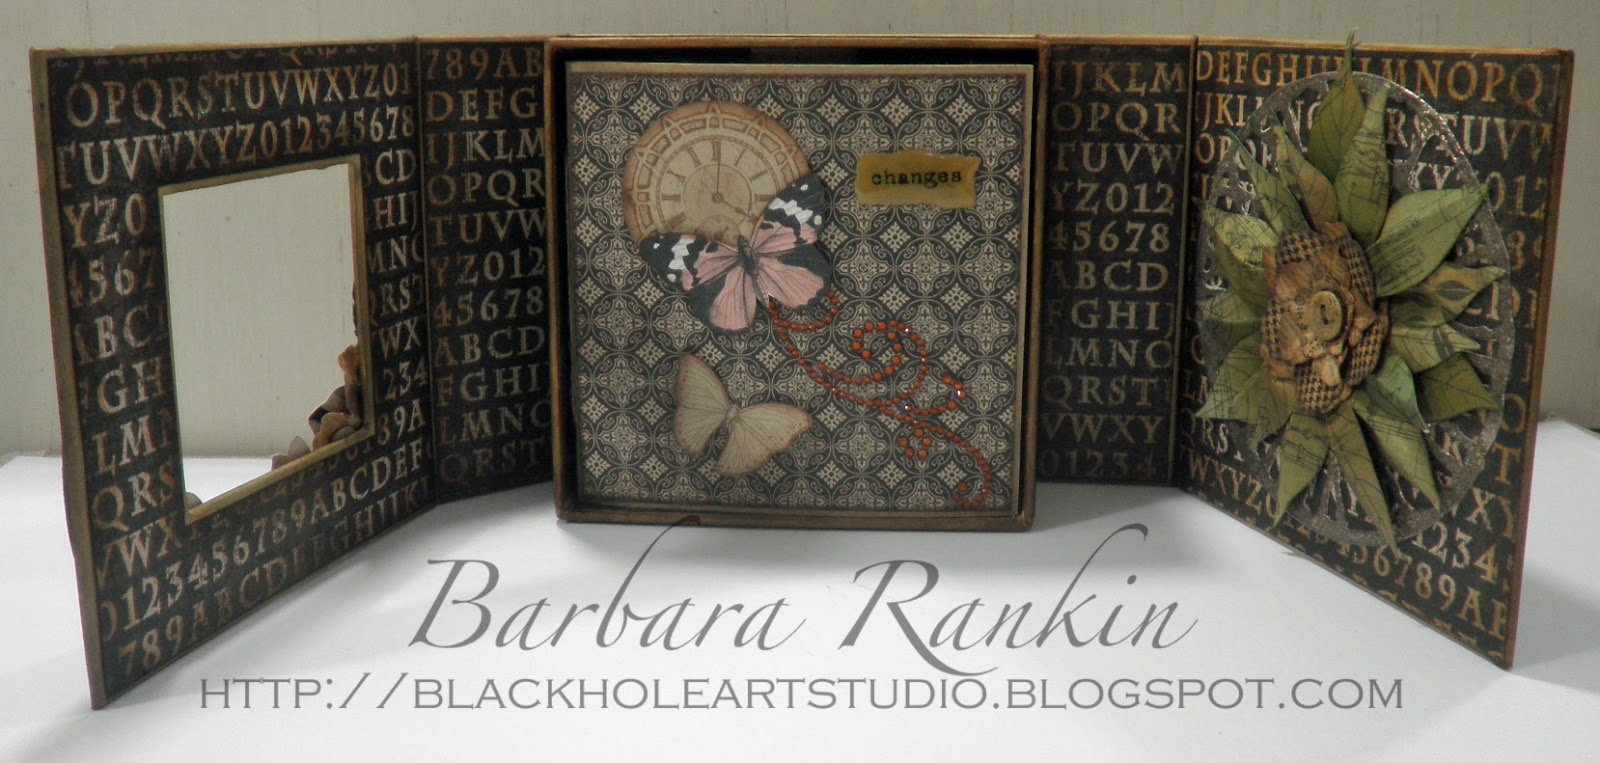
This box with mini album was covered and decorated with papers from both the Graphic 45 Almanac and Kraft Reflections paper collections.  I know you have a lot of places to visit, so I will let the pictures do the talking.
Front of Box

Side view of Box

Inside of Box with Mini Album

Inside of Box, Mini Album removed

Mini Album Front Cover

Mini Album Pages 1 and 2

Mini Album Pages 3 and 4

Mini Album Pages 5 and 6

Mini Album Pages 7 and 8

Mini Album Pages 9 and 10

Mini Album Pages 11 and 12

Mini Album Back Cover

Supplies used:

Graphic 45 Mixed Media 5x5 Kraft Box
Graphic 45 Almanac Paper Collection
Graphic 45 Kraft Reflections Paper Collection
Lots of embellishments

Here is the list of the participating Bloggers. Make sure to hop along and say hello! 
I hope we have inspired you to join us every month and de-hoard those supplies! 

Have a wonderful and creative weekend, but most of all, have fun!!!

Barbara

Friday, September 4, 2015

Mixed Media Canvas: A Walk In My Garden Video Tutorial

Hello everyone. Today, I want to share my very first YouTube video as a member of the newly formed ColourArte Video Creator Design Team.  I will be posting a new video twice a month, and sharing projects, tips and techniques for using your ColourArte products in all of your mixed media art.  

Here is my video link, and if you like my project, I would really love a thumbs up.  In addition, if you want to keep in touch and see my videos as they come out, you can subscribe to my channel by clicking here.


Thanks so much for all of your support, and I hope you enjoy this new adventure of mine as much as I am!

Barbara

Thursday, September 3, 2015

A Dragon's Tale Canvas Layout

Hello everyone.  So glad you stopped by because I have a fanciful, mythical page to share today.  I love these dragon chippies from Gina's, and I still had this beautiful paper from Die Cuts With a View (DCWV) called Once Upon a Time.  Yep, I am a hoarder, after all.  And a good thing, too, since this was a perfect match for my page today.


If you are a scrapbooker, I figure you could use this page layout with your pictures, just simply by moving some of the embellishments around.  If you are a mixed media artist, bookmaker, or general paper crafter, I thought this would be a nice layout for a canvas, book cover, or even a card, simply using the smaller shapes in the set, or doing a bit of rearranging.  No matter what I choose to make, I really enjoy playing with the different chipboard shapes and experimenting with different ways to embellish them.  So let me tell you what I did.

Lay out your chipboard and paper pieces that you plan to use.  Take a picture (optional) to use as a reference.
Adhere print paper to a 12x12 piece of mat board, distress edges and add brown ink to darken.  Make a very watery color combination using Twinkling H20s Mystic Blue and Douglas Fir, pick up with a watercolor brush and splatter over background .  Pick up those same two colors with a makeup sponge and apply to background through the stars stencil, as shown.

Begin embellishing your chipboard pieces.

Wrought iron border: Cover with black pigment ink and heat emboss with the Antiqued Iron embossing powder.  Adhere along top edge of page, as shown.
Once Upon a Time title:  Heat emboss with Versamark ink and Tarnished Gold embossing powder; edge with Branch Bark ink for depth.
Large standing dragon: Draw details in with pencil (Picture 1).  Mist lightly with water and begin embossing those lines with an embossing tool.  Color dragon as shown with Blue, Lime Green, Teal, Yellow, and Orange Inktense blocks (Picture 2), then go over those with similar colors of Twinkling H20s Mystic Blue, Golden Jade, Douglas Fir, Key Lime, Yellow Rose.  Add details back in by going over embossed lines with a black permanent marker.  Add Crackle Accents to body and Glossy Accents to wings (Picture 3). Adhere to page with foam dots.
Picture 1

Picture 2

Picture 3

Medium and small flying dragons:  Paint one coat of Oyster, then one coat of Warm Gray Silks acrylic glaze.  Combine the Mystic Blue with the Garden Jade Silks Acrylic Glazes and brush over both dragons, letting the colors run, heat with heat tool  Add Waterfall glitter glue to both.  Adhere to page with foam dots.
Flourish (flame): Color with Red and Orange Inktense blocks, then paint over that with Yellow Rose Twinkling H20.  Heat emboss with Versamark ink and clear embossing powder.  Adhere to page with glue, as shown.
Supplies used:

Gina's Designs Lasercuts:
Wrought Iron Set
Words and Phrases 2
Dragons Shape Set
Flourishes 2
12x12 Once Upon a Time Collection - Camelot (DCWV)
12x12 mat board (or chipboard)
ColourArte Twinkling H20s: Mystic Blue, Garden Jade, Douglas Fir, Key Lime, Yellow Rose
ColourArte Silks Acrylic Glazes: Oyster, Warm Gray
Tim Holtz Stars stencil
Ink Pads: Black pigment ink (Colorbox); Branch Bark (Prima); Versamark (Tsukineko); Black pigment ink (Colorbox)
Embossing Powders: Rustique Antiqued Iron (Judi-Kins); Tarnished Gold (Ranger); Detail clear
Stickles Waterfall glitter glue (Ranger)

I sure hope you have enjoyed my project today and that I have given you some good ideas and inspiration.  Stop by Gina's Designs Lasercuts to see all of the various laser cut chipboard available.  You never know what will strike your fancy!

Thanks for stopping by, and have a wonderful, crafty weekend!

Barbara

Tuesday, September 1, 2015

House of Cards September 2015 Monthly Challenge: Stitch It Up

Hello everyone, and welcome back to a new monthly challenge here at House of Cards.  I so enjoy seeing all the creations each month, not only from the design team, but also from you, the challenge participants.

This month's challenge is ...


SEPTEMBER 2015
Use Stitching (Faux or Real)

My card is fairly simple this month.  I used to do a lot of cross stitch and needlepoint, so I am familiar with a lot of different stitches. This came in might handy for my card this month.
I stamped the flowers onto white card and colored with markers. Then, I simply laid the card stock onto a soft surface, like fun foam, and pierced my holes for stitching along the stamped image.  

I used a die cut to make a frame (reddish pink paper) to go around my image, and the center part of the same frame was used to cut an opening (in the green print paper) for the stitched card to show through.  You can use any dies you may have that will fit around your stamped and stitched image.  


You can use whatever stitches you are familiar with.  I used a long stitch for the flower, and I made tiny french knots at the ends.  The green stems were done with a "stem" stitch.  
Now, do you remember these rub on dispensers from years ago?  If you don't have one somewhere in your stash that you've been hoarding, then you can make the faux stitches with a pen, making zig zag or broken straight lines.


But I had fun using this and, as you can see, the stitches did not always print out onto the paper, so I got broken stitches, which I actually liked.  I just thought it would be fun to show you this in case any of you still have one of these laying around, waiting for just the right moment, like NOW!  


I hope you enjoyed my card this month and that I have been able to inspire and entice you to play along with us in this month's challenge, which can be seen by clicking here.

Thanks for stopping by, and please come back on the September 3rd for MORE inspiration from this very talented Design Team!  We hope you join in the fun, too--please check out our House Rules HERE before linking up!  I can't wait to see your creations!

Barbara xo