

From the Glitz Design Vintage Blue 6x6 paper pad, fold the yellow polka dot paper in half and glue it together. Cut the top tag edges using the Art Deco corner scissors. If you do not have any of these scissors, you can use a punch instead. I inked the edges with Frayed Burlap distress ink.

Cut out the dancers image from the Color ATC Yellow collage sheet, distress and ink the edges. Die cut several different snowflakes using a Spellbinders die in two different blue print papers from the Glitz Design Vintage Blue 6x6 paper pad.

I painted the edges of each snowflake using Terri Sproul's Mixers (Smokey Quartz) and a water brush. Layer the snowflakes and glue to the tag. Attach a silver filigree jewelry piece to the center. I added more of the Smokey Quartz mixer with water to the filigree pieces to tone down the bright silver.

Now, for the fun part. If you have never tried this, you are in for a real treat. Go to the hardware store and buy yourself a roll of self-adhesive paper drywall tape. You will have enough to either remodel your home or share with a few friends.

The drywall tape tears easily and makes a really cool looking background piece when inked. After removing the backing paper, you can adhere it to your project.

However, for this project, I did something a bit different. I first removed the backing paper to reveal the adhesive and applied gold multi-color leafing flakes to the adhesive side. Isn't that beautiful?
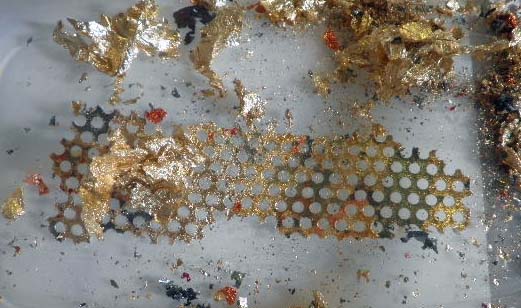
I simply put a dab of glue beneath the collage image to adhere it. I love the look of drywall tape when torn because it looks like honeycomb to me. It is so much fun to play with. I hope you will give it a try.

Another neat find I want to share is this beaded Christmas garland I found at Michaels for half price. I have been removing pieces of it to use in my art work, and I am getting a lot of mileage from it.

Here, I added pieces of the garland through the eyelet that I attached to run the ribbon through. The ribbon was ivory, but I found that Tim Holtz's Weathered Wood Distress Stain matched the blue in this paper perfectly. Scrunch the ribbon up while wet and dry it carefully with your heat gun to achieve that vintage crinkly look. So pretty.

For added interest, I added tiny dabs of Duo Adhesive and more gold multi-color leafing flakes to the background paper.
I hope you enjoyed my project today, and thanks so much for stopping by.
Happy crafting!
Barbara
Love your tag!
ReplyDeleteThis is beautiful. Love your artistic creativity.
ReplyDeleteThanks so much Robin and Brenda. Glad you liked it.
DeleteThis is just gorgeous Barbara. I love the beautiful layered snowflakes and how you transformed the joint tape.
ReplyDeleteThanks, Danie. I really love playing with that joint tape.
DeleteBeautiful, Barbara! Such great techniques and ideas. I'll have to raid my hubby's tool box and find some of that joint tape! LOL! Love your inking too.
ReplyDelete