Showing posts with label Halloween paper bag album. Show all posts

Thursday, October 17, 2013

Halloween Card and Paperbag Mini Album Continued

Hey there, Sin City Stamps fans, and welcome back to the continuing saga of my Halloween mini album.  We are proud to have The Robin's Nest sponsor us this month.  I cannot think of a better fit for two separate companies, fabulous papers and awesome stamps.


Supplies used:

The Robin's Nest:  Black and White ClockClassified card stock, Damask Black and White
Smooth white card stock (Neenah)
Distress Inks (DI):  Frayed Burlap, Dusty Concord, Brushed Corduroy,
Distress Stains (DS): Gathered Twigs
Distress Paints (DP): Crushed Olive, Ripe Persimmon
Ink Pads:  French Lilac, Black India Ink (Stewart Superior); Tuxedo Black (Memento)
Ink Sprays:  White Linen, Squeezed Orange, Fresh Lime (Dylusions); Wheat Grass (Maya Mist)
Dies:  Bewitching Hour, Crossbones and Bat Garland,  Mini Pumpkin and Acorn(Sizzix)
Miscellaneous:  Clock hands (Prima), Pitt White Artist Pen (Faber-Castell), Rock Candy Crackle Medium (Ranger), white gesso, green glitter nail polish (Walgreens), Purple Passion Glimmer Glaze, Auburn Mist, Peach Delight Mist, Wild Currant Mist (Tattered Angels)


Let's start today by colorizing and stamping onto some of the beautiful Robin's Nest papers.  We are showcasing their Classified Collection this month, which is a very elegant black and white line.  They are all printed with a resin that acts as a resist, making them perfect for colorizing and mixing up your media.  So, for my next little project,  I made this Fall card using  this piece of Damask Black and White card stock from one of my previous posts.
I needed to "Fall" it up a bit, so I added more Autumn colors to it, first misting over the original colors with Auburn, then some Peach Delight, and lastly Wild Currant.  I still need more orange, so I randomly spray Squeezed Orange.
You see, you can continue to color this wonderful paper over and over til you get what you want.  So don't be afraid that you might make a mistake...  there are NO mistakes!

This particular "scrap" measures 4-3/4" x 6-1/2", so I was able to tear bits off the remaining three sides to fit my card base that I made from a piece of Brown on Brown Animal Print, which I cut to 7" x 10", folded in half to make a 5" x 7" card.  I then adhered this piece to my base card.

Die cut two pumpkins from Orange Glitter Crackle card stock.  I am going to use the reverse (solid) side so they show up against my background paper.  I used my trusty embossing tool and foam pad to dimensionalize my pumpkins.
Then I used my water brush to pick up a tiny bit of Brushed Corduroy DI and run the color down in the grooves made with my embossing tool.  Adhere to card front with pop dots.
Stamp leaf image a couple of times onto Classified card stock with black India ink.  Mist paper with water, add Ripe Persimmon and Crushed Olive DP over images and spritz again.  Dab up excess paint. Spritz with water again and gently wad up your paper.  Carefully spread paper flat again and dry with heat tool.
Fussy cut the leaves and adhere to pumpkins.
Stamp Autumn and Blessings onto reverse (green) side of Halloween Glitter Stripe card stock.  Trim close to image, edge with green glitter nail polish,  and layer onto a slightly larger rectangle of Orange Glitter Crackle card stock.  Adhere to card front, as shown in finished photo above.
----------------------------------------------------------

As I said in earlier posts, this Halloween mini album is a work in progress.  There are so many pages, tags, pockets, nooks and crannies inside for me to embellish and decorate to my heart's content.  I am having so much fun with this book, and I want to continue to share my journey in the process of  making this book.

I have already shown you how to assemble the book.  If you missed that post, you can get those directions by clicking here.  And if you want to see more stamping techniques and supply list used, you can visit my previous post by clicking here.

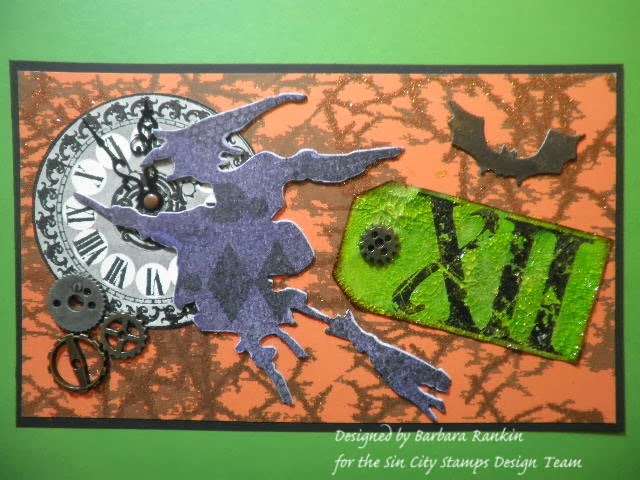
I am going to start with decorating a couple of the pocket tags that are inserted into the various paper bags. Like I said, this little book is jam packed with places to decorate.

Die cut witch and bat from chipboard, ink witch with French Lilac and mist lightly with White Linen ink spray.
Stamp row of diamonds, honeycomb, bubble wrap, and circles in black ink from the Art Journaling with Terri Sproul set.  I just love all of the elements in this set.  
I then used my white Pitt pen to edge the witch, using thicker lines along the edges I decided were where my light source was coming from.  In this case, it is upper right. Can you see the difference?
Cut out one of the clocks from Black and White Clock and adhere clock hands.   Rather than using a brad, I glued the hands down to the clock and added a tiny metal circle sticker to the center because the minute hand was a bit too long for the size of my clock, and it is going to be hidden by my witch die cut.  I also do not want the hands to move for this particular tag.
Stamp "XII" onto tiny tag with Versamark ink and emboss with black embossing powder.  That is, after all, the bewitching hour!
Mist first with Wheat Grass, then Fresh Lime.  It gave this mottled look, which I really like.  Heat set, but be careful doing this so you don't lose your embossed image.  Edge tag with Gathered Twigs DS.  
Add clear crackle medium and let dry. Adhere to large pocket tag.
Ink die cut bat with Black ink and mist with Black Magic.  Adhere to large pocket tag, and add a few metal gears for fun.
For my next pocket tag, I lightly painted white gesso on the smaller of the two paperbag pocket tags.
Sponge Crushed Olive DP over entire tag, and edge distress with Dusty Concord DI.  Die cut crossbones garland from cream card stock and sponge with Dusty Concord DI.  Die cut bat garland from black card stock and sand to distress.  Adhere to tag, as shown.
Stamp row of diamonds and honeycomb in black ink, as shown.
Stamp lady waiting clock face in black Memento ink onto smooth white card stock.  Mist with Dylusions ink sprays (Fresh Lime, Squeezed Orange).  Roughly cut out the circle and heavily distress the edges; ink with Gathered Twigs DS and sponge Frayed Burlap DI around the edge.  This gives a really burnt edge effect.
Add two spinners with a brad.

To finish, die cut owl from chipboard and colorize with Dusty Concord DI.  When dry, paint a coat of Purple Passion Glimmer Glaze.  Paint eyes with green glitter nail polish.  Adhere with pop dots over clock face, as shown above.   Add diamond shaped dew drops over diamonds stamped image.
Whew, another long post, but I just can't stop going sometimes.  Don't these tags look like fun?  Well, they really are, especially since they are going to decorate my mini album.  But do you know what else you could use these for if you are not a book maker?  These would be wonderful additions to the front of a card.   And the card above would make a cool addition to one of the pockets in my book. 

Well, I have kept you long enough.  I hope you enjoyed my projects this month and that you are inspired to make your own Halloween cards and mini album.  And please take a moment to visit the Sin City Stamps online store and blog for more inspiration from the design team, as well as checking out the fab papers and embellishments from our sponsor, The Robin's Nest

Thanks so much for stopping by, and have a wonderful, creative weekend!

Barbara

Wednesday, October 16, 2013

Halloween Paperbag Mini Album Directions

Hello again, and welcome back.  I am always glad to have you stop by.  As I promised in my previous post, I am going to share with you my directions for making this mini paperbag album.   For this post, I am only sharing the supplies used to make the book, since my previous post includes the supplies I used for embellishing the book after it is put together.  If you missed it or would like to see it again, here is the link to that post.

This book started out as packaging inserts, that is, pieces of cardboard to protect the box contents.  I knew as soon as I saw it that it was going to be the beginning of a fabulous book.  Well, here is a picture of the front cover, what do you think?


Supplies used:

Corrugated cardboard packaging for cover (9" x 5-1/4" x 1")
Cover:  6" x 9" for outside (2), 3" x 5-1/4" corrugated cardboard scrap for outer spine, 3" x 6" for inner
             spine, 5-1/8" x 8-5/8" for inside (2)
3 Orange, 3 Black Paper bags (9" x 4-3/4")(Michaels)
Paper bag sizes:  4-1/2" x 7-1/2"for bag front (6), 4-1/2" x 6-1/4" for bag back (6), 4-1/2" x 2-1/2" for
                           bag pocket (6), 4-1/2" x 5" (pocket flaps)
Paper bag pocket tags:  6-1/4" x 4-1/2" and 7-1/2" x 4-1/2"
Small pockets formed by bottom of paper bag:  #8 black tags (Ranger) or cut CS to measure 3-1/8" x 6-1/4"
Small ring binder (Tim Holtz)
Cardstock:  Black Bats Glitter, Pumpkin Glitter,  Bones Orange, Ghost Camo GlitterHalloween Glitter StripeHaunted HouseOrange Glitter CracklePumpkin HeadsPurple Bats GlitterPurple Glitter CrackleSpider Web GlitterWitch Accessories Glitter (The Robin's Nest)
Martha Stewart PATP spider web punch set
EK Success 1-3/8" square paper punch
Maya Mists: Orange Juice
Tattered Angels Glimmer Mists:  Black Magic, Fully Purple


Directions for making the book:

These scraps of cardboard came in an appliance box, or something like that.  The white piece was already folded and looks very much like the beginnings of a book.  And guess what, it is going to be a mini album very soon.  I tore off the top paper layer on the larger piece of cardboard for that shabby chic look.  Measurements are listed above, so you would, of course, change them to suit your album cover.  These instructions apply to my piece of cardboard.  You can, of course, make your own from chipboard cut to the same size.
Spray corrugated cardboard spine with Orange Juice, Black Magic, and Fully Purple mists.  Let dry.
outside spine cover
Adhere black bats glitter spine piece to inside spine.  Make creases where the book folds before the glue dries.
book inside
Make tiny slits where the book folds and then turn excess CS over and adhere to the inside.
Mark and punch holes for the binder rings.  Do not attach the binder ring yet.
Mark holes on outside and punch
Adhere Pumpkin Glitter card stock (CS) to outside cover, mitering corners and turning excess CS to inside.
outside cover
Then glue two Black Bats Glitter CS to the inside covers.  Add ring binder to the inside spine now.
inside cover
 The binder ring brads show on the outside of the book.
You will need to cover that by adhering the cardboard spine to outside cover.

cardboard spine adhered to outside cover
Trim off open end of envelopes to measure 8".

Trim various printed papers using measurements given above.  I laid my papers out first to decide which ones would be my covers and spine, and which ones would be placed on each of the paper bags front, back, and pocket sections.  I have listed above all of the Robin's Nest papers used in the making of my book.

Adhere each piece to your paper bags.  You can arrange the papers in any order you desire.  You will need to punch two holes along the bottom edge of each of the bags to accommodate the ring binder.  

To make a thumb hole, punch half of the 1-3/8" square punch in the top of each bag to allow for easy removal of your tags.
Glue each of the bag bottoms down to form pockets for insertion of tags. Below is pictured an orange bag with pocket on the left, a black bag covered, with flap, on the right.  Each bag will have a pocket on one side and an opening with a flap on the other.  I used black #8 tags for the pockets formed by folding the bag bottom up (left side of book).
To make the pocket flaps, I again chose coordinating, but contrasting, papers and cut them to size.  I punched each flap using the spiderweb PATP punches, and made a score line at the 2-1/2" mark from the punched edge.
In order for the PATP punches to punch accurately, your flap has to measure 5".  This, however, is just slightly too large to insert into the 4-3/4" wide paper bag.  So, I trimmed off slivers from both the top and bottom, angling my cut from the edge of the punched web to the edge that will be inserted inside the bag.  Adhere flaps to the bottom gusset of each bag, as shown in photo.  You want to be able to insert a tag when you open the flap.

To make the tags, I cut 6 pieces of black CS to 7-1/2"  4-1/2", and 6 pieces to 6-1/2" x 4-/2".  Then I adhered various print papers to each tag, trimming the print papers slightly smaller (1/4") than the tag.  Two tags will be inserted into each paper bag.  The shorter tags fit in the back gusset of each bag.
I hope you have enjoyed my book in progress.  I will continue to post my progress throughout the month.  You can follow along if you like now that you can make your own book, or simply do your own thing.  You are the artist.  So have fun with it.

Thanks so much for stopping by, and have a wonderful week.

Barbara