Monday, December 9, 2013

Christmas Gift Card Envelopes with Altered Pages

Hello everyone!  Barbara here with my first post for December.  And what cold weather we are having this year. How about you?  Hope everyone is staying toasty warm this winter.  And to help you out with that, I have some fun gift card envelopes for you to make at home for your special friends or relatives that are hard to buy for.  And Altered Pages has all the supplies you need to make these wonderful gift presentations.


Supplies Used:

Gathered Twigs distress ink
Decorative punches (pine branch, chain)

Cover coin envelopes with print papers from the Joyeax Noel paper pad.   To do this easily, I simply opened up the envelope and glued the right side of the envelope to the wrong side of my print paper.  (NOTE:  Ensure that your paper is going in the correct direction, if necessary).  
Cut out around the envelope and score fold lines.
Add a scrap of paper to the top flap on the reverse, then reattach side and bottom flaps with more glue.
Ink edges with gathered twigs distress ink.

Red gift card envelope:  Lay snowflake stencil over envelope, spritz with Dylusions white linen spray.  Remove stencil and let dry.  
Punch scalloped circle doily from print paper.  Fussy cut Santa and adhere Santa with foam dots over doily.  Add a bit of white Wink of Stella to Santa's hat and beard.
Green Angel gift card envelope:  Color ribbon with watered-down Peeled Paint distress ink, tie around envelope.  Make rumpled ribbon rose from another piece of green dyed ribbon and adhere over knot.  Fussy cut Angel, adhere to envelope with foam dots.  Add a few sprigs of green print paper punched with pine branch punch and some clear Wink of Stella to the angel.
 
Brown print gift card envelope:  Punch chain from brown print paper and wrap around envelope.  Flatten a bottle cap and color edges with gold Krylon pen.  Adhere giant rhinestone to center of cap.  Adhere bottle cap and a few sprigs of green print paper punched with pine branch punch.
 I hope you have enjoyed this quick and easy project for your last-minute gift giving.  It makes giving a gift card so much more personal when presented in a handmade gift card envelope.  And if you still need something to give your craft friends, there is still time to check out the fabulous products and new line of Altered Pages original art stamps, too.  So check them out and see what fabulous gift giving ideas you can come up with.

Thanks so much for stopping by, and have a wonderful week.

Barbara


Thursday, December 5, 2013

Winter Wonderland Sliding Easel Card

Hello everyone, and welcome to December!!!!  I hope everyone is having a wonderful winter and great holiday season.  Today I want to share a fun card with you that can not only be beautiful, but can stand alone, literally.  I love dimension, as well as interaction, and this card does both.  I also wanted to play with my new stamp set from Sin City Stamps, Winter Wonderland.  I love the vintage images on this plate, and I think you will, too.

slider in closed position 


slider opened to reveal message

Supplies Used:

Sin City Stamps:  Winter Wonderland
5" x 7" Kraft Card
Print papers:  Glistening Collection (Authentique)
Dies:  Circle (Spellbinders), Doily (My Favorite Things)
Ink Pads:  Brilliance Lightning Black (Tsukineko); Iced Spruce distress ink (Tim Holtz)
Tab punch (Stampin' Up)
Snowflake border punch (Martha Stewart)
Starform glitter lines stickers (Ecstasy Crafts)

Directions:

Cut print paper to 5" x 7".  Follow diagram below to cut a window in this layer.
After you cut and fold this top layer, it will look like this.
Trim a pull tab layer to measure 3-1/2" x 6" and adhere bottom of pull tab piece to bottom fold of window opening.
Before I adhere this to the card front, I want to make a pencil mark for where to stamp my phrase.
Center and stamp Let It Snow with Brilliance ink.  Erase pencil marks.
Add a tab punched from tan print paper to center top of pull tab layer.  (NOTE:  You can use any shape you have to make a pull tab, a circle folded in half, for instance, or just make your pull tab layer longer than 6", i.e.,  6-1/2", so that it extends past the card top.
close-up of tab

full view of tab
Turn card layer over and add adhesive strips around side and bottom edges only.  Leave top free for the pull tab layer.
Adhere to top of base card.
Stamp skaters onto blue print paper with Brilliance lightning black ink, die cut into circle.  Die cut doily from coordinating tan print paper.  Attach circle to doily with foam tape for dimension.
Die cut street light from dark gray print paper.  Add and trim small piece of transparent tape to back of light fixture and add tiny piece of gold gilding flake to sticky side of tape, rubbing gently to remove excess.
Adhere both the street light and doily skaters to the front easel piece, as shown, being sure not to add adhesive past the easel itself, and not to interfere with the movement of each fold.  (See photo of finished card.)

Punch three snowflake strips from tan print paper.  Edge snowflakes with Iced Spruce distress ink.
Adhere to all three sides of card front.  Add glitter lines stickers around perimeter of card to finish off all edges.
Here is a view of the card from the side.
I hope you enjoyed my tutorial for this fun easel card.  They make wonderful cards to display by the recipient, and with Sin City Stamps, you have all the tools you need to make fabulous cards.  So check out all the new products here, and the fabulous sale going on this month.  Even all of the newest products are on sale.
Thanks for stopping by, and have a wonderful weekend.

Barbara

Monday, December 2, 2013

Snow Angels and Christmas Tree Cards

Happy December, everyone.  This month, we are featuring the Russian Winter Collection of papers, and we are also sponsored by another wonderful company, Ecstasy Crafts.

The rush is on to finish up on those Christmas cards so you can get them in the mail.  I have made two more cards for you to hopefully inspire and motivate your creative juices.


Supplies Used:

The Robin's Nest:  Winter Glitter Snowflakes cardstockGlitter Winter Words cardstock,  Boy Polka Dot Stamp card stock,  Silver Classic Glitter card stockPeach Classic Glitter cardstockGold Classic Glitter cardstock, Robins Egg Blue Classic Glitter CardstockWinter Glitter Chipboard SnowflakesGreen Glitter JournalingVellum - Silver Classic SwirlVellum - Irredescent Glitter Swirl, Ocean Blue Mini Dew DropsFushia Mini Dew Drops, Metallic Silver Dew Drops
Christmas Tree Sticker, Stars Stickers (Ecstasy Crafts)
Punches:  3-Dot Scallop, Cathedral Arches,  (Martha Stewart); Mini scallop edger, 1/2" circle, 3/4" circle, 1" circle (EK Success)
Dies:  Doily (Sizzix), Flower Rosette (Memory Box)


Directions:

My first card, Snow Angel, is inspired by Laura Denison's paper rosette angel.  She has a wonderful how-to video on youtube here.  While there are many different versions of paper angels, I really liked this one the most for adhering to a card and just had to share.  It is dimensional without the addition of more layers for wings, etc.
Cut Winter Glitter Snowflakes cardstock to 6" x 12", fold in half to make a 6"x6" top fold card.

Cut the words "Snow Angels" from Glitter Winter Words cardstock to 1" x 5".

Trim around a Green Glitter Journaling label and adhere "Snow Angels" to center with foam dots, covering the journal lines.
Adhere to top of card at an angle, as shown.

To make the rosette angel, cut papers as follows:
3" x 4-1/2" Silver Classic Glitter card stock (skirt)
1-3/4" x 5-1/2" Vellum - Silver Classic Swirl (wings)(2)
3/4" x 5" Gold Classic Glitter cardstock (halo)
3/4" circle Silver Classic Glitter card stock (1/2" circle punched off center to form halo behind head)
3/4" circle Peach Classic Glitter cardstock (1/2" circle punch centered inside, cut in half) (arms)
1/2" circle Peach Classic Glitter cardstock (face)
1" circles (to hold rosette together) (2)

Before using edge punches on skirt, wings, and halo, score each strip of paper every 1/4", then punch your decorative edges, as follows:

 3-Dot Scallop along skirt bottom
Cathedral Arches along wings
Mini scallop edger along halo

Follow directions on video to put the pieces together.  Here are the pieces ready to assemble.
Adhere angel to card, as shown.  Here is a close-up of her.  I added a metallic silver dew drop to the center of the chipboard snowflake, and added a sprinkling of blue dew drops in the background.
For my second card, I wanted to use some of the Starform Stickers from Ecstasy Crafts, our co-sponser this month.
Cut Boy Polka Dot Stamp card stock to 5-1/2" x 11", fold in half.  Do the same with the Vellum - Irredescent Glitter Swirl card stock.  Insert the polka dot paper inside the vellum.  Tie together along the spine with a piece of iridescent ribbon.

Die cut a doily from green card stock, and a rosette from Robins Egg Blue Classic Glitter Cardstock.  Adhere rosette to doily, but leave the rosette loose so it will fit to the edges of the doily, as shown.
Adhere Christmas tree sticker to a piece of Gold Classic Glitter cardstock.
Trim around the sticker close to the edges.
Adhere tree to center of doily with foam tape, covering the rosette opening.
Adhere Fushia Mini Dew Drops to tree, as shown.  Glue to center of card front.  Add some star stickers  from the same sticker sheet, and a couple of Winter Glitter Chipboard Snowflakes to opposite corners of card, as shown.

Here is a close up.
I hope you have enjoyed my Christmas cards using the Russian Winter paper collection and Ecstasy Crafts stickers.  Both products are so beautiful and work so well together.  And the stickers look like you spent hours heat embossing the images.  Very easy to use.

So please take a moment or two to visit the Robin's Nest online store to see this awesome collection, which is one sale this month for 20% off, and then take a look at the wonderful products that Ecstasy Crafts has to offer, too.

Thanks so much for stopping by, and have a wonderful week.

Barbara

Thursday, November 28, 2013

Happy Thanksgiving

Happy Thanksgiving everyone!  I made this card especially for you, because I am thankful for you.


Supplies:

5" x 7" kraft card
Tim Coffee Cottage Garden print papers & embellishments (K & Company)
Sizzix thinlits die - Border, Label, Medallion & Key
Chipboard
Vintage Photo distress ink

It is a very simple card, so I have very little instructions.  Here are the parts for the base of my card.  
I cut the die cut in half diagonally, as shown, and adhered to the reverse of the collage image, which I had adhered to a scrap of chipboard for strength and dimension.
Roll two opposite corners and add a few flowers on pop dots to disguise your cut die piece. (See photo of finished card above).

And that is it.  

Thanks for stopping by.  

I wish everyone a very  happy, fun-filled, and blesssed day today, and every day.  

Barbara

Wednesday, November 27, 2013

Christmas Triptych with Altered Pages Instructions

Hi everyone, Barbara here with one of my favorite art forms, the triptych.  With the Christmas holidays fast approaching, I wanted to make a Christmas triptych.  If you missed my post earlier this week, I did not give any instructions for how I made this.  So, I thought I would post them for you here today.  I hope you enjoy it and are inspired to give these beautiful art forms a try.

So,  some of you have asked, what is a triptych?  Wikipedia defines it:  
triptych (/ˈtrɪptɪk/ trip-tik; from the Greek adjective τρίπτυχον ("three-fold"), from tri, i.e. "three" and ptysso, i.e. "to fold" or ptyx, i.e. "fold")[1][2] is a work of art (usually a panel painting) that is divided into three sections, or three carved panels which are hinged together and can be folded shut or displayed open. It is therefore a type of polyptych, the term for all multi-panel works. The middle panel is typically the largest and it is flanked by two smaller related works, although there are triptychs of equal-sized panels.
Side 1 - Vintage Christmas
Side 2 - Traditional Christmas
Supplies used:

Altered Pages collage sheets:  Happy Holidays (AP-505), Holiday Postcards (AP-1155), Ivory Angels (AP 2090), 
Christmas Emporium 8x8 paper pad (Graphic 45)
Graphic 45 Coredinations Cardstock
Vintage Text Paper
Faber-Castell Big Brush Pen (Brown)
German Scrap
4x6 chipboard pennants (Paper Accents) (3)
Hinges (Tim Holtz)
Distress Stain:  Old Paper (Tim Holtz)
Copper Metallic acrylic paint
Ink Pads:  Dark Moss Chalk (Colorbox)
Doily die (My Favorite Things)
Ornate Frame die (Tim Holtz)
Mini Rosettes die (Tim Holtz)
Botanicals, decorative brads, bling

Directions:

Cover one side of three pieces.  This will be the front side of the triptych.

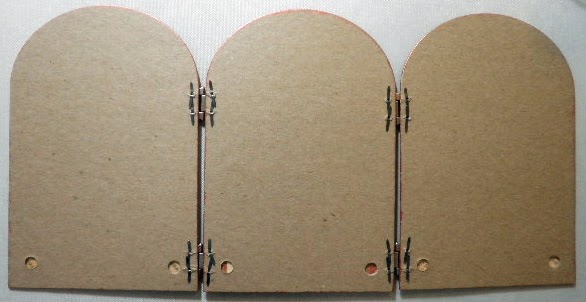
Attach hinges, as shown.  


Reverse side - brads holding hinges show
Cover the remaining sides of the three pieces, covering the brads that hold the hinges on.

Die cut ornate frame from Christmas Emporium red print paper and chipboard, adhere together.
Center holly flower girl (AP-1155) in center of frame and trim to fit inside opening.  Use brown big brush pen to finish off the frame edges.

Adhere to center panel with foam dots.  (see photo below)


Die cut one doily from Astroparche paper, distress edges with Vintage Photo, and cut in half.

Cut out two half circle poinsettia images (AP-505) and adhere to each half of the doily die.  

Adhere to both side panels, as shown.
Die cut two mini rosettes from vintage text paper.  Add a strip of washi tape to back of rosettes to give this fragile paper more strength.  
Form into rosettes following directions on die.

Stamp a "2" and a "5" onto a scrap piece of the vintage text paper with moss chalk ink.  Punch out with   1/2" circle punch, adhere each to center of rosettes.  Add 1/2" epoxy circle to center.

Add oval centers (removed from center of ornate frame die cut) and add to both outer panels, as shown.
Trim "Angels" image from AP-2090.  Adhere images to ovals, add botanicals and gem flourishes, as shown.  

close-up of decorative brad covering ends of botanicals
For reverse side, trim and distress edges of Climbing Santa, Merry Christmas Santa, and two ivy spray (AP-505-Happy Holidays), Santa with child  (AP-1155-Holiday Postcards).  Add Old Paper distress stain to edges and adhere to coredinations cardstock cut slightly larger than image.  Adhere to reverse side of triptych, as shown.

Adhere a strip of German scrap to the bottom of each panel.  If you want to tone down the bright gold color, you can apply a thin coat of a black metallic cream or black archival ink and wipe off excess.
A few close-ups of the botanicals and embellishments.

I hope you have enjoyed my Christmas Triptych and directions for making it.  These are very easy to make and are so beautiful as stand alone decorations for any occasion.

You can get all your supplies to make this at www.alteredpages.com.  And don't forget to stop by the Altered Pages Monthly Challenge Page to see all the inspiration from the design team, and go vote for your favorite in the side bar.

Thanks for stopping by.  Happy Thanksgiving to you all!

Barbara