Tuesday, July 23, 2013

CHA Release-Eileen Hull's New Sizzix Collection Sneak Peek

Welcome my fellow die cutting friends.  I am so glad you stopped by today.  I want to share with you Eileen Hull's newest collection from Sizzix, debuting today at CHA.  I was so honored to be asked by Eileen to make some CHA samples for her using this new collection she calls "Cherish".  It is absolutely to "die" for.  There are several pieces in this collection.  These would be so wonderful to celebrate the birth of your baby or a friend's baby, a grandchild, a baby shower, gift giving, you name it.  Check out her video here.

Cherish Collection by Eileen Hull

First up is this adorable baby crib.  I fell in love with this one the minute I saw it.  I used papers from the Prima Art Journal pad as my background for most of the pieces.  However, I used papers from the Prima "Fairy Belle" collection entirely on the crib.  Real wood paper was used to cover the rockers at the bottom and some vintage photo distress ink added to get the color I wanted.  It also helped the real wood grain show up.  As always, I used my Xyron 850 to apply adhesive to each paper piece before adhering them to the chipboard.


Found this little stuffed sheep toy in the miniature doll house section of my local craft store.  Isn't he adorable sitting in the crib, waiting for his playmate?


Of course, Prima flowers, a tiny fairy charm, and a butterfly cut out from the paper are added.  I used the chipboard part from the center of the crib (side) and added the paper with "Flower Song".  I think it made a nice embellishment as well.  Nothing goes to waste here.  


A few more Prima flowers and some metal fairy and decorative charms are added to the reverse side.


Now we have a cute rocking chair.  I used the Prima art journal papers for this one, added some pretty lace and trim that I inked to match, more Prima flowers and pearls, and real wood paper for the rockers again.  Of course, what chair isn't complete without your favorite puppy sitting in it?


Here is the cutest baby food jar.  I also used the Prima art journal paper on this, inked edges with distress inks in matching colors, and a gold corrugate paper for the lid.  A piece of Gina's Designs lasercut doily behind a metal charm and a picture cut out from one of the Fairy Belle papas added to the front.  A smaller metal charm and silver paper added to the spoon, held onto the jar with a piece if baby pink pearls.


On the reverse side, I fussy cut an image from the same paper and  added 3D Crystal Lacquer to her face for added dimension.


This would make such a cute favor box for any event.


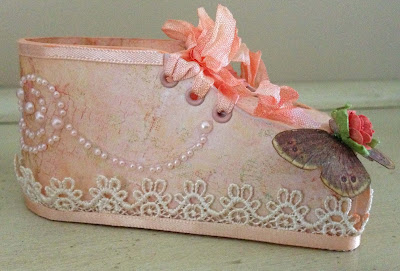
Okay, and here is the 3D baby bootie.  Art journal paper used for the background, Prima flowers, lace, pearls, fussy cut butterfly from Fairy Belle paper, and 5/8" seam binding colored to match were all added to make this a super cute display piece.  This would also make a fabulous favor, as well.


And lastly, three boxes, or building blocks, to use either as display pieces or for gift giving.  I chose to make these into small gift boxes.    Art journal paper from Prima, lace, seam binding, chipboard die cuts, pearl string, and prima flowers added to finish off each piece.  On the largest box, I first ran the paper through my die cut machine using the honeycomb embossing folder from  Sizzix 658455-Basketweave and Honeycomb set, and hit the high spots with various colors of distress inks.  It gave a wonderful texture to the paper.


I hope you have enjoyed this little sneak peek of what is coming your way very soon.  And be sure to check out Eileen's blog to see what else may be headed your way.  I know she has the most wonderful mini album coming out that you are going to want big time.  

In the meantime, thanks so much for stopping by, and have a wonderful crafty week!

Barbara

Monday, July 22, 2013

Barbara's Creative Paperclay® July Tips

Hey there, Creative Paperclay® fans.  Barbara here to share with you this month's tips and techniques.  A few weeks ago, I shared my rosewater bottle that I decorated with roses made using Creative Paperclay®.  As I was making these roses, I realized I had a few more tips to pass along.  


First of all, when you push these small pieces of Paperclay® onto your craft sheet, they are quite thin and want to stick.  


I found that the easiest way to scoop these petals up without distorting them is slip a simple piece of card stock beneath the clay.  This worked extremely well.  No need to go out and buy an expensive spatula when you probably already have card stock on your desk right now. 


However, sometimes tools are good to have, especially when you can use a coupon from your local craft store.  I found this clay tool in my local craft store that had several tips, two of which were rubber shapes.  I found the rubber shapes made it quite easy to, not only neaten the edges of my leaves, but I could also smooth out any crack lines.  I also used it to make the veins.   I have to say it really made the whole process so very easy and fun.


When rolling out a long strand of clay, such as this, you need to use the heel of your palm to keep it even and stretch it out as you roll your clay back and forth.  Move in a back and forth, side to side,  motion to continue stretching the strand. 


I hope you enjoyed my tips and can put them to good use when working on your next Creative Paperclay® project.  

Thanks so much for stopping by today, and please be sure to visit the Creative Paperclay blog and online store to see what is new, and what the fabulous design team are making to share with you.  And I would love it if you would visit my blog at Black Hole Art Studio to see some of my other work.

Have a wonderful and creative week!

Barbara 

Thursday, July 18, 2013

Artist Trading Cards with Sin City Stamps

Hello everyone, and welcome back to the blog.  As I promised you in my last post, I want to share with you today the ATCs that I made to fit in the altered ATC box, which can be viewed here.

So, what are ATCs?  They are Artist Trading Cards, similar to baseball cards, at least in size.  ATCs are always 2-1/2" x 3-1/2", and can be decorated in either a horizontal or vertical format.  I tend to prefer the vertical format, but this is just a personal preference.  ATCs are meant to be traded only, and unlike baseball cards, are never to be sold.  You always want to sign, date, and number your ATCs.  If you make one ATC or 10 ATCs, number it 1 of 1 or 1 of 10, 2 of 10, and so on.  So let's get started.
Supplies:

                             Art Journaling with Terri Sproul 2
                             Love of Butterflies
                             Rosette Hearts
                             A Wing Above the Rest
                             Birds and Clocks
Gold Glitter Cardstock (The Robin's Nest) 
Kraft Cardstock (Paper Studio)
Encore Gold Metallic ink (Tsukineko)
Black archival ink (Ranger)
VersaFine Onyx Black archival ink (Tsukineko)
VersaFine Vintage Sepia archival ink (Tsukineko)
3-D Crystal Lacquer
Distress inks:  Evergreen Bough, Spiced Marmalade, Shabby Shutters, Peeled Paint,  Faded Jeans, Dried Marigold, Picked Raspberry, Fired Brick, Soot, Brushed Corduroy)
Woodsies wooden shapes
Helmar 450 glue
German paper scrap (gold embossed borders)

Directions:

First, cut pieces of Kraft cardstock into 2-1/2" x 3-1/2".

The most cost-effective way to cut a piece of 8-1/2" x 11" cardstock that will yield 10 ATCs is shown below:
Stamp background image from the Rosette Hearts plate with Encore gold metallic ink.  

I chose to heat emboss  the ATCs on the left with gold embossing powder (EP).
Stamp background image from the Rosette Hearts plate with VersaFine black ink on one ATC, and VersaFine sepia brown on the other.  Here are the four bases for my ATCs.
TIP:  When stamping a large stamp onto a smaller piece of paper, I find it easier to turn the stamp over and lay my paper piece down onto the stamp.  That way, I can see exactly where I am stamping.
Allow the inks to dry before proceeding, or speed it up with a heat gun.  Patience is never a virtue when it comes to art.

I made four heart shaped woodsies, similar to the ones I made in my last post.  You can see the tutorial there.
I placed my woodsies on each of the four ATCs to audition their placement.  Then I decided what stamps I wanted to use around them.  

I used the gold stamped piece for my first ATC.  Stamp the small flourish and "ART" from the Art Journaling with Terri Sproul plate with black ink.  Stamp the script background and rosette from the Rosette Hearts plate.  (TIP:  When stamping script background images, ink portions of the image unevenly for that artsy look.)
I rounded the corners on my ATCs, but this is just a matter of personal preference.  Then I distress inked the edges.  

Adhere the woodsie and sign the back of your ATC.  (TIP:  If you add dimensional objects to your ATC, it makes it easier to sign the back first.)
Here is a free ATC back template I found online from craftingwithstyle.blogspot.com.  
The remaining ATCs were made in a similar fashion.  Close-up pictures are provided below.
Background stamped with Vintage Sepia archival ink, add Scattered Straw, Peeled Paint, Faded Jeans, and Dried Marigold distress inks to background; stamp Rosette Hearts border,  Love of Butterflies mini butterfly, Art Journaling with Terri Sproul 2 brick background and Friends with black ink, sponge on Encore gold metallic ink randomly, ink edges black, fussy cut butterfly, add woodsie, bling, and a piece of German scrap that you antiqued with archival black ink.   

German scrap antiqued with archival black ink

Background stamped with Black Onyx ink, Spiced Marmalade,  Peeled Paint,  Faded Jeans, Dried Marigold, Fired Brick, Soot, Brushed Corduroy sponged over background; A Wing Above the Rest STEAM (black) and steam engine gold embossed, small piece of German scrap, tiny gear.
Background stamped with Gold metallic ink and gold embossed, sponged black soot distress ink over all,  Art Journaling with Terri Sproul 2 small flourish in black archival ink, Birds and Clocks hummingbird in black ink, colored with Peeled Paint, Picked Raspberry, Faded Jeans, Scattered Straw distress inks, cut out, added to front with woodsy, heart locket charm, small bits of German scrap.
I hope I have inspired you to try your hand at making some ATCs and swapping with friends.  I also like to use ATCs as focal points on cards, in my art journals, altered books, and scrapbooks. Can you think of some more creative ways to include ATCs in your art?  

Before I close, I also want to tell you about these two fabulous stamp plates that are now available; Nautical 1 and Nautical 2 are ready for shipping.  I love both of these sets and I think they would make great summer page layouts for those beach vacation pictures, as well as making great masculine cards.  Or how about a mini album for saving your beach treasures.  Check these out in the Sin City Stamps store.  
Best of all, you can get 20% off your entire purchase during the month of July.  Just use the coupon code:  nautical20 .  So go stock up now!  And with every purchase, you are entered into the Sin City Stamps $1,000 Giveaway.  Click here for the official rules.

Also, be sure to visit the Sin City Stamps blog often to see what wonderful creations the design team has in store for you!  They are extremely talented and full of wonderful ideas to share with you.

Have a wonderful weekend, and as always, thanks so much for stopping by.

Barbara

Monday, July 15, 2013

Friendship Cards with The Robin's Nest

Hello again, and welcome back.  So glad you stopped by today.  The Robin's Nest is really rockin' this month with some fabulous animal print papers that are on sale all month for a whopping 20% off.  Pair them with these fabulous glitter papers for perfect color matches. Let me show you what I mean.

I have a couple of simple cards to share with you today, but when you have beautiful Robin's Nest papers to work with, it makes it so easy.

Supplies:

The Robin's Nest Products:
Dino Feet Glitter Cardstock
Sour Apple Classic Glitter Cardstock
Brown Classic Glitter Cardstock
Pink Leopard on Pink Glitter
Creme Glitter Card stock
Chocolate Brown Classic Glitter Cardstock
Gold Classic Glitter Cardstock
Cherry Chocolate dew drops
Easter dew drops
White Alpha Sticker Letters
Gina's Designs Ornamental Bird Cages
Sizzix Fancy Tags die
Diamond Fence Border larges edger punch - Martha Stewart
Coffee Shop rubber stamp - Magenta
Coffee and Friends rubber stamp - Inkadinkado
Little Bird rubber stamp - unknown
Black Archival ink
Gold metallic ink pad (Encore)
Pearlustre Champagne embossing powder
Black embossing powder
Markers (Distress and Copic)
White 5/8" seam binding
Distress ink pads (Vintage Photo, Moss Green)

Directions:

I used the Sizzix die to cut the card base from Sour Apple Classic Glitter Cardstock.  The card measures 4-1/2" x 6".  You can make your own without the die and use any decorative edger punch you have.
Layer 1 measures 4-1/4" x 5-3/4", cut from Brown Classic Glitter Cardstock.

Layer 2 measures 4" x 5-1/2", cut from  Dino Feet Glitter Cardstock.  I thought the design on this paper looked a bit like bird's feet.  But after I got the card together, I then thought they looked more like tulips.

I colored one of Gina's Designs Ornamental Bird Cages using gold metallic ink pad.
I then embossed with champagne pearlustre embossing powder.  Reheat the embossing powder (EP) and sprinkle on a tiny bit of black EP, allowing it to melt into the hot EP.  This will give you the look of antiqued gold.

I colored a piece of seam binding with the moss distress ink, ran it through the hole in the top of the birdcage and adhered it to the card front, as shown.
Next, I stamped a tiny bird image and colored it with markers.  Then I fussy cut it out and layered it on top of the bird cage.
Add the letter stickers to spell "FLY" using the White Alpha Sticker Letters and add some Easter dew drops to the newly formed tulips (not dino feet any more), and you have a really cute, fun card.
My next card is equally simple, but I really love how these papers make them look like a million bucks!
 
I used the Sizzix die to cut the card base and layers for this card as well.  These are the pieces I used.  
The base card is made from Creme Glitter Card stock, second layer from Chocolate Brown Classic Glitter Cardstock, and top layer is from Gold Classic Glitter Cardstock.  I used the diamond fence border punch to cut a strip from the Pink Leopard on Pink Glitter.

On stamped both images with archival ink onto a scrap of white cardstock.  I colored the coffee shop image with markers, then distressed both pieces before adding Vintage Photo distress ink all over.
I assembled all the layers and added my stamped images, as shown.  I used pop dots to raise the sentiment.  Added some Cherry Chocolate dew drops to the bottom, and again, a really fun card completed in no time to send to your friends.

I hope you enjoyed my card projects today and are inspired by these fun, beautiful animal prints.  
Animal prints are on sale all month at a whopping 20% off, and you can check out all of the wonderful papers and embellishments in this and all categories right here.  And a special thanks to our sponsor this month, Gina's Designs, for sharing their fun products with us to share with you.

Be sure to visit The Chattering Robin's Blog regularly this month for more animal print fun from the fabulous design team.

Thanks so much for stopping by, and have a wonderful week!

Barbara


Friday, July 12, 2013

Exciting News!

Hey there everyone!  Welcome back to my blog.  I have some exciting news to share with you today.  I made the Sin City Stamps design team for another term.  I cannot begin to tell you how happy I am because there just in not anything better than working with the people and products you love.  I absolutely love their stamps and accessories, and I know you will, too.  

Their stamps are high quality rubber and they have such wonderful designs.  Also, their stamps are designed, pressed and packaged in-house, enabling them to charge less than their competitors.  They also stock Sticky Thumb Adhesive products. So be sure to check out their online store for monthly specials and great stamps!

And speaking of specials, here is one you won't want to miss.


These two fabulous stamp plates that are now available; Nautical 1 and Nautical 2 are ready for shipping.  I love both of these sets and I think they would make great summer page layouts for those beach vacation pictures, as well as making great masculine cards.  Or how about a mini album for saving your beach treasures.  Check these out in the Sin City Stamps store. 
Best of all, you can get 20% off your entire purchase during the month of July.  Just use the coupon code:  nautical20 .  So go stock up now!  And with every purchase, you are entered into the Sin City Stamps $1,000 Giveaway.  Click here for the official rules.

Once again, I am so honored to be a part of this new team, and I will work hard to bring you the best creative ideas possible.  So, I hope you will check back often, and please be sure to visit the Sin City Stamps blog regularly to see what the rest of the team is "cooking up" for you.  


Many thanks for all of your support and your time spent visiting my blog.  Here's wishing you many happy hours doing what you love, creating art.  


Barbara


Monday, July 8, 2013

Rose Water Bottle with Creative Paperclay®

Hello there, Creative Paperclay® fans, and welcome back.  Today I have a really super fun project that looks like it was very hard to make, but so very easy!  I was inspired by a video I saw where the artist was making ceramic roses.  I wondered if I could do the same thing with Paperclay®, and best of all,  Paperclay® does not have to be fired in a kiln.  It air dries!  Here is a photo of my finished piece.  I really love how this turned out, and I have to say, I truly amazed myself.
Supplies:
Creative Paperclay® modeling material
Altered Arts Collage Sheet AP-392 - Beauty Labels
Maya Mists (Pink Mist)
Glimmer Mists (Viva Pink, Suflower, Pinecone, Olive Vine, Coral, English Ivy)
Distress Ink (Brushed Corduroy)
Treasure Gold metallic wax finish (Rose Quartz)
Vanilla acrylic paint
Sakura 3D Crystal Lacquer
Glass bottle

Directions:

I found this bottle in the clearance aisle at my local craft store.
Clean the bottle with alcohol to remove any oils or residue.

Roll out a long strand of Paperclay® and attach to bottle.
I misted the bottle with water so the Paperclay® will stick to the bottle while it is drying in the desired shape.
When the strands are dry, remove them from the bottle and mist them with the Pinecone mist.  Let dry.

Clean residue from bottle again and set aside.

To make the roses, I have a series of photos for you to see the step-by-step process.

Press seven pieces of clay onto your craft sheet.  These pieces are probably about 1/16" thick, i.e., a little bit thicker than a piece of computer printer paper.   Imperfection is key to making these rose petals.  I know, I can hardly believe I said that, but trust me on this one.  Rose petals are never equal, and the uneven shapes make the best roses.

First, tightly roll one of the small pieces of Paperclay® to form the center bud.
Add a second clay petal to the bud.
Offset each clay petal as you attach them to the previous petal.  Pinch the bottom, and gently manipulate the outer edges of the petals as you work around.


When you finish attaching the petals, you will find that a bit of the clay extruded out from the bottom as you were pinching, so cut off the excess, pinch and form into a neater, small flower bottom.

While these are air drying, make tiny little leaves.  These are so easy to make.  Simply press small bits of Paperclay® onto your craft sheet (or a piece of wax paper) and trim into marquee shapes.  Add veins with a toothpick or clay tool, if you have one.
Color the roses and leaves with the mists.  Let dry.  I wanted to add a bit of shabbiness to the roses, so I dabbed a tiny bit of watered down vanilla acrylic paint around the petals.  I also added a touch of brown distress ink to the strands to give them a more mottled, natural look.
After the roses dried, I highlighted the petals with Treasure Gold (Rose Quartz).  Unfortunately, the pictures do not do it justice, but I think you get the idea.
Now that your bottle is clean again, and your clay pieces are made, it is time to embellish the bottle.  I first chose a small vintage perfume label that fit inside this pretty little metal frame.  After gluing it inside the frame, I added 3D Crystal Lacquer to the inside.  I used a post-it note to represent where I was going to place the frame while I continued to add the clay pieces.
Attach the branch strands to the bottle in a pleasing manner.  You can use either a glue gun or a good, quick grab glue.  Begin gluing your roses and leaves onto the bottle, along the branches.
Attach the metal framed perfume label to the front, as shown.
Add some rose water to your bottle, and you are done!  What do you think?  Wouldn't this make a wonderful gift for someone special?

I hope you enjoyed my project, and that I have inspired you to make some Creative Paperclay® roses.  They are so easy and fun, you may not want to stop.  As always, I want to thank you for stopping by, and hope you will visit the Creative Paperclay® online store, as well as the blog to see what our other fabulous designers have created for you!

Since google reader is about to disappear, I would love it if you would follow my blog through bloglovin'.  Just click on the button in the upper right hand corner.  Thanks so much for stopping by today, and have a wonderful, creative week!

Barbara