Monday, March 4, 2013

Party Like A Rock Star Card


Greetings everyone.  Can you believe it is March already?  Spring is just around the corner.  And best of all, The Robin's Nest is offering 20% off of their beautiful Crackle Glitter card stock this month.  This paper is absolutely gorgeous.  It has glittering crackle on one side and solid matching color on the reverse.  And wait, that's not all.  We are also teaming up with Epiphany Crafts this month.  They are another wonderful company that makes it easy for you to create your own embellishments using your own papers.  When I saw the star punch, along with these glittery papers, I immediately thought about being a rock star.  I have to admit that I was having so much fun, I could not stop.  Warning:  This card is not for the minimalist.  So, let's get started.

1.  Cut Purple Crackle Glitter card stock to 5" x 6-1/2" to cover an A7 size white card.

2.  Cut gears overlay from Orange Crackle Glitter card stock using Silhouette electronic die cut machine.

3.  Add gold hammered metal look paper behind some of the gear shapes.
4.  Attach metal gears to paper gears with brads.
5.  Adhere gears overlay onto purple background.
6.  Add Neon Mini dew drops along gear shapes.
7.  Punch star shapes from Purple Crackle Glitter card stock using the Epiphany Crafts Shape Studio Tool Star 25 punch and coordinating bubble caps.

These are so easy to make.  First, insert paper into punch, aligning a section inside the tool, and insert bubble cap through punch opening.

Close lid, punch, and remove ready assembled epoxy embellishment.  Could not be easier.  And the best part is that your embellishment matches your project.

8.  To make the guitar, I used my Silhouette die cut machine again and cut out the guitar parts from various papers.  I thought the  Blue Crackle Glitter card stock would be perfect for the accents on the guitar, and the reverse (solid) side for the guitar base.  I used a brown card stock for the fret board (neck).

9.  After assembling the pieces, I drew lines for guitar strings, added tiny bits of a flourish die cut from Valentine card stock, and blue Neon Mini dew drops, as shown.

10.  Attach the guitar to the front of the card with pop dots for added dimension.

11.  Punch two wings from Blue Crackle Glitter card stock.  Remember to reverse the punch so that you will get mirror images of the wings.  Ask me how I know this.
12.  Gently shape the wings with your fingers and attach the wings to the neck of the guitar.

13.  For the inside of the card, I decided to make a quick pop-up.  I die cut the phrase "Party Like A" and "Rock Star" from Blue Crackle Glitter card stock.  I used the reverse side to make the shadow piece under "Rock Star", and a tiny piece of orange beneath the banner.


14.  Die cut a label shape from Orange Crackle Glitter card stock and adhere to card inside.  

I used something I just recently purchased called an action wobble.  It is a plastic spring with adhesive on both sides.  When attached beneath your image, it "wobbles".  I thought this would be fun for a partying rock star.

Robin's Nest Supplies used:
Blue Crackle Glitter card stock
Orange Crackle Glitter card stock
Purple Crackle Glitter card stock
Valentine card stock
Neon Mini dew drops

Other supplies used:
Epiphany Crafts Shape Studio Tool Star 25 punch
Epiphany Crafts Shape Studio Accessories Bubble Caps Star 25
McGill angel wings punch
Spellbinders Fantastic Flourish Two D-Lites die
Black foam dots
Gold hammered metal paper
Tim Holtz metal gears and brads
Action Wobble

I sure hope you enjoyed my rather wild, but fun, card today.  And don't forget to check out the Robin's Nest online store, as well as the Chattering Robin's blog, and the monthly design challenge.  

Have a wonderful, creative week.

Barbara

Sunday, March 3, 2013

Altered Microscope Slide Holder

Hello again.  I know, I was just here a few days ago, but I was asked by fellow Sin City Scraps design team member, Pam Bray, to cover her post today.  Never fear, however, because Pam will be back in two weeks with another fabulous project to share with you.

Today, I am going to make an altered art project for you.  Do you remember these?

It is a microscope slide holder.  Some years ago, these were a really hot item.  I am going to show you that they can still be a fun item to alter, so look through your stash and see if you still have any of these hidden somewhere.  If you are like me (and you know who you are) you never throw anything away.  I have been dying to use these Fairies Plate 2 set of stamps ever since I got them, and I am so very happy the way this turned out.  So, let's get started.
front cover
inside


1.  Paint slide holder with white acrylic paint.

2.  Sand back some of the paint for a grungy look.

3.  Distress edges of slide holder with Shabby Shutters and Peeled Paint ink.


4.  To cover the holder, trim three papers to approximately 2-3/4" x 3-1/2".  Adhere one piece to back outside cover.  Snip off corners of remaining two pieces and adhere pieces to front and inside front covers.
5.  Die cut two label shapes and fleur de lys accent piece from print paper, distress with Shabby Shutters distress ink.
6.  Layer both label shapes to front cover, and fleur de lys piece between microscope slides.  (See front cover and inside pictures above).
7.  Stamp image from Fairies Plate 2 with black archival ink onto printed scrapbook paper.

8.  Trace around two microscope slides and color image with colored pencils.  It is easier to color the image if you leave it intact.  It is so much fun to stamp onto pre-printed paper, such as this.  The colors will mix and mingle with your color variations.
9.  Cut out both rectangles and lay flat on craft sheet.  Apply glossy accents to glass slides, sprinkle lightly with ultra fine glitter, and adhere to each rectangular image. The bit of glitter really makes it look more like fairy land.  (See close-up of slides picture below).

10.  Glue each slide into the openings and a couple of dew drops at the top.

11.  Stamp fairy and fairy wings onto print paper.  Color with pencils and fussy cut both.  Layer wings onto fairy for dimension and glue whole fairy image to front cover.

12.  Stamp "Magic" and "never seen a fairy" phrase onto print paper.  Trim "Magic" with scissors, and tear out the phrase.
13.  Adhere "Magic" to front cover, and phrase to inside front cover.

14.  Stamp fairy flower images in two sizes onto printed paper.
15.  Cut out each image.


16.  Place flowers face down on a piece of foam and begin to shape each one with a large ball stylus tool.

17.  Turn the flowers back over to the the right side and cup the flowers only in the middle.

18.  Punch a few leaves using any leaf punch and add a bit of peeled paint distress ink.  Layer and arrange your flowers and leaves, as shown.  Add dew drops to the flower centers.

Supplies Used:

Sin City Scraps Fairies Plate 2 rubber stamps
White acrylic paint
Black Archival ink
Prima Botanical 6x6 paper pad
Chipboard double  microscope slide holder
Two glass microscope slides
Terri Sproul's Ultra Fine Glitter
Lyra Colored Pencils:
  Blue Butterfly - Light Blue, True Blue
  Yellow Butterfly (partial) - Light Chrome, Ochre, Light Orange
  Flowers - Pink Madder Lake, Dark Carmine, Lavender (Prismacolor)
  Fairy Wings - Light Flesh, Rose Carmine
  Fairy Silhouette -Black
  Leaves - Light Green, Sap Green
Distress Inks - Shabby Shutters, Peeled Paint
Glossy Accents
Distress Stickles Crystal
Robin's Nest Getaway dew drops
Spellbinders dies - Labels 14, Accents
Martha Stewart leaf punch

I hope you have enjoyed my altered project today, and that you will be inspired to find some of those "oldies but goodies" items in your stash to make some beautiful art.  I hope you will take some time to visit the Sin City Scraps online store, and stop back by the blog for more inspiration from the wonderfully talented design team members.

Thanks so much for stopping by, and have a wonderful, creative week.

Barbara

Thursday, February 28, 2013

Gentler Times Vintage Card

Hello everyone, and happy March!  I can hardly believe it is March already.  I guess time flies when you are having fun, and I am certainly doing just that when I get to play with these fabulous stamp plates from Sin City Scraps.    Today, I am using one of the images from the Sin City Scraps Clocks and Birds Rubber Stamp Plate.  I also made another wonderful discovery.  I found yet another die that fits another clock on this plate.  So, check out your own inventory of dies and see what you can come up with to work with these wonderful stamp images. 


1.  Stamp image onto Specialty Stamping Paper using Black archival ink.  You want to use a waterproof ink so that it will not bleed during the coloring process.


2.  Pick up various colors of Terri Sproul's Mixers with a water brush and color the image.  You can see where I was testing my color choices out on the perimeter of the paper before actually coloring my image.  


Terri Sproul's Mixers used:
Dress:  Pink Sapphire Pearl and Shimmer Garnet
Chair:  Aquamarine Pearl
Ladie's fan:  Citrine Pearl & Garnet Pearl
Skin:  Shimmer Garnet
Cheeks:  Shimmer Rose
Gentleman's Suit:  Silver
Background:  Aquamarine Peal & Citrine Pearl

3.  Blend Bundled Sage and Evergreen Bough distress inks to image.  Add Old Paper Distress Ink to image to make it more vintage looking.  Apply a coat of 3D Crystal Lacquer to both the man and woman images. The dimension it gives is subtle, but very effective.  

Colored image, pencil marks show where to trim away excess

4.  Die cut weathered clock from chipboard.  I ultimately did not use the two elegant scrolls pictured.  
5.  Paint the clock and clock hands (not pictured) with burnt umber paint, let dry.
6.  Cover the clock with one step crackle medium, let dry.  
7.  Add a light coat of metallic copper acrylic paint, let dry. 
8.  Use a foam blending tool to apply Black Soot distress ink.  This step really gives the clock a distressed and aged look. 


9.  Place clock diecut over stamped image and draw pencil marks around the clock to determine where to trim the image.  (See photo above).


10.  Glue die cut over image, as shown.  Attach both clock hands to center of image with a brad.


11.  Choose a piece of coordinating printed scrapbook paper, trim to 4-3/4" x 6-1/4".  Dry brush edges with copper metallic paint.  Adhere to card front.  
12.  Distress edges of card front with Old Paper Distress ink.
13.  Glue clock piece to front of card.

Close-up of 3D Crystal Lacquer applied to man and woman images

Supplies Used:

Sin City Scraps Rubber Stamp Plate Clocks and Birds
White A7 Card (6-1/2" x 5")
DCWV 8x8 Stack-Timeless Type
Specialty Stamping Paper (Ranger)
Archival Black Ink
Distress Ink (Bundled Sage, Evergreen, Old Paper, Black Soot)
Chipboard
Terri Sproul's Mixers (Sakura)
3-D Crystal Lacquer (Sakura)
Weathered Clock die (Sizzix-Tim Holtz)
Acrylic Paint (Burnt Umber, Metallic Copper)

I hope I have been able to inspire you to try some of Sin City Scrap's wonderful stamps, and shown another way to make them really stand out on your art work.  So go on over to their online store and check out their fantastic products.  And while you are there, you might like to visit their blog to see what else the design team has made to further inspire you and get those creative juices flowing.  

Thanks so much for stopping by.  

Barbara

Monday, February 18, 2013

Two Cards, Two Looks


Hello everyone.  Welcome back to my blog, and my second monthly post for The Robin's Nest.  Before I get to the project, though, I want to tell you about a fabulous sale going on this month.  All tear shaped dew drops are 20% off this month.  There are not only new shapes, but new sizes and colors, too!  So head on over to the the store and stock up now.  We are also teaming up with Mod Podge this month, so I will be using their Mod Podge One-Step Crackle Medium in one of my projects today.  This product is awesome and I hope you will also visit their website to check out their line of products as well.

Today, we are going to play with die cuts and fabulous papers from The Robin's Nest.  There is just no better combination, in my humble opinion.  So, let's take a look at my first card.


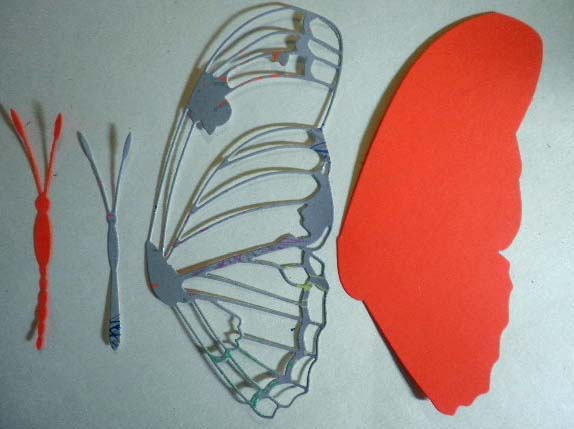
1.  Die cut both butterfly shapes from Mango and Birthday Glitter Stars card stock.

Photo 1

2.  Ink solid butterfly wing using white pigment ink, direct to paper.  Remove excess ink with clean paper towel.

Photo 2
3.  Apply Twinkling H20's to solid butterfly wing.  I discovered that the white pigment ink mixed with the H20's to give a bit of an opaque, pastel color.  As it turns out, I liked this effect a lot.  Allow the H20's to air dry for a more sparkly shine.


4.  Stamp News Print stamp onto solid butterfly with black ink.


5.  Use your finger to apply glitter glue to open butterfly, then adhere to solid butterfly.  Layer both  butterfly bodies and adhere to wings.


6.  Adhere open wings to solid wings.  Cover body with Walnut Stain glitter glue.


Close-up of glitter glue on body of butterfly

7.  Die cut two leaf shapes from Kiwi Glitter Sorbet Card Stock.  Color with Moss Green H20s.


8.  Trim gray card stock to 6-1/2" x 9".  Fold in half to make 6-1/2" X 4-1/2" card.
9.  Trim Awning Glitter Card Stock to 6-1/4" x 4-1/4".  Adhere to gray card.
10. Adhere leaf stems to card front, as shown.  Attach butterfly with foam dots.

Close-up of wings popped with pop dots
My second card is basically using the same supplies, but achieving a very different look.


1.  Die cut both butterfly shapes from Mango and Birthday Glitter Stars card stock.  (See photo 1).
2.  Ink solid butterfly wing using white pigment ink, direct to paper.  Remove excess ink with clean paper towel.  (See photo 2).
3.  Apply a coat of white pigment ink to inside of embossing folder.


4.  Run Mango butterfly wing through your die cut machine to emboss.  The white pigment ink lightens the card stock in the debossed areas.


5.  Continue to add various colors of pigment ink to the high spots on the wings.  (NOTE:  Remember these duo daubers from years ago?  These work really well for adding spots of color to your work).


6.  Adhere open wings to solid wings.  Cover body and wings with mini dew drops.  Adhere tear shaped dew drops to outer edge of wing.


7.  Die cut two sets of poppies from green card stock and scraps of Mango Card Stock for the poppy flowers.  Attach the Mango flowers to the green flowers and coat just the flowers with a coat of Mod Podge One-Step Crackle Medium.  
8.  Allow the medium to dry.  Heat the crackle medium with a heat gun until it begins to burn.  It will leave this beautiful shadowy look to your flowers.  Of course, be careful whenever heating your paper and mediums.  

Top flower unburned, bottom flower burned
9.  Die cut Blue Raspberry Glitter Sorbet Card Stock with Catillion Frame die and adhere to light gray 5"x7" card. 
10.  Glue poppies and butterfly to card, as shown in finished card photo above.  Add foam dots to the butterfly for dimension.


Supplies Used:

The Robin's Nest Mango Card Stock
The Robin's Nest Birthday Glitter Stars Card Stock
The Robin's Nest Awning Glitter Card Stock
The Robin's Nest Blue Raspberry Glitter Sorbet Card Stock
The Robin's Nest Kiwi Glitter Sorbet Card Stock
The Robin's Nest tear shaped dew drops
Mod Podge One-Step Crackle Medium
Memory Box dies (Maribelle Butterfly) (Selena Butterfly) (Cottage Leaf) (Catillion Frame) (Prim Poppy)
Cuttlebug embossing folder (Paper Lace)
White pigment ink pad
Black archival ink pad
Twinkling H20's (Pink Azalea)(Sky Blue)(Sunflower)(Moss Green)
Inkadinkadoo News Print rubber stamp
Stickles glitter glue (Tropical Tangerine)(Walnut Stain)
Foam dots


I sure hope you enjoyed my cards and will be so inspired by The Robin's Nest beautiful papers and embellishments that you will stop on over to The Robin's Nest online store to stock up on those fabulous tear shaped dew drops and gorgeous, high quality papers and embellishments.  I also want to encourage you to visit The Chattering Robin's blog for more inspiration from the wonderfully talented design team.  Oh, and just a quick reminder to enter their monthly design challenge for a chance to win a $20 gift certificate in their online store.  How fun is that?

Until next time, I hope everyone has a wonderful, crafty week, and thanks so much for stopping by!

Barbara