Wednesday, April 10, 2013

Creative Paperclay DT Tryout


Hello everyone, and welcome to my blog.  Today, I am trying out for the Creative Paperclay design team.  Creative Paperclay® is a non-toxic modeling material that can be sculpted, molded or shaped, and air dries (no baking!) to a hard finish that can be carved or sanded.

The idea for my project was inspired by Terri Sproul's weekly live show, Mix It Up With Terri Sproul, at http://www.linqto.com/rooms/terrisproul, where she teaches new techniques each week.  She is teaching us about the basics of Zentangle, and we are all encouraged to play along and try this fun art form in our own art journals.  I have tons of mixed media type paper pads, so I decided to make my own art journal. But, I needed a special embellishment for the cover. Hmmmm......   what to do, what to do?

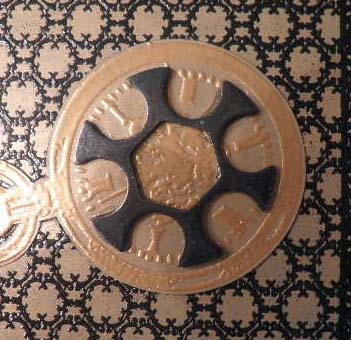
I did not want the whole cover done in Zentangle, but instead, I wanted something representative of Zentangle.  Then I got this wonderful idea to make a focal piece for the cover using Creative Paperclay.  I am so excited to share this with you.  I call this my faux zentangle technique.

How perfect is this for the cover of my book of Zentangle patterns?

1.  Using the plastic packaging from a 7Gypsies embellishment package as a mold, I pressed Paperclay into the largest opening.

2.  Remove the Paperclay from the package and trim with a craft knife.

3.  Make tiny tick marks around the circumference using a toothpick or skewer.

4.  Remove the ink cartridge from a ballpoint pen and use the empty tip to make circular indentations just inside the tick marks previously made.

5.  Make more textures, as shown, using various metal texture tools.  (Note:  Cake making tools, as well as clay tools, also work well for this.  Let your imagination lead you.)  Allow Paperclay to dry.

6.  Spray piece with Glimmer Mist colors.  You can speed up the drying time with your heat gun.

7.  I am crazy for weathered copper.  I love the greenish blue patina color that develops on the metal.  That is the look I was going for.  I achieved these colors by lightly applying Copper gilder's paste with my finger, just highlighting the high spots.  Next, I used a water brush to apply Black Soot distress stain, then dry brushing Tarnished Brass distress stain over the top.  There is no real recipe.  Just play with the colors until you like it.

Voila!  My focal image is finished.

Now, I need a book to adhere it to.

8.  To make the book, I cut two pieces of heavy duty chipboard to measure 8-1/4" x 8-1/4".

9.  Cover both sides of each piece of chipboard with printed papers.  Distress edges with Aged Mahogany distress stain.

10.  Cut drawing paper to 8" x 8".  Cut as many pieces as you want for your book.

11.  Follow the directions on your binding tool to punch holes in the chipboard and pages to bind your book.

12.  Die cut pearl gold specialty paper using lacy oval die.

13.  Adhere oval to center of book cover.  Center and adhere Paperclay focal piece to the center of the oval.  I added a light coat of 3D Crystal Lacquer to the top of the piece, which gives it this nice shine and a deeper color.

14.  Add trims, flowers, leaves, and gem flourishes to embellish the cover as desired.

Supplies Used:

Creative Paperclay air dry clay
Tattered Angels Glimmer Mist (Dragonfly, Mistletoe, Crushed Shells)
12x12 Printed Scrapbook Paper (My Mind's Eye)
MercArt metal embossing tools (clay or cake making tools can be used)
Empty ball point pen
Toothpick or wooden skewer
Copper Gilder's Paste (Baroque Art)
Distress Stain (Black Soot, Tarnished Brass, Aged Mahogany)
Water brush (or paint small brush)
Lacy Oval die (Spellbinders)
3D Crystal Lacquer (Sakura)
Chipboard
80 lb Drawing Paper (Strathmore)
Binding Tool (WRMK Cinch)
Red O-Wires (WRMK)
Alphabet stickers (Prima)
Various trims, flowers, leaves, and gem flourishes from Prima, Paper Studio, Michaels

I hope you have enjoyed my faux zentangle technique using Creative Paperclay.  This is such a fun product and so easy to use.  There are so many wonderful things you can make with it, and you are only limited by your imagination.

Thanks for stopping by, and remember to come back tomorrow, April 12,  for The Daisy Days blog hop, sponsored by The Robin's Nest.  Each blog will be giving away a Daisy Package worth $15, and there will also be one grand prize worth $25 from The Robin's Nest online store.

Have a wonderful, creative week!

Barbara

Thursday, April 4, 2013

Ornate Hinged Door Card

Hello Sin City Scraps fans.  I am so glad you stopped by today.  I first want to tell you about the new stamp plates that are available for pre-order.  There are five new plates and they are all only $13.00 each until the 7th of April.  Click here to see these gorgeous stamp plates.  Each plate contains many images, so this is a super good buy.

Now for today's project.  This week, I am using one of Sin City Scraps fabulous rubber stamp plates. This one is called Metal Madness, and I have to say, I am absolutely "mad" for this one.   The images on this plate are absolutely gorgeous, and my mind is reeling with ideas for this set.

To begin with, I made this really cool card using this ornamental background image.  It reminds me of an ornate door, so I decided to go with that.


I love the phrase on this plate:  "Art is never finished, only abandoned".  I thought this would be nice for the recipient to find inside when they open the door.  To enhance the phrase, I die cut a Spellbinders fancy tag out of black card stock and, with an embossing mat, ran it through the machine again to emboss it.  The photo below shows what is beneath the door, before the door was added  to the card front.  


Directions:

1.  When embossing onto card stock, especially a glossy card stock, it is a good idea to swipe the card with an anti-static pouch to help keep the stray embossing powder from sticking to the card.

2.  Stamp image with Versamark ink onto card stock and heat emboss the image using detail gold embossing powder.

3.  Fussy cut the image.

4.  Distress the image with Brilliance archival ink.  Distress inks are dye-based and do not dry on non-porous card stock, such as glossy.

5.  Follow steps 1 and 2 for the ornate background image using black detail embossing powder.

6.  Before cutting out, adhere the image to the reverse side of your chosen print paper.  This will be the back side of the door when it is open.  Trim all layers at one time and distress edges with black soot.

7.  One easy way to find center of a rectangle is to first draw an "X" from corner to corner.

8.  Using my door image piece to determine where I will make my frame opening, I aligned the corners to match the pencil marks.

9.  Draw around the door image with pencil.  I wanted my frame a bit smaller than the door, so I used those pencil marks to remove approximately 1/4" more all around, inside the frame.

10.  Adhere the reverse side of the paper  frame to black card.  The rectangle you cut from the center is now reversed and inserted back into the opening.  This is the result.
11.  To make the door open, you will need some sort of hinge.  When I saw these ornate decorations, I thought "hinge".  Follow steps 1-3 using black detail embossing powder.

12.  Fold the hinges in half, but leave the center straight, just as if you were folding a butterfly, leaving the body flat.

13. Attach one half of each hinge to the front side of the door and adhere only that portion of the hinge.  When it is dry, align the door to the front of the card and glue the center and part of the remaining hinge to the front.  Clamp down until glue dries before proceeding.

14.  Turn the remaining portion of hinge to the back and adhere.

15.  Clamp the hinges until dry.


16.  Here is what your hinge should look like when finsihed.

17.  Attach the pocket watch image to the front at an angle, as shown.

18. Attach a half moon bullet holder over the center of the clock.


And here is the final photo of the card front beneath the door.  The hinges are attached and working as they should, and you still have the traditional inside of the card to write your sentiment.

Supplies Used:

Sin City Scraps rubber stamp plate - Metal Madness
Gold/Silver marbled glossy cardstock
Bo Bunny 12x12 double-sided paper - Timepiece Numbers
Spellbinders Die - Fancy Tags Three
Black Soot distress ink
Versamark ink
Detail Black embossing powder (Mark Enterprises)
Brilliance Lightning Black ink (Tsukineko)
Glossy Accents (Ranger)
Tombo Mono Multi Liquid Glue

I hope you have been inspired to try making a door front card.  Just imagine all the things you could hide beneath the door, to the surprise and wonderment of the recipient.

I hope you will take a moment to visit Sin City Scraps online store to check out their wonderful products and pre-order sale, and to check back often to visit the blog to see what the other wonderful designers have come up with to entice and inspire you.

Thanks so much for stopping by.  Have a happy, creative week.

Barbara

Monday, April 1, 2013

Blooming Daffodils Card

Hello Robin's Nest fans, and welcome back.  I hope everyone had a wonderful and blessed Easter holiday.  For my first project of the month, I made this  beautiful card for Spring using the gorgeous Glitter Sorbet Collection card stock from The Robin's Nest.  I am in love with this paper collection.  The colors are absolutely gorgeous with glittery swashes across the front, and the reverse side is a complimentary color without glitter, perfect for card making.


1.  Cut 12"x12" Aquamarine Glitter Sorbet card stock in half to 6"x12".
2.  Place short edge of card stock along the ornate edge die and cut out.


3.  Cut a second piece of card stock 1-1/2" x 6" and die cut this piece using the same die.


TIP:  To help you see where to place your card stock on these edge dies, draw straight lines with a white pen and mark the center of the die.  This will help you make straight cuts.  


4.  Fold card in half with glittered side out.  Adhere reverse side of second die cut along front edge, as shown.


The edge made by the second die cut gives you a horizon line to place your daffodils, so they are not floating in the air.

5.  Punch multiples of the daffodil punch in both green scrap card stock (3 complete) and Kiwi glitter sorbet card stock (12 flower heads).

Cut three complete green daffodils
Cut the two flower heads six times for total of twelve


6.  Adhere the first daffodil image in the center, and continue adhering the remaining two on either side.


7.  Snip off the excess stem from each Kiwi flower head and adhere them to each of the green images, as shown.


8.  If you have been following me, you know by now that I am a glutton for dimension.  Dry emboss the remaining six flower heads using a large ball stylus tool and a piece of fun foam.  If you do this from the reverse, you will "cup" the flower.   Turn it back over to the front and gently push the center back down.  This will give you a nice form to your flower.


9.  Put a small bead of white glue in the center of each flower, and using a pair of tweezers, lay the embossed flower on top, a bit offset from the bottom one.  This gives the appearance of more petals.


10.  Allow to dry, then glue tiny orange neon dew drops to the flower centers.  Isn't that pretty?


I also glued a few pink and purple neon mini dew drops to the bottom of the card front.

11.  Cut out just the word "BLOOM" from the Core-dinations Seasonal embossed card stock.


12.  Sand the letters,  and distress with peeled paint.


13.  Die cut another piece of Aquamarine Glitter Sorbet card stock using the Fancy Tags 2 die cut and distress edges with peeled paint.  Adhere to card, as shown.


14.  Adhere "BLOOM" over Fancy Tag with foam tape.


15.  One last thing to do was punch a beautiful pink butterfly from the pink sorbet card stock, adhering only the body of the butterfly and allowing the wings to remain free.

Supplies Used:

Aquamarine Glitter Sorbet card stock 
Kiwi Glitter Sorbet card stock
Shocking Pink Sorbet card stock
Neon Orange Mini Dew Drops
Neon Pink Mini Dew Drops
Neon Purple Mini Dew Drops
Sizzix/Tim Holtz Alterations On the Edge die - Ornate
Spellbinders Fancy Tags 2 die
Tim Holtz Core-dinations Seasonal embossed card stock
Paper Shapers Daffodil craft punch
Martha Stewart butterfly punch
Distress Ink - Peeled Paint
Scotch Quick Dry Adhesive

I hope you have enjoyed this Spring card, and that I have inspired you to pull out those punches and dies and get busy making some easy cards using The Robin's Nest gorgeous papers and dew drops.  Check out their newest products  and sale of the week while you are visiting their online store.

I also want to invite you to The Robin's Nest Daisy Days blog hop on 12 April  There will be prizes given away; over a $290 retail value.  There are 18 chances to win a daisy package, retail value of $15.  One Grand Prize will be a gift certificate to their online store:  Retail value of $25.  So be sure to come back and visit The Chattering Robins Blog on 12 April, and don't forget to tell your friends.

As always, thanks so much for stopping by, and have a wonderful, crafty week.

Barbara