Monday, February 4, 2013

Heartfelt and Love Cards


Hello everyone.  Welcome back to my blog, and my first monthly post for The Robin's Nest.  Before I get to the project, though, I want to tell you about a fabulous sale going on this month.  All tear shaped dew drops are 20% off this month.  There are not only new shapes, but new sizes and colors, too!  So head on over to the the store and stock up now.  We are also teaming up with Mod Podge this month, so I will be using their Mod Podge One-Step Crackle Medium in my project today.  This product is awesome and I hope you will also visit their website to check out their line of products as well.

Since Valentine's Day is just around the corner, I thought it would be appropriate to make a couple of Valentine's cards.


1.  Cut a piece of 10" x 6-1/2" Ivory card stock.  Fold in half to make 5" x 6-1/2" card.
2.  Cut Viva La France card stock 5" x 6-1/2".  Add distress ink colors to glittered portions of paper.  Punch decorative corners and adhere to front of ivory card.
3.  Adhere Princess Glittered card stock to thin chipboard.  Die cut heart shape, as shown.


4.  Following directions on bottle, apply thin layer of Mod Podge One-Step Crackle Medium to heart shape.  Let dry.


5.  Die cut scalloped heart shape from reverse side of Viva La France card stock  Dab scalloped edges with picket fence distress stain.

Distress stain dabbed around edge
6.  Distress white edges with brushed corduroy distress stain.

Brown distress ink sponged to edges

I think this technique makes the edges look a bit like tortoise shell.  What do you think?

Close-up of inked edges

7.  Add same distress ink colors used on the glittered portions of the Viva La France card stock to the crackled heart shape to bring out the crackle, adhere to scalloped heart.


8.  Die cut/emboss scroll tag using reverse of Viva La France card stock.
9.  Stamp "Heartfelt" in center of tag using pink pigment ink and pastel pink embossing powder.


10.  Add pink and orange pigment ink to embossed areas of tag.


11.  Attach scroll tag to heart with foam dots.
12.  Add three sets of three tear drops to heart shape, as shown, simulating tiny heart shapes.


Below is a close-up of the card front.  I think it shows off the beautiful tear shaped dew drops a bit better.


My second card is a bit simpler, but just as pretty, I think.


1.  1.  Cut a piece of 10" x 6-1/2" Ivory card stock.  Fold in half to make 5" x 6-1/2" card.  Ink edges with distress ink.
2.  Cut background shape from Valentine card stock using Silhouette Valentine frame image.  Adhere to ivory card.
3.  Die cut scalloped heart shape from reverse side of Princess Glittered card stock.  Distress edges with distress ink.
4.  Die cut classic heart shape from Valentine card stock and emboss with Quickutz embossing folder.  Adhere to scalloped heart shape.

Close-up of embossed heart and dew drops
5.  Die cut Spellinders fantastic flourish die on reverse side of Princess Glittered card stock.  Distress edges with distress ink.  Adhere to bottom of heart shape, leaving top portion unattached.
6.  Die cut image of vintage couple dancing from black card stock using Silhouette machine.  Adhere image, as shown, slightly beneath flourish.

Close-up of vintage image beneath flourish


7.  Add Pink letter glitter stickers to form word "LOVE" near bottom of card, as shown.  Attach three sets of pale pink tear-shaped dew drops to each corner of card, as shown.


Below is a close-up of the card front.  Again, I think this picture shows off the tear-shaped dew drops a bit better, as well as the embossing on the heart shape.  


Supplies Used:

The Robin's Nest Princess Glittered card stock
The Robin's Nest Viva La France card stock
The Robin's Nest Valentine card stock
The Robin's Nest red tear shaped dew drops
The Robin's Nest Pink glitter stickers
Mod Podge One-Step Crackle Medium
10" x 6-1/2" Ivory card stock (folded to make 5" x 6-1/2" card)
Spellbinders Classic Heart Nestabilities die
Spellbinders Classic Scallop Heart Nestabilities die
Spellbinders Fantastic Flourish Two D-Lites die
Cuttlebug Plus Fanciful Labels embossing folder
Silhouette image-vintage couple dancing
Quickutz embossing folder - Diamonds & Dots
Fiskars decorative corner punch
Distress Ink (Brushed Corduroy, Spiced Marmalade, Picked Raspberry, Old Paper)
Distress Stain (Picket Fence)
Pigment ink (orange, pink)
Pink Pastel embossing powder

I sure hope you enjoyed my cards and will be so inspired by The Robin's Nest beautiful papers and embellishments that you will stop on over to The Robin's Nest online store to stock up on those fabulous tear shaped dew drops and gorgeous, high quality papers and embellishments.  I also want to encourage you to visit The Chattering Robin's blog for more inspiration from the wonderfully talented design team.  Oh, and just a quick reminder to enter their monthly design challenge for a chance to win a $20 gift certificate in their online store.  How fun is that?

Until next time, I hope everyone has a wonderful, crafty week, and thanks so much for stopping by!

Barbara


Thursday, January 31, 2013

Love Forevermore and Time Well Spent Cards

Hello everyone, and welcome to my blog.  This is a really exciting day for me.  I have the great honor and pleasure of sharing with you the first post as a member of the newly-formed design team for Sin City Scraps. Sin City Scraps has a beautiful selection of rubber stamps and accessories, and I hope you will take some time to visit their online store.  I guarantee you will love their products as much as I do.

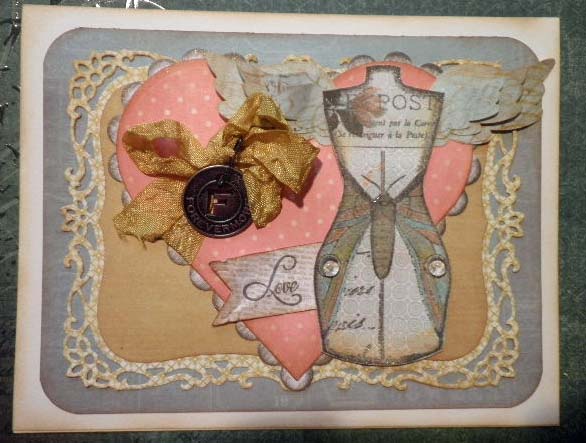
Since Valentine's Day is just around the corner, I naturally chose to make a couple of Valentine's Day cards.   I call my first card "Love Forevermore".


1.  Adhere 4-1/2" x 6" piece of blueish green print paper to ivory card base.  Round corners.
2.  Use largest size of decorative labels eight die to cut green print paper.
3.  Use next to largest size of labels eight die to cut olive green print paper.
4.  Use largest scalloped heart die to cut off white print paper.
5.  Use largest classic heart die to cut pink polka dot paper.
6.  Ink scalloped heart edges with Brilliance lightning black ink.
7.  Distress edges of remaining papers with brushed corduroy distress ink.
8.  Adhere paper layers as shown in photo.


9.  Stamp mannequin tags 2 image onto a piece of green print paper using Brilliance lightning black ink.  Emboss with clear embossing powder.
10.  Color image using Distress Markers.
11.  Trim image and adhere to card with pop dots.


12.  Punch two sets of wings.  Remember to turn the paper over when punching the second set of wings.
13.  Stamp any small scroll image onto each wing using scattered straw distress ink.


14.  When dry, layer the wings and attach beneath the stamped mannequin image.


15.  Color off-white seam binding using Scattered Straw distress stain.  Bunch up and allow to dry to achieve the vintage, crinkled look.


16.  Tie ribbon around one edge of the pink polka dot heart and tie in a bow.

17.  Attach the "Forevermore" metal tag to the bow using a mini safety pin.


18.  Stamp "Love" onto another scrap of printed paper and cut out.  Trim one edge into points and distress the paper.
19.  Adhere beneath the mannequin image.


20.  Add two clear dew drops to mannequin image, and add a layer of 3D crystal lacquer to moth body only.


Supplies used:
Sin City Scraps Rubber Stamp Plate mannequin tags 2 (mannequin tag) (Love)
MME 6x6 paper pad - Market
Ivory Card folded in half to measure 5" x 6-1/2"
Tim Holtz Idea-ology mini safety pin and Forevermore metal tag
Distress Ink (Old Paper, Scattered Straw, Brushed Corduroy)
Distress Stains (Scattered Straw, Shabby Shutters)
Distress Markers (Pumice Stone, Spun Sugar, Weathered Wood, Old Paper, Scattered Straw, Picket Fence, Tattered Rose, Tumbled Glass, Bundled Sage, Shabby Shutters)
Brilliance Lightning Black ink pad
Spellbinders Decorative Labels Eight (largest size)
Spellbinders Labels Eight (next to largest size)
McGill Punch - Angel Wings
Sakura 3-D Crystal Lacquer
Any scroll image rubber stamp
Off-White 1/2" seam binding
Foam pop dots

My second card is entitled, "Time Spent With You".  I plan on giving this one to my sweet husband.


1.  Cut 5" x 6-1/2" printed paper from Timeless Type paper pad to cover front of ivory folded card.


2.  Stamp "IV" and "X" from Clockworks Inspired by Terrri Sproul stamp plate, as shown, with Versamark ink.  Emboss with Pearl Gold Lustre embossing powder.  
3.  Adhere to ivory folded card front.

4.  Use largest scalloped heart die to cut off white print paper from MME Market pad.
5.  Use largest classic heart die to cut pink music background paper from MME Market pad.
6.  Ink scalloped heart edges with Brilliance lightning black ink.
7.  Distress edges of remaining papers with brushed corduroy distress ink.
8.  Adhere heart layers as shown in photo.


9.  Stamp clock face image from  Clocks and Birds stamp plate onto white card stock using Archival black ink pad.
10.  Color image using Distress markers.  Blend colors with a water brush.


11. Cut pocket watch using Spellbinders die several times onto thin chipboard and gold hammered card stock.  Glue pieces together for dimension.


12.  Cut out a template using 1-3/4" circle punch.  Place over center of pocket watch and line up punch with template to punch out center.


13.  Adhere pocket watch over clock face.  Fill center with 3D Crystal Lacquer to give the appearance of glass.  

14.  Punch two sets of wings.  Remember to turn the paper over when punching the second set of wings.


15.  Mix Terri Sproul's Pearl Garnet Mixer with water in a mini mister bottle and spray the wings. 

16.  Allow wings to dry.  Layer wings and attach beneath pocket watch.
17.  Sprinkle a few Robin's Nest Soil dew drops for added interest.


I computer-generated the sentiment inside the card, as follows:

"Time spent with you is time well spent.  
Happy Valentine's Day!"


Supplies Used:
Sin City Scraps Rubber Stamp Plate Clockworks Inspired by Terrri Sproul (Roman Numerals - 14)
Sin City Scraps Rubber Stamp Plate Clocks and Birds (clock face)
DCWV Timeless Type 8x8 paper pad
MME 6x6 paper pad - Market
Robin's Nest Dew Drops - Soil
Distress Markers (Pumice Stone, Spun Sugar, Weathered Wood, Old Paper, Scattered Straw, Picket Fence, Tattered Rose, Tumbled Glass, Bundled Sage, Shabby Shutters)
Spellbinders Die - Pocket Watch
EK Success 1-3/4" circle punch
HOTP Gold Hammered Cardstock
Quickutz 4x12 double-sided adhesive chipboard
Ranger Archival Black ink pad
Versamark ink pad
Gold Pearl Lustre embossing powder

Well, I hope you enjoyed my project cards this week.  Thanks so much for stopping by, and please be sure to visit the Sin City Scraps blog to see what the other extremely talented design team members have prepared.  Inspiration awaits you.

Have a happy crafting week!

Barbara

Saturday, January 26, 2013

Altered Pages January Challenge

Hello everyone, and welcome back to my blog.  Are you familiar with the monthly challenges over at Altered Pages?  If not, I hope you get a chance to check out their Altered Pages Artsociates blog and online store.  The challenge theme for January is "Snow Dancing".  I took a bit of "artistic license" to make my tag.  I put the dancers beneath snowflakes; hence, snow dancing.


From the Glitz Design Vintage Blue 6x6 paper pad, fold the yellow polka dot paper in half and glue it together.   Cut the top tag edges using the Art Deco corner scissors.  If you do not have any of these scissors, you can use a punch instead.  I inked the edges with Frayed Burlap distress ink.


Cut out the dancers image from the Color ATC Yellow collage sheet, distress and ink the edges.  Die cut several different snowflakes using a Spellbinders die in two different blue print papers from the Glitz Design Vintage Blue 6x6 paper pad.


I painted the edges of each snowflake using Terri Sproul's Mixers (Smokey Quartz) and a water brush.  Layer the snowflakes and glue to the tag.  Attach a silver filigree jewelry piece to the center.  I added more of the Smokey Quartz mixer with water to the filigree pieces to tone down the bright silver.


Now, for the fun part.  If you have never tried this, you are in for a real treat.  Go to the hardware store and buy yourself a roll of self-adhesive paper drywall tape.  You will have enough to either remodel your home or share with a few friends.


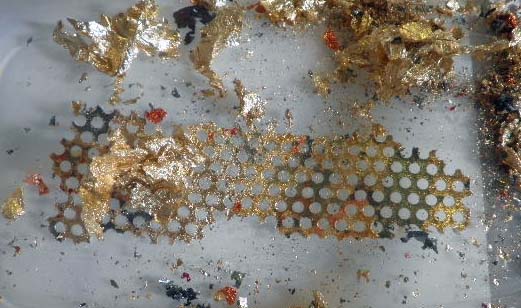
The drywall tape tears easily and makes a really cool looking background piece when inked.  After removing the backing paper, you can adhere it to your project.


However, for this project, I did something a bit different.  I first removed the backing paper to reveal the adhesive and applied gold multi-color leafing flakes to the adhesive side.  Isn't that beautiful?


I simply put a dab of glue beneath the collage image to adhere it.  I love the look of drywall tape when torn because it looks like honeycomb to me.  It is so much fun to play with.  I hope you will give it a try.


Another neat find I want to share is this beaded Christmas garland I found at Michaels for half price.  I have been removing pieces of it to use in my art work, and I am getting a lot of mileage from it.


Here, I added pieces of the garland through the eyelet that I attached to run the ribbon through.  The ribbon was ivory, but I found that Tim Holtz's Weathered Wood Distress Stain matched the blue in this paper perfectly.  Scrunch the ribbon up while wet and dry it carefully with your heat gun to achieve that vintage crinkly look.  So pretty.


For added interest, I added tiny dabs of Duo Adhesive and more gold multi-color leafing flakes to the background paper.

I hope you enjoyed my project today, and thanks so much for stopping by.

Happy crafting!

Barbara

Friday, January 25, 2013

Sin City Scraps Design Team Announced


Hello everyone, and welcome back to my blog.  Today, I have some exciting news to share with you all.  I have been chosen to be a member of the brand new design team for Sin City Scraps.  I absolutely love their stamps, matching dies, and stamping accessories, and I know you will, too.  Their stamps are high quality rubber and they have such wonderful designs.  Sin City Scraps, located in North Las Vegas, NV, is a complete source for all of your rubber stamps and accessories.  
Did you know that some of their stamps are designed to coordinate with select Lifestyle Crafts (aka Quickutz) dies?  That means no more fussy cutting those images.  The dies will do all the work for you.  Isn't that fabulous?  Also, their stamps are designed, pressed and packaged in-house, enabling them to charge less than their competitors.  They also stock Miracle Tape in six different widths, as well as Miracle Sheets, and just recently added Sticky Thumb Adhesive products. 

I am so honored to be a part of this new team, and I will endeavor to bring you the best creative ideas possible.  So, I hope you will check back often, and please be sure to visit the Sin City Scraps blog regularly to see what the rest of the team is "cooking up" for you.  

Many thanks for all of your support and your time spent visiting my blog.  Here's wishing you many happy hours doing what you love, creating art.  

Barbara

Monday, January 21, 2013

More CHA 2013 Favorites

Hello everyone.  Welcome back to my blog.  Today, I am going to share a few more of the wonderful new products I saw while at CHA Anaheim.

The Buckle Boutique had a fantastic product that I had never seen before.  It is called Dazzling Diamond sticker sheets.  They are adhesive backed sheets that can be cut with scissors, paper cutters, and most die cut machines, even your Cricut.  The stones are actually a soft resin material that can be cut right down the middle.


Pretty, isn't it?  I don't know how many colors they carry, but there were quite a lot.  In addition to these beauties, they also carried large sheets of glitter vinyl sticker sheets in many colors.  


These sheets will also go through your cutting machines.  And just imagine, these sheets are large enough to cover a book or a box.  Wouldn't that be super blingy cool?

Now, for you steampunk lovers.  Solid Oak, Inc. carries a fantastic line of steampunk inspired charms.  If you like Tim Holtz's line of charms and adornments, then you will certainly love these as well.  There are wings, owls, birds, bird cages, keys,  hearts, dragonflies, pocket watches, gears, tiny bottles, etc.  In addition to steampunk, they also carried a variety of other charms, so there is something to please everyone.  


I hope you have enjoyed this edition of my favorites I saw at CHA.  I will post more as I think of them.  In the meantime, I have provided links to each of these companies so you can view more of their wonderful products.  I do not receive any kick backs.  These are just things I saw that I like.  

Enjoy and happy crafting.

Barbara